Vue.js Mixins
In Vue.js, mixins are a set of defined logic, stored in a predefined way specified by Vue.js. We can use these mixins over and over to add functionality to our Vue.js instances and components. So, we can say that mixins are used to distribute reusable functionalities for Vue components. They provide a flexible and straightforward way to deal with Vue.js components and share reusable code among them.
A mixin object can contain any component options. When a component uses a mixin, all options within the mixin are "mixed" into the component's own options and become an integral part of the component options.
Why are Mixins important?
Following is a list of some features that make Vue.js mixins necessary:
- js mixins ensure that you do not need to repeat yourself. You can efficiently distribute reusable functionalities for Vue.js components and use them again and again.
- js mixins provide an excellent option for flexibility. A mixin object contains Vue components options, which means it is a mix of both mixin and component options of Vue.js.
- js mixins provide a great safety feature. They do not affect changes outside their defined scope if you have written them well.
- js mixins are an excellent platform for code reusability.
The problem Vue.js mixins were supposed to solve
The main reason to use Vue.js is to resolve the re-use problem in the program. Suppose, you have two components that contain a method that does exactly the same thing or performs the same functionality in the two components same as the following code:
Component 1:
- <template>
- <div>
- <button v-on:click="clicked('you just clicked on button 1')">
- Button 1
- </button>
- </div>
- </template>;
- export default {
- name: "Test",
- methods: {
- clicked(value) {
- alert(value);
- }
- }
- };
Component 2:
- <template>
- <div>
- <button v-on:click="clicked('you just clicked on button 2')">
- Button 2
- </button>
- </div>
- </template>;
- export default {
- name: "Modal",
- methods: {
- clicked(value) {
- alert(value);
- }
- }
- };
After using the both components, your App.vue file should have the both components imported and declared same as following:
- <template>
- <div id="app">
- <img alt="Vue logo" src="./assets/logo.png">
- <Test />
- <modal />
- </div>
- </template>;
- <script>
- import Test from "./components/Test.vue";
- import Modal from "./components/Modal.vue";
- export default {
- name: "app",
- components: {
- Test,
- Modal
- }
- };
- </script>
Here, you can see that we have repeated the click method code block in both components. This is not an ideal and efficient way to handle memory resources; that's why Vue.js Mixin was introduced.
Vue.js has introduced the mixins as an excellent solution to this problem. By using mixins, you can encapsulate a piece of code or functionality and then import it to use when you need it in various components.
Vue.js Mixin Syntax
The Vue.js mixin syntax would look like the following code:
- // define a mixin object
- var myMixin = {
- created: function() {
- this.hello();
- },
- methods: {
- hello: function() {
- console.log("hello from mixin!");
- }
- }
- };
- // define a component that uses this mixin
- var Component = Vue.extend({
- mixins: [myMixin]
- });
- var component = new Component(); // => "hello from mixin!"
Let's take a simple example to understand the concept of Vue.js Mixin well.
Index.html file:
- <html>
- <head>
- <title>Vue.js </title>
- <link rel="stylesheet" href="index.css">
- <script src="https://cdn.jsdelivr.net/npm/vue/dist/vue.js"></script>
- <script src="https://unpkg.com/vue/dist/vue.js"></script>
- </head>
- <body>
- <div id = "mixin_1"></div>
- <script type = "text/javascript">
- var vm = new Vue({
- el: '#mixin_1',
- data: {
- },
- methods : {
- },
- });
- var myMixin = {
- created: function () {
- this.startmixin()
- },
- methods: {
- startmixin: function () {
- alert("This is a Vue.js Mixin example!!");
- }
- }
- };
- </script>
- <script src="index.js"></script>
- </body>
- </html>
Index.js file:
- var Component = Vue.extend({
- mixins: [myMixin]
- })
- var component = new Component()
Let's use a simple CSS file to make the output more attractive.
Index.css file:
- html, body {
- margin: 5px;
- padding: 0;
- }
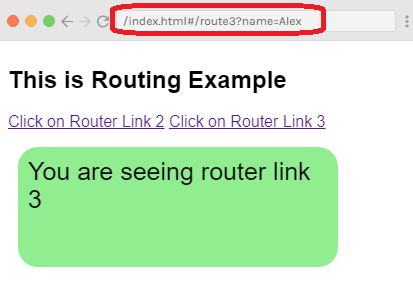
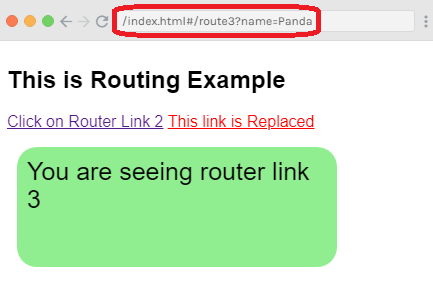
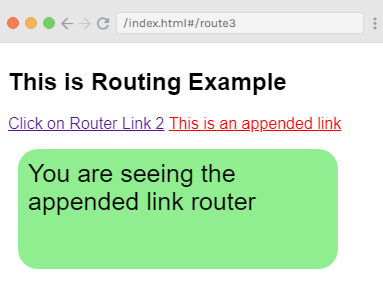
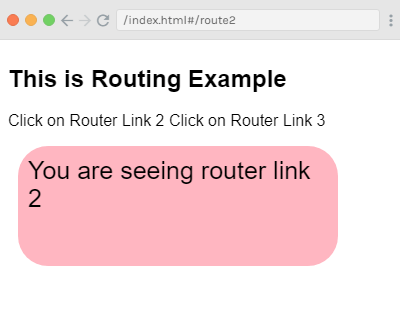
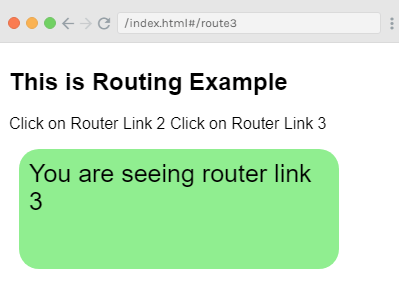
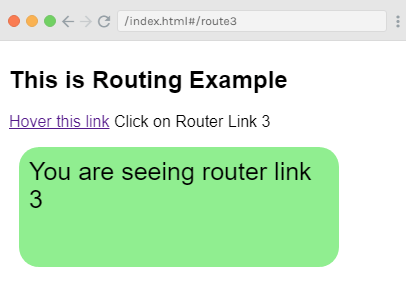
After the execution of the program, you will see the following output:
Output: