CoderFunda
  • Home
  • About us
    • Contact Us
    • Disclaimer
    • Privacy Policy
    • About us
  • Home
  • Php
  • HTML
  • CSS
  • JavaScript
    • JavaScript
    • Jquery
    • JqueryUI
    • Stock
  • SQL
  • Vue.Js
  • Python
  • Wordpress
  • C++
    • C++
    • C
  • Laravel
    • Laravel
      • Overview
      • Namespaces
      • Middleware
      • Routing
      • Configuration
      • Application Structure
      • Installation
    • Overview
  • DBMS
    • DBMS
      • PL/SQL
      • SQLite
      • MongoDB
      • Cassandra
      • MySQL
      • Oracle
      • CouchDB
      • Neo4j
      • DB2
      • Quiz
    • Overview
  • Entertainment
    • TV Series Update
    • Movie Review
    • Movie Review
  • More
    • Vue. Js
    • Php Question
    • Php Interview Question
    • Laravel Interview Question
    • SQL Interview Question
    • IAS Interview Question
    • PCS Interview Question
    • Technology
    • Other

05 December, 2018

Laravel - Installation

 Programing Coderfunda     December 05, 2018     Laravel Installation     No comments   

For managing dependencies, Laravel uses composer. Make sure you have a Composer installed on your system before you install Laravel. In this chapter, you will see the installation process of Laravel. You will have to follow the steps given below for installing Laravel onto your system −
Step 1 − Visit the following URL and download composer to install it on your system.
https://getcomposer.org/download/
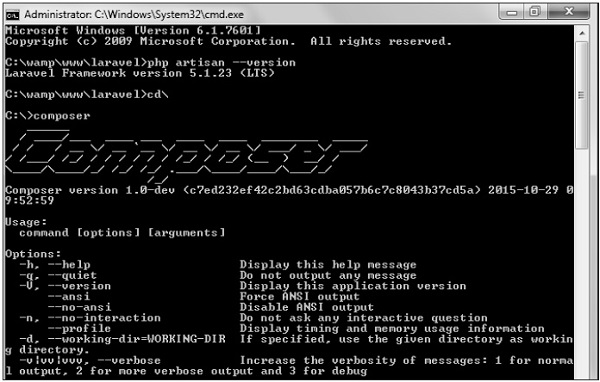
Step 2 − After the Composer is installed, check the installation by typing the Composer command in the command prompt as shown in the following screenshot.
Composer
Step 3 − Create a new directory anywhere in your system for your new Laravel project. After that, move to path where you have created the new directory and type the following command there to install Laravel.
composer create-project laravel/laravel –-prefer-dist
Step 4 − The above command will install Laravel in the current directory. Start the Laravel service by executing the following command.
php artisan serve
Step 5 − After executing the above command, you will see a screen as shown below −
Administrator
Step 6 − Copy the URL underlined in gray in the above screenshot and open that URL in the browser. If you see the following screen, it implies Laravel has been installed successfully.
  • Share This:  
  •  Facebook
  •  Twitter
  •  Google+
  •  Stumble
  •  Digg
Email ThisBlogThis!Share to XShare to Facebook
Newer Post Older Post Home

0 comments:

Post a Comment

Thanks

Meta

Popular Posts

  • Write API Integrations in Laravel and PHP Projects with Saloon
    Write API Integrations in Laravel and PHP Projects with Saloon Saloon  is a Laravel/PHP package that allows you to write your API integratio...
  • Credit card validation in laravel
      Validation rules for credit card using laravel-validation-rules/credit-card package in laravel Install package laravel-validation-rules/cr...
  • Fast Excel Package for Laravel
      Fast Excel is a Laravel package for importing and exporting spreadsheets. It provides an elegant wrapper around Spout —a PHP package to ...
  • iOS 17 Force Screen Rotation not working on iPAD only
    I have followed all the links on Google and StackOverFlow, unfortunately, I could not find any reliable solution Specifically for iPad devic...
  • Features CodeIgniter
    Features CodeIgniter There is a great demand for the CodeIgniter framework in PHP developers because of its features and multiple advan...

Categories

  • Ajax (26)
  • Bootstrap (30)
  • DBMS (42)
  • HTML (12)
  • HTML5 (45)
  • JavaScript (10)
  • Jquery (34)
  • Jquery UI (2)
  • JqueryUI (32)
  • Laravel (1017)
  • Laravel Tutorials (23)
  • Laravel-Question (6)
  • Magento (9)
  • Magento 2 (95)
  • MariaDB (1)
  • MySql Tutorial (2)
  • PHP-Interview-Questions (3)
  • Php Question (13)
  • Python (36)
  • RDBMS (13)
  • SQL Tutorial (79)
  • Vue.js Tutorial (68)
  • Wordpress (150)
  • Wordpress Theme (3)
  • codeigniter (108)
  • oops (4)
  • php (853)

Social Media Links

  • Follow on Twitter
  • Like on Facebook
  • Subscribe on Youtube
  • Follow on Instagram

Pages

  • Home
  • Contact Us
  • Privacy Policy
  • About us

Blog Archive

  • September (100)
  • August (50)
  • July (56)
  • June (46)
  • May (59)
  • April (50)
  • March (60)
  • February (42)
  • January (53)
  • December (58)
  • November (61)
  • October (39)
  • September (36)
  • August (36)
  • July (34)
  • June (34)
  • May (36)
  • April (29)
  • March (82)
  • February (1)
  • January (8)
  • December (14)
  • November (41)
  • October (13)
  • September (5)
  • August (48)
  • July (9)
  • June (6)
  • May (119)
  • April (259)
  • March (122)
  • February (368)
  • January (33)
  • October (2)
  • July (11)
  • June (29)
  • May (25)
  • April (168)
  • March (93)
  • February (60)
  • January (28)
  • December (195)
  • November (24)
  • October (40)
  • September (55)
  • August (6)
  • July (48)
  • May (2)
  • January (2)
  • July (6)
  • June (6)
  • February (17)
  • January (69)
  • December (122)
  • November (56)
  • October (92)
  • September (76)
  • August (6)

Loading...

Laravel News

Loading...

Copyright © CoderFunda | Powered by Blogger
Design by Coderfunda | Blogger Theme by Coderfunda | Distributed By Coderfunda