25 January, 2022
18 January, 2022
Magento 2.4.3 after fresh install admin page stuck on loading
Programing Coderfunda
January 18, 2022
Magento 2
No comments
![]()
Hi,
I've installed Magento 2.4.3 - fresh install from hosted server - on Windows 10 - installation went well through install wizard. But now I can't access the admin page - I can see the admin page on the background, but there is 'n circle going round and round and round ... forever - page is stuck on loading.
Ans: php bin/magento config:set web/secure/use_in_adminhtml 1
25 October, 2021
Your requirements could not be resolved to an installable set of packages.
Programing Coderfunda
October 25, 2021
Laravel
No comments
![]()
Problems : Your requirements could not be resolved to an installable set of packages.
Solution :
Run this command:
composer install --ignore-platform-reqs
or
composer update --ignore-platform-reqs
Solution 2nd
I solved the same issue setting 'laravel/framework' dependency version from "^8.0" to "^7.0".
After that running
"composer update --ignore-platform-reqs" simply worked
What is the difference when we add marquee tag to the webpage?
Programing Coderfunda
October 25, 2021
HTML-Tag, HTML5
No comments
![]()
What is the difference when we add marquee tag to the webpage?
Marquee tag is using in html5
When you want to moving on webpage right to left or left to right & top to bottom and bottom to top
Example :
<marquee> Hello </marquee>
An HTML marquee is a scrolling piece of text displayed either horizontally across or vertically down your webpage depending on the settings. This is created by using HTML <marquees> tag.
Note − The <marquee> tag deprecated in HTML5. Do not use this element, instead you can use JavaScript and CSS to create such effects.
Syntax
A simple syntax to use HTML <marquee> tag is as follows −
<marquee attribute_name = "attribute_value"....more attributes>
   One or more lines or text message or image
</marquee>
The <marquee> Tag Attributes
Following is the list of important attributes which can be used with <marquee> tag.
| Sr.No | Attribute & Description |
|---|---|
| 1 | width This specifies the width of the marquee. This can be a value like 10 or 20% etc. |
| 2 | height This specifies the height of the marquee. This can be a value like 10 or 20% etc. |
| 3 | direction This specifies the direction in which marquee should scroll. This can be a value like up, down, left or right. |
| 4 | behavior This specifies the type of scrolling of the marquee. This can have a value like scroll, slide and alternate. |
| 5 | scrolldelay This specifies how long to delay between each jump. This will have a value like 10 etc. |
| 6 | scrollamount This specifies the speed of marquee text. This can have a value like 10 etc. |
| 7 | loop This specifies how many times to loop. The default value is INFINITE, which means that the marquee loops endlessly. |
| 8 | bgcolor This specifies background color in terms of color name or color hex value. |
| 9 | hspace This specifies horizontal space around the marquee. This can be a value like 10 or 20% etc. |
| 10 | vspace This specifies vertical space around the marquee. This can be a value like 10 or 20% etc. |
Below are few examples to demonstrate the usage of marquee tag.
<!DOCTYPE html>
<html>

   <head>
      <title>HTML marquee Tag</title>
   </head>

   <body>
      <marquee>This is basic example of marquee</marquee>
   </body>

</html>
<!DOCTYPE html>
<html>

   <head>
      <title>HTML marquee Tag</title>
   </head>

   <body>
      <marquee width = "50%">This example will take only 50% width</marquee>
   </body>

</html>
<!DOCTYPE html>
<html>

   <head>
      <title>HTML marquee Tag</title>
   </head>

   <body>
      <marquee direction = "right">This text will scroll from left to right</marquee>
   </body>
<!DOCTYPE html>
<html>

   <head>
      <title>HTML marquee Tag</title>
   </head>

   <body>
      <marquee direction = "up">This text will scroll from bottom to up</marquee>
   </body>

</html>
31 July, 2021
419 Page Expired Laravel 7.0, 8.0 - After Login
Programing Coderfunda
July 31, 2021
Laravel - Interview questions
No comments
![]()
 |
| 419 Page Expired Laravel 7.0, 8.0 - After Login |
When Change one Server To Another Server Then Login Expire Error Show => 419
Laravel Project Run On Localhost But Live Server Login Error Show 419 or Page Expired
Then You Follow These Step : 100% your problem solve .
Solution -1
Just add @csrf following right after your form opening tag line. It should look like this:
<form class="singn-form" method="POST" action="{{ route('register') }}">
@csrf
....
</form>
Use this in the head section instead of @csrf :<meta name="csrf-token" content="{{ csrf_token() }}"> php artisan cache:clear chmod -R 755 storage
chmod -R 755 vendor
chmod -R 644 bootstrap/caches
domain' => env('SESSION_DOMAIN', null),
'secure' => env('SESSION_SECURE_COOKIE', false), // in case of cookie
These step by step approach fixes the error and make Laravel working again
chmod -R 644 bootstrap/caches this will cause the following error ` tempnam(): file created in the system's temporary directory ` in laravel 8. Give 755 permission to bootstrap/cache
chmod -R 777 bootstrap/cache not chmod -R 644 bootstrap/caches
----------------------------
Yes, the problem is caused by the csrf_token. @csrf return only the token but which is going to be sent so use csrf_field() which will generate a hidden input field. Or you can remove this route from middleware like below, which is not recommended as it's your authenticate route. Also, try
Clear cache : php artisan cache:clearGenerate new app key : php artisan key:generate
class VerifyCsrfToken extends Middleware
{
    /**
     * Indicates whether the XSRF-TOKEN cookie should be set on the response.
     *
     * @var bool
     */
    protected $addHttpCookie = true;

    /**
     * The URIs that should be excluded from CSRF verification.
     *
     * @var array
     */
    protected $except = [
        '/login'
    ];
}
or you can use this type ;
As others said this should be a csrf_token issue. However, in my case, I couldn't find a proper solution yet so, I temporarily removed all routes from middleware for testing the rest of the functions.
PS:- Do not do this in production.
class VerifyCsrfToken extends Middleware
{
    /**
     * The URIs that should be excluded from CSRF verification.
     *
     * @var array
     */
    protected $except = [

        '*',

    ];
}
17 July, 2021
WordPress Hosting
Programing Coderfunda
July 17, 2021
Wordpress, wordpress-tutorial
No comments
![]()
WordPress Hosting
There are different types of web hosts available today, the large majority of which meets WordPress's minimum requirements, and it can be a challenge to choose one from the developers. WordPress does the best work if it's in a rich hosting environment. It is essential to choose the best hosting for our WordPress website because our website's quality will depend on the hosting provider we are using.
Whenever we want to select the host for WordPress, we must keep these three important factors:
- Speed: It is also known as "load time".
- Uptime: It must be at least 94%.
- Customer Support: They should help us to solve the WordPress related queries.
We cannot ensure that the user will have similar results in terms of uptime or speed to their website. It depends on the various factors such as their chosen hosting plan, the website's size and the number of visitors.
There are different types of WordPress website hosting. Some of the popular WordPress hosting's are as follows:
- Bluehost
- DreamHost
- Site Ground
- Hostinger
- HostGator Managed WordPress
Bluehost
It is the best WordPress hosting service between small business owners and bloggers. It is cheap ($2.75 per month), simple to use, and doesn't have any performance problem.
Bluehost has the best cost-value ratio. Our Pingdom uptime and speed monitoring tool shows 99.99% of the total time duration with just 24 outages and full-page loading speed of 390 ms in less than an hour in the last 12 months.
It is one of the few best web hosts officially recommended by the WordPress.org community. This web host's plans come with free SSL, WordPress staging area, and a simple installation feature for WordPress. Although it's not cheap, its prices start at $2.75 per month, but they set up a free SSL domain name for a year. Some of the important features of this hosting service are as follows:
- Speed: Its speed is 390 ms.
- Uptime: Its uptime is 99.99%.
- Customer Support: It provides customer support for 24/7 live chat.
- Features: Its features are one-click installation for WordPress, free domain for one year, and http (SSL).
- Website: bluehost.com
DreamHost
It is a popular and well-established WordPress hosting server from the USA with more than 340000 users. It is also a recommended WordPress hosting service by the WordPress.org website. This hosting service is simple, fast, optimized, and reliable for WordPress users. Site transfers are not free, its cost is $99, but free with their $16.95 per month DreamPress plan and no support service is available 24/7. They have a chat service with live support, which is available at 5:30 a.m. Up to 9:30 a.m. for a week.
It doesn't need an ideal website hosting to serves visitors outside the United States or Asia, but it certainly offers a stable page speed of 569 ms and 99.92 percent "OK" uptime. Features of DreamHost are as follows:
- Speed: Its speed is 569 ms.
- Uptime: Its uptime is 99.92%.
- Customer Support: It provides customer support for 24/7 live chat.
- Features: DreamHost features include the pre-installation of WordPress, Infinite bandwidth or storage, and the drag and drop builder.
- Website: dreamhost.com
SiteGround
It is another popular and valid WordPress hosting service recommended by the WordPress.org community. Since 2004 it has grown to a large network of more than 2,000,000 domain names worldwide. It has tools that make it easy to handle WordPress websites such as one-click installation, managed updates, WP-Cli, staging WordPress, and git integration. It has a strong support team that is available 24/7 with a specialized WordPress experience. It provides the latest speed technologies, including PHP 7, CDN, NGINX-based caching, and SSD-drives, allowing WordPress sites to load faster. It quickly and effectively protects WordPress sites from hacks.
It is maintained an average uptime of 99.98% (with 34 outages) followed by a high speed of 629 ms in terms of uptime. The features of SiteGround are as follows:
- Speed: Its speed is 629 ms.
- Uptime: Its Uptime is 99.98%, with 34 outages.
- Customer Support: It provides customer support 24/7.
- Features: Features of SiteGround is Google cloud servers, free https (SSL), and free emails.
- Website: siteground.com
Hostinger
It is a popular WordPress Host server originally from Europe, but its data centers are available in Europe, USA, and Asia. It doesn't provide the option to select a data center right away, but once we are signed up, we can ask for their support to change out server location from Europe to the USA or the USA to Asia. It also adds a WordPress website builder feature, which is not good, but it can help a lot to a beginner. It also provides customer support services for 24/7 live chat. Their performance is actually on the great side, even after being on the cheapest WordPress hosts. Its speed is 339 ms, and Uptime is all right, coming in at 99.93% over the last 12 months. The features of Hostinger are as follows:
- Speed: Its speed is 339 ms.
- Uptime: Its uptime is 99.93%.
- Customer Support: It provides Customer Security for 24/7 live chat.
- Features: It provides a free email account, 24/7 customer support, and free (SSL).
- Website: hostinger.com
HostGator Managed WordPress
HostGator WordPress Hosting server provides the service to more than 10 million domains, which makes it the most popular web hosting service provider in the market. It is similar to the Bluehost and also provides the specialized WordPress hosting solution like WordPress hosting. It is the best choice for high website traffic, which needs quicker loading time. Hostgator WordPress plan must provide our website loads quicker in several regions, mainly for mobile users. Its last 12-month speed average is 369 ms, and the uptime average is 99.99%. The features of HostGator WordPress hosting are as follows:
- Speed: Its speed is 369 ms.
- Uptime: Its uptime is 99.99%.
- Customer Support: It provides customer service for 24/7 live chat.
- Features: It provides the free website and transfer and backups. WordPress optimized the servers.
- Website: hostgator.com
WordPress Event Calendar Plugin
Programing Coderfunda
July 17, 2021
Wordpress, wordpress-tutorial
No comments
![]()
WordPress Event Calendar Plugin
What is WordPress Event Calendar?
The Event Calendar is a free and popular calendar plugin. It is used to display the visitor event based on dates on the website. It is a structured way to display upcoming events based on calendar dates. On our WordPress websites, we can add an event calendar as an external plugin.
A traditional event calendar contains a link to the event page when we click on a specific date. It shows a preview of events and some calendar settings. It could be set to show events based on specified conditions. For example, we could configure an event calendar to display only upcoming events or events from a specific category.
Installation of WordPress Event Calendar Plugin
The installation of the Event Calendar plugin is easy. We can use the following steps to install the WordPress Event Calendar Plugin:
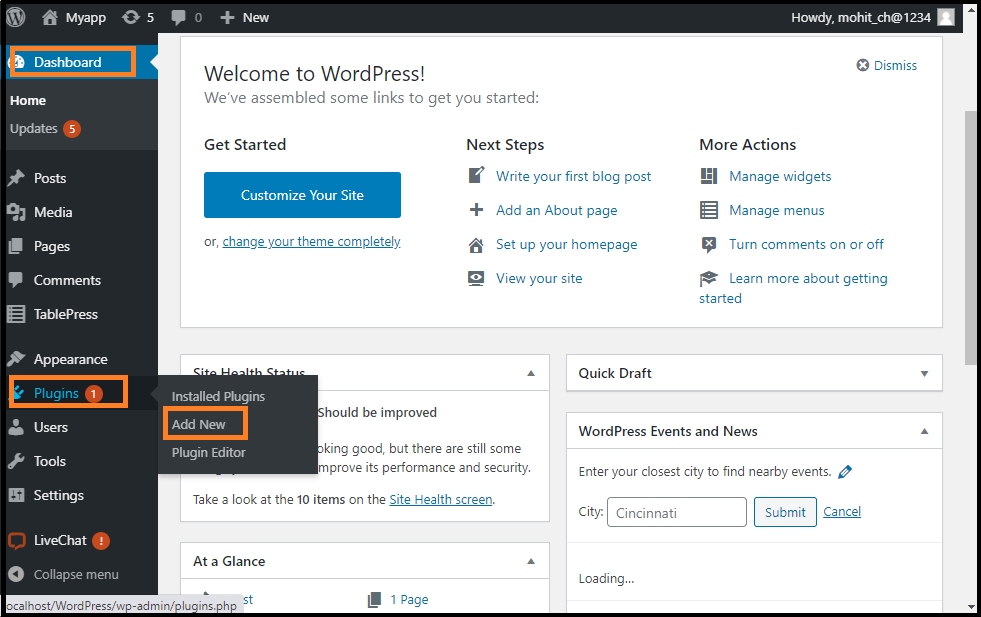
Step 1: Firstly, go to the WordPress Dashboard and choose the "plugins" option and click on the "Add New" button.
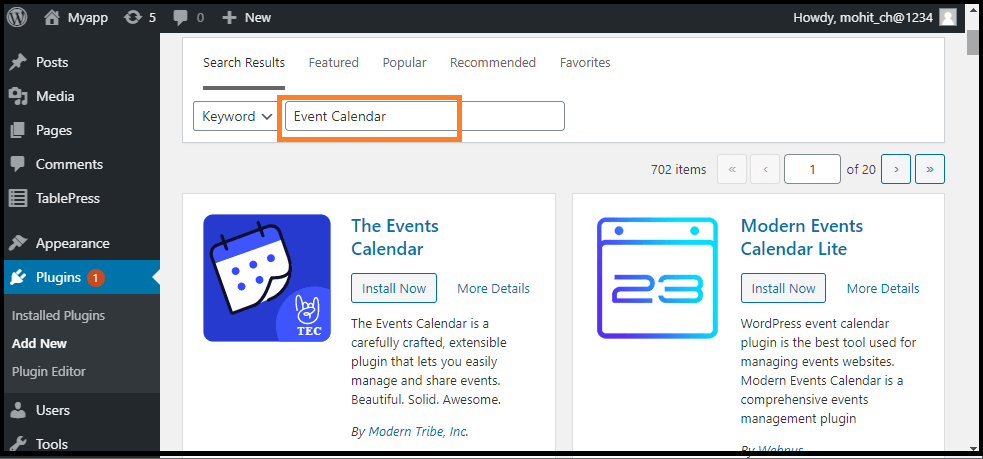
Step 2: After click on the Add New Button, search for "Event Calendar".
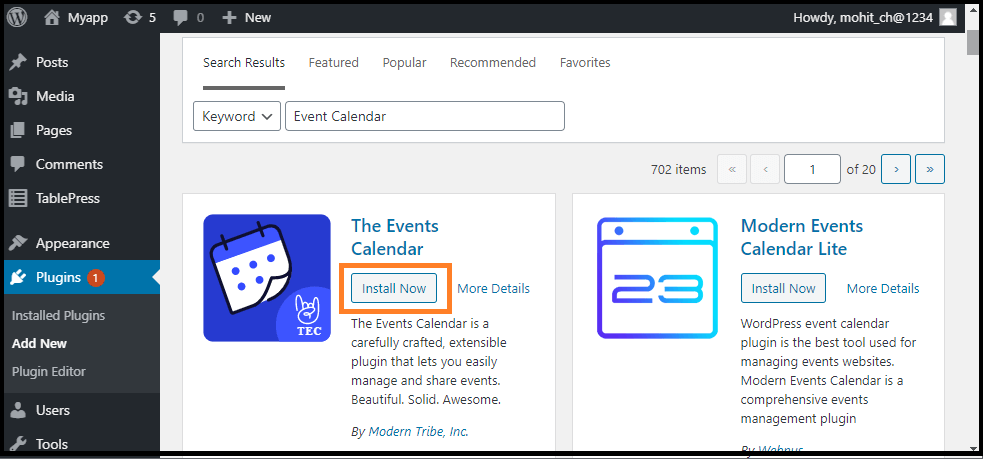
Step 3: After that, click on the "Install Now" button.
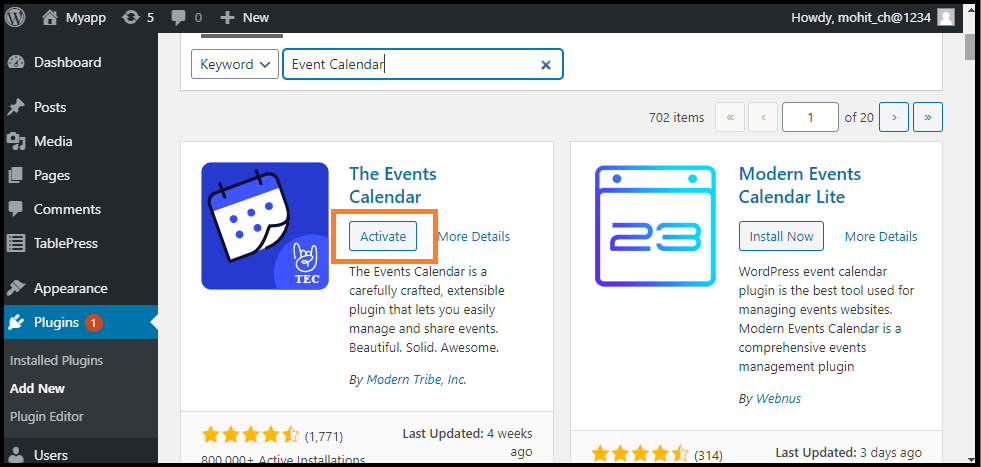
Step 4: Once the installation is complete, activate the plugin.
After completing the installation of the Event Calendar plugin on the Website, we are able to make and publish the first event quickly.
Using the plugin dashboard, we can make multiple platforms for the events that can be reused as needed. There are many forms available while publishing the event calendar, including inventory and day views. There are different ways to display the calendar and its event, including some helpful widgets for the sidebars and custom page templates. Developers can appreciate this plugin as it is built to support code customization and is fully documented.
However, the free events calendar plugin is ready to help us add events to our WordPress website, and a pro version is also available with more useful features. By upgrading to the plugin's paid version, we can begin developing recurring events, managing event ticket sales, and integrating Facebook events. With Events Calendar Pro, we may also import the events from other services, including Google Calendar.
Despite the premium upgrade, there are still many offers for the free version of the events calendar, allowing us to publish events on the WordPress website easily.
Creating an Event
Now, we are going to create an event in the WordPress site. We can use the following steps to create an event in WordPress.
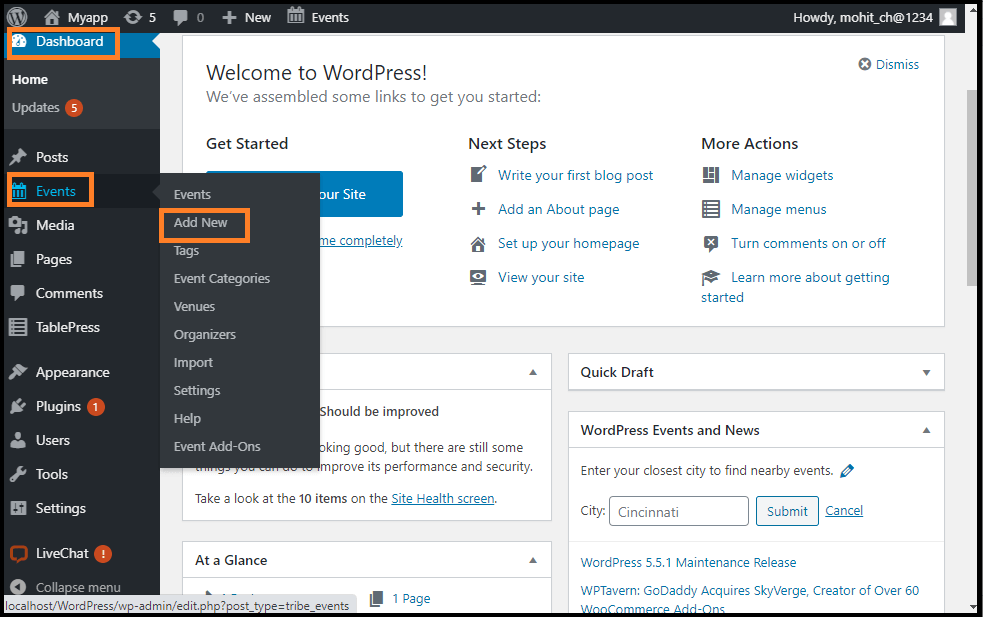
Step 1: Firstly, go to the WordPress Dashboard and select the Events option and then click on the "Add New" button.
Step 2: Once we click on the "Add New" button, it brings us to the Event editor.
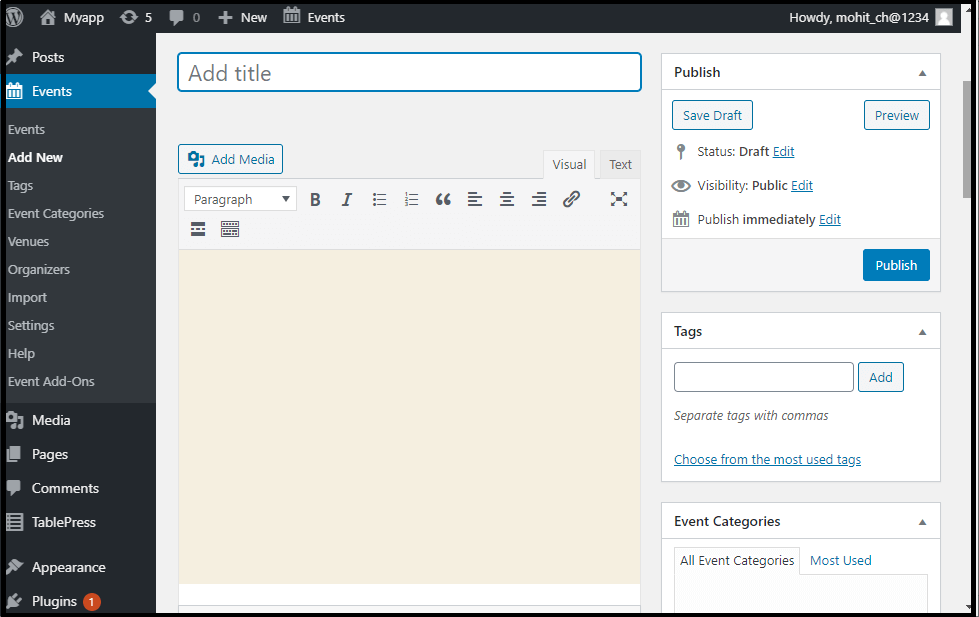
Step 3: Here, we can add a title and description to the event with a WordPress page and post.
Event Time
Events have several pieces of information required by most of the pages and the articles, which are the start and end dates, for example, not to mention venues and organizers in WordPress.
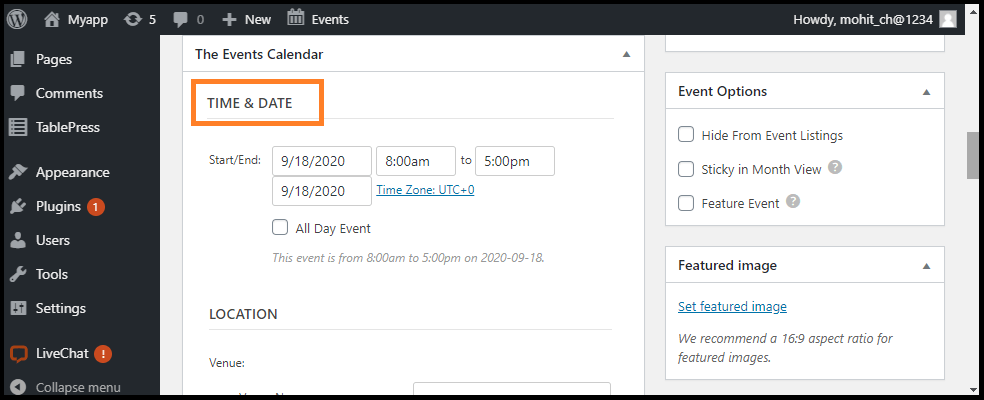
To set all these things, we will find the fields below the editor's summary, in an area called the Events Meta Box. In this field, we can see each of the settings, the date and time fields.
The Start/End
It is simply used when the events start and end. When we click on any date field, a date picker popup will appear, where we can select the date from a calendar according to our needs. Events start and end times can be choosing from a drop-down menu, or we can enter date and time manually. If we already checked the all-Day Event box, we would not be able to define a date or time for the Event.
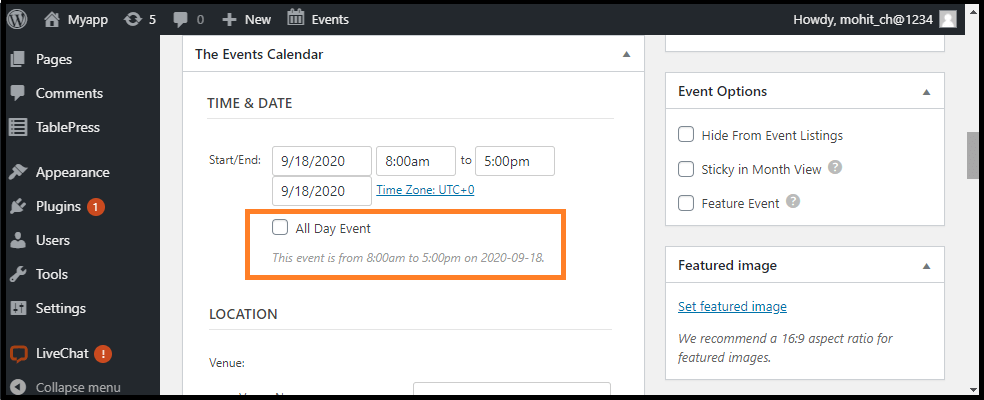
All Day Event
The All-Day Event checkbox is useful when the event is taking place on a specific date.
Event Venue
If we are using the Event Calendar first time, we can see the field's list to create the first event venue. If we have created a venue for the previous event, we will have the option to pick an existing venue from the drop-down menu. Entering a new event menu name and choosing the Create option from the menu will show the new event menu from the fields below:
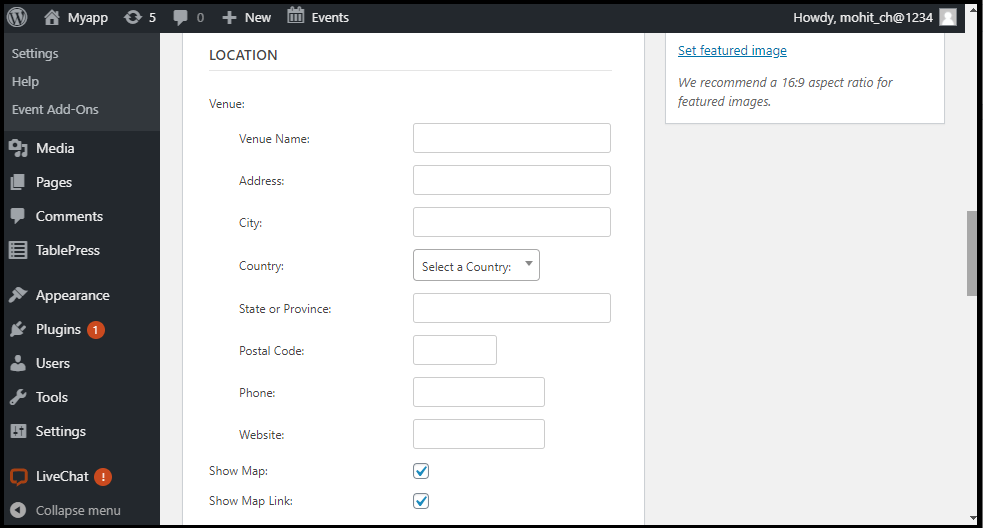
It is also important to remember that we don't have to build a venue. If we do not want to define a location, simply proceed to the next section.
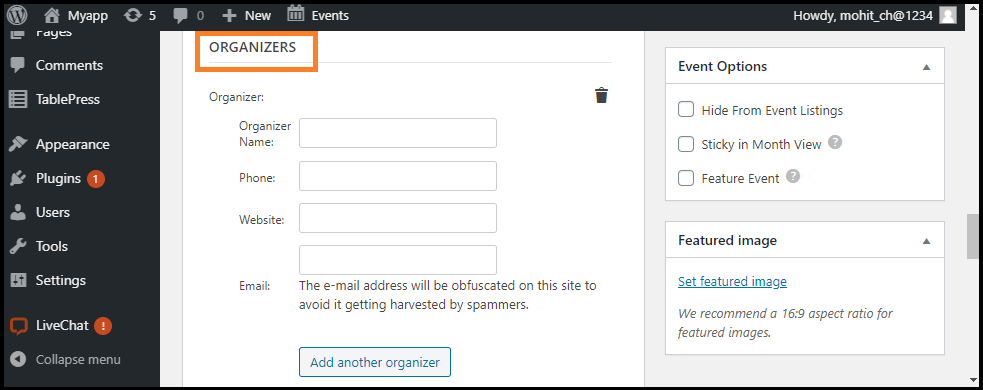
Organizers
Like the venue details, we may choose the pre-existing organizer details that we already entered in the event venue. Rather than the venue details, the area of the organizer has a full option.
Event Website
In this section, the New Event Admin provides us an event website. If we show the events organized by the external organizations and have a particular dedicated event website, it is very useful in the Event Calendar.

Event Options
We can find the Event Option close to the tag and event category meta boxes. Usually, there are the three Event options used in the Event Calendar, which are: Hide from Event Listings, Sticky in Month View and Feature Event.
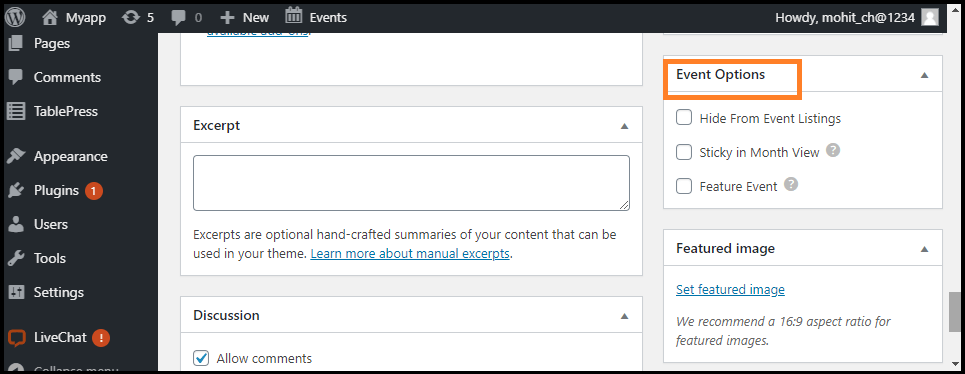
Hide from Event Listings
Often, we can link and post events via email or a menu, but it is not included in the views of events, and this is done by checking the Hide from Event listings box.
Feature Events
It allows us to designate the important events for extra emphases on the pages. The featured events will be displayed in event views, files, and widgets, making it an excellent choice for special commitments.
