CoderFunda
  • Home
  • About us
    • Contact Us
    • Disclaimer
    • Privacy Policy
    • About us
  • Home
  • Php
  • HTML
  • CSS
  • JavaScript
    • JavaScript
    • Jquery
    • JqueryUI
    • Stock
  • SQL
  • Vue.Js
  • Python
  • Wordpress
  • C++
    • C++
    • C
  • Laravel
    • Laravel
      • Overview
      • Namespaces
      • Middleware
      • Routing
      • Configuration
      • Application Structure
      • Installation
    • Overview
  • DBMS
    • DBMS
      • PL/SQL
      • SQLite
      • MongoDB
      • Cassandra
      • MySQL
      • Oracle
      • CouchDB
      • Neo4j
      • DB2
      • Quiz
    • Overview
  • Entertainment
    • TV Series Update
    • Movie Review
    • Movie Review
  • More
    • Vue. Js
    • Php Question
    • Php Interview Question
    • Laravel Interview Question
    • SQL Interview Question
    • IAS Interview Question
    • PCS Interview Question
    • Technology
    • Other

17 October, 2018

CSS Syntax and Selectors

 Programing Coderfunda     October 17, 2018     css     No comments   

CSS Syntax and Selectors


CSS Syntax

A CSS rule-set consists of a selector and a declaration block:
CSS selector
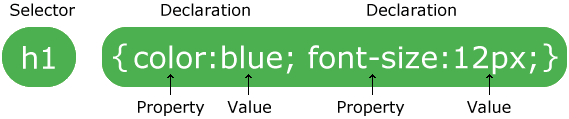
The selector points to the HTML element you want to style.
The declaration block contains one or more declarations separated by semicolons.
Each declaration includes a CSS property name and a value, separated by a colon.
A CSS declaration always ends with a semicolon, and declaration blocks are surrounded by curly braces.
In the following example all <p> elements will be center-aligned, with a red text color:

p {
    color: red;
    text-align: center;
}


CSS Selectors

CSS selectors are used to "find" (or select) HTML elements based on their element name, id, class, attribute, and more.

The element Selector

The element selector selects elements based on the element name.
You can select all <p> elements on a page like this (in this case, all <p> elements will be center-aligned, with a red text color):

p {
    text-align: center;
    color: red;
}


The id Selector

The id selector uses the id attribute of an HTML element to select a specific element.
The id of an element should be unique within a page, so the id selector is used to select one unique element!
To select an element with a specific id, write a hash (#) character, followed by the id of the element.
The style rule below will be applied to the HTML element with id="para1":

#para1 {
    text-align: center;
    color: red;
}

The class Selector

The class selector selects elements with a specific class attribute.
To select elements with a specific class, write a period (.) character, followed by the name of the class.
In the example below, all HTML elements with class="center" will be red and center-aligned:

.center {
    text-align: center;
    color: red;
}

You can also specify that only specific HTML elements should be affected by a class.
In the example below, only <p> elements with class="center" will be center-aligned:

p.center {
    text-align: center;
    color: red;
}

HTML elements can also refer to more than one class.
In the example below, the <p> element will be styled according to class="center" and to class="large":

<p class="center large">This paragraph refers to two classes.</p>

Grouping Selectors

If you have elements with the same style definitions, like this:

h1 {
    text-align: center;
    color: red;
}

h2 {
    text-align: center;
    color: red;
}

p {
    text-align: center;
    color: red;
}


It will be better to group the selectors, to minimize the code.
To group selectors, separate each selector with a comma.
In the example below we have grouped the selectors from the code above:

h1, h2, p {
    text-align: center;
    color: red;
}

CSS Comments

Comments are used to explain the code, and may help when you edit the source code at a later date.
Comments are ignored by browsers.
A CSS comment starts with /* and ends with */. Comments can also span multiple lines:

p {
    color: red;
    /* This is a single-line comment */
    text-align: center;
}

/* This is
a multi-line
comment */
  • Share This:  
  •  Facebook
  •  Twitter
  •  Google+
  •  Stumble
  •  Digg
Email ThisBlogThis!Share to XShare to Facebook
Newer Post Older Post Home

0 comments:

Post a Comment

Thanks

Meta

Popular Posts

  • Write API Integrations in Laravel and PHP Projects with Saloon
    Write API Integrations in Laravel and PHP Projects with Saloon Saloon  is a Laravel/PHP package that allows you to write your API integratio...
  • Features CodeIgniter
    Features CodeIgniter There is a great demand for the CodeIgniter framework in PHP developers because of its features and multiple advan...
  • Laravel Breeze with PrimeVue v4
    This is an follow up to my previous post about a "starter kit" I created with Laravel and PrimeVue components. The project has b...
  • Fast Excel Package for Laravel
      Fast Excel is a Laravel package for importing and exporting spreadsheets. It provides an elegant wrapper around Spout —a PHP package to ...
  • Send message via CANBus
    After some years developing for mobile devices, I've started developing for embedded devices, and I'm finding a new problem now. Th...

Categories

  • Ajax (26)
  • Bootstrap (30)
  • DBMS (42)
  • HTML (12)
  • HTML5 (45)
  • JavaScript (10)
  • Jquery (34)
  • Jquery UI (2)
  • JqueryUI (32)
  • Laravel (1017)
  • Laravel Tutorials (23)
  • Laravel-Question (6)
  • Magento (9)
  • Magento 2 (95)
  • MariaDB (1)
  • MySql Tutorial (2)
  • PHP-Interview-Questions (3)
  • Php Question (13)
  • Python (36)
  • RDBMS (13)
  • SQL Tutorial (79)
  • Vue.js Tutorial (68)
  • Wordpress (150)
  • Wordpress Theme (3)
  • codeigniter (108)
  • oops (4)
  • php (853)

Social Media Links

  • Follow on Twitter
  • Like on Facebook
  • Subscribe on Youtube
  • Follow on Instagram

Pages

  • Home
  • Contact Us
  • Privacy Policy
  • About us

Blog Archive

  • September (100)
  • August (50)
  • July (56)
  • June (46)
  • May (59)
  • April (50)
  • March (60)
  • February (42)
  • January (53)
  • December (58)
  • November (61)
  • October (39)
  • September (36)
  • August (36)
  • July (34)
  • June (34)
  • May (36)
  • April (29)
  • March (82)
  • February (1)
  • January (8)
  • December (14)
  • November (41)
  • October (13)
  • September (5)
  • August (48)
  • July (9)
  • June (6)
  • May (119)
  • April (259)
  • March (122)
  • February (368)
  • January (33)
  • October (2)
  • July (11)
  • June (29)
  • May (25)
  • April (168)
  • March (93)
  • February (60)
  • January (28)
  • December (195)
  • November (24)
  • October (40)
  • September (55)
  • August (6)
  • July (48)
  • May (2)
  • January (2)
  • July (6)
  • June (6)
  • February (17)
  • January (69)
  • December (122)
  • November (56)
  • October (92)
  • September (76)
  • August (6)

Loading...

Laravel News

Loading...

Copyright © CoderFunda | Powered by Blogger
Design by Coderfunda | Blogger Theme by Coderfunda | Distributed By Coderfunda