CoderFunda
  • Home
  • About us
    • Contact Us
    • Disclaimer
    • Privacy Policy
    • About us
  • Home
  • Php
  • HTML
  • CSS
  • JavaScript
    • JavaScript
    • Jquery
    • JqueryUI
    • Stock
  • SQL
  • Vue.Js
  • Python
  • Wordpress
  • C++
    • C++
    • C
  • Laravel
    • Laravel
      • Overview
      • Namespaces
      • Middleware
      • Routing
      • Configuration
      • Application Structure
      • Installation
    • Overview
  • DBMS
    • DBMS
      • PL/SQL
      • SQLite
      • MongoDB
      • Cassandra
      • MySQL
      • Oracle
      • CouchDB
      • Neo4j
      • DB2
      • Quiz
    • Overview
  • Entertainment
    • TV Series Update
    • Movie Review
    • Movie Review
  • More
    • Vue. Js
    • Php Question
    • Php Interview Question
    • Laravel Interview Question
    • SQL Interview Question
    • IAS Interview Question
    • PCS Interview Question
    • Technology
    • Other

11 December, 2018

CodeIgniter - File Uploading

 Programing Coderfunda     December 11, 2018     codeigniter, CodeIgniter File Uploading     No comments   

Using File Uploading class, we can upload files and we can also, restrict the type and size of the file to be uploaded. Follow the steps shown in the given example to understand the file uploading process in CodeIgniter.

Example

Copy the following code and store it at application/view/Upload_form.php.
<html>
 
   <head> 
      <title>Upload Form</title> 
   </head>
 
   <body> 
      <?php echo $error;?> 
      <?php echo form_open_multipart('upload/do_upload');?> 
  
      <form action = "" method = "">
         <input type = "file" name = "userfile" size = "20" /> 
         <br /><br /> 
         <input type = "submit" value = "upload" /> 
      </form> 
  
   </body>
 
</html>
Copy the code given below and store it at application/view/Upload_success.php
<html>
 
   <head> 
      <title>Upload Form</title> 
   </head>
 
   <body>  
      <h3>Your file was successfully uploaded!</h3>  
  
      <ul> 
         <?phpforeach ($upload_data as $item => $value):?> 
         <li><?php echo $item;?>: <?php echo $value;?></li> 
         <?phpendforeach; ?>
      </ul>  
  
      <p><?php echo anchor('upload', 'Upload Another File!'); ?></p>  
   </body>
 
</html>
Copy the code given below and store it at application/controllers/Upload.php. Create “uploads” folder at the root of CodeIgniter i.e. at the parent directory of application folder.
<?php
  
   class Upload extends CI_Controller {
 
      public function __construct() { 
         parent::__construct(); 
         $this->load->helper(array('form', 'url')); 
      }
  
      public function index() { 
         $this->load->view('upload_form', array('error' => ' ' )); 
      } 
  
      public function do_upload() { 
         $config['upload_path']   = './uploads/'; 
         $config['allowed_types'] = 'gif|jpg|png'; 
         $config['max_size']      = 100; 
         $config['max_width']     = 1024; 
         $config['max_height']    = 768;  
         $this->load->library('upload', $config);
   
         if ( ! $this->upload->do_upload('userfile')) {
            $error = array('error' => $this->upload->display_errors()); 
            $this->load->view('upload_form', $error); 
         }
   
         else { 
            $data = array('upload_data' => $this->upload->data()); 
            $this->load->view('upload_success', $data); 
         } 
      } 
   } 
?>
Make the following change in the route file in application/config/routes.php and add the following line at the end of file.
$route['upload'] = 'Upload';
Now let us execute this example by visiting the following URL in the browser. Replace the yoursite.com with your URL.
http://yoursite.com/index.php/upload
It will produce the following screen −
Upload Form
After successfully uploading a file, you will see the following screen −
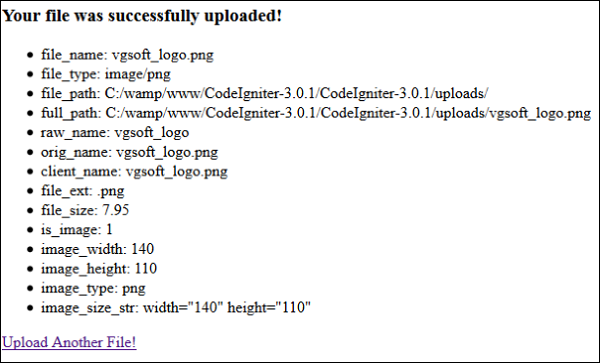
successfully uploaded

  • Share This:  
  •  Facebook
  •  Twitter
  •  Google+
  •  Stumble
  •  Digg
Email ThisBlogThis!Share to XShare to Facebook

Related Posts:

  • CodeIgniter - File UploadingUsing File Uploading class, we can upload files and we can also, restrict the type and size of the file to be uploaded. Follow the steps shown in the … Read More
  • CodeIgniter - File Uploading Using File Uploading class, we can upload files and we can also, restrict the type and size of the file to be uploaded. Follow the steps shown in th… Read More
Newer Post Older Post Home

0 comments:

Post a Comment

Thanks

Meta

Popular Posts

  • Spring boot app (error: method getFirst()) failed to run at local machine, but can run on server
    The Spring boot app can run on the online server. Now, we want to replicate the same app at the local machine but the Spring boot jar file f...
  • Log activity in a Laravel app with Spatie/Laravel-Activitylog
      Requirements This package needs PHP 8.1+ and Laravel 9.0 or higher. The latest version of this package needs PHP 8.2+ and Laravel 8 or hig...
  • Failed to install 'cordova-plugin-firebase': CordovaError: Uh oh
    I had follow these steps to install an configure firebase to my cordova project for cloud messaging. https://medium.com/@felipepucinelli/how...
  • Laravel auth login with phone or email
          <?php     Laravel auth login with phone or email     <? php     namespace App \ Http \ Controllers \ Auth ;         use ...
  • Cashier package and Blade files
    I'm a little confused about this Cashier package. I installed it using the Laravel website (with composer), but noticed there's no...

Categories

  • Ajax (26)
  • Bootstrap (30)
  • DBMS (42)
  • HTML (12)
  • HTML5 (45)
  • JavaScript (10)
  • Jquery (34)
  • Jquery UI (2)
  • JqueryUI (32)
  • Laravel (1017)
  • Laravel Tutorials (23)
  • Laravel-Question (6)
  • Magento (9)
  • Magento 2 (95)
  • MariaDB (1)
  • MySql Tutorial (2)
  • PHP-Interview-Questions (3)
  • Php Question (13)
  • Python (36)
  • RDBMS (13)
  • SQL Tutorial (79)
  • Vue.js Tutorial (68)
  • Wordpress (150)
  • Wordpress Theme (3)
  • codeigniter (108)
  • oops (4)
  • php (853)

Social Media Links

  • Follow on Twitter
  • Like on Facebook
  • Subscribe on Youtube
  • Follow on Instagram

Pages

  • Home
  • Contact Us
  • Privacy Policy
  • About us

Blog Archive

  • September (100)
  • August (50)
  • July (56)
  • June (46)
  • May (59)
  • April (50)
  • March (60)
  • February (42)
  • January (53)
  • December (58)
  • November (61)
  • October (39)
  • September (36)
  • August (36)
  • July (34)
  • June (34)
  • May (36)
  • April (29)
  • March (82)
  • February (1)
  • January (8)
  • December (14)
  • November (41)
  • October (13)
  • September (5)
  • August (48)
  • July (9)
  • June (6)
  • May (119)
  • April (259)
  • March (122)
  • February (368)
  • January (33)
  • October (2)
  • July (11)
  • June (29)
  • May (25)
  • April (168)
  • March (93)
  • February (60)
  • January (28)
  • December (195)
  • November (24)
  • October (40)
  • September (55)
  • August (6)
  • July (48)
  • May (2)
  • January (2)
  • July (6)
  • June (6)
  • February (17)
  • January (69)
  • December (122)
  • November (56)
  • October (92)
  • September (76)
  • August (6)

  • Failed to install 'cordova-plugin-firebase': CordovaError: Uh oh - 9/21/2024
  • pyspark XPath Query Returns Lists Omitting Missing Values Instead of Including None - 9/20/2024
  • SQL REPL from within Python/Sqlalchemy/Psychopg2 - 9/20/2024
  • MySql Explain with Tobias Petry - 9/20/2024
  • How to combine information from different devices into one common abstract virtual disk? [closed] - 9/20/2024

Laravel News

  • Improved Installation and Frontend Hooks in Laravel Echo 2.1 - 5/15/2025
  • Filter Model Attributes with Laravel's New except() Method - 5/13/2025
  • Arr::from() Method in Laravel 12.14 - 5/14/2025
  • Streamline API Resources with Laravel's Fluent Methods - 5/13/2025
  • Customize URL Handling with Laravel's Macroable URI Class - 5/13/2025

Copyright © 2025 CoderFunda | Powered by Blogger
Design by Coderfunda | Blogger Theme by Coderfunda | Distributed By Coderfunda