
In Laravel, all requests are mapped with the help of routes. Basic routing routes the request to the associated controllers. This chapter discusses routing in Laravel.
Routing in Laravel includes the following categories −
- Basic Routing
- Route parameters
- Named Routes
Basic Routing
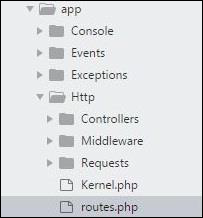
All the application routes are registered within the app/routes.php file. This file tells Laravel for the URIs it should respond to and the associated controller will give it a particular call. The sample route for the welcome page can be seen as shown in the screenshot given below −
Route::get ('/', function () {
   return view('welcome');});
Example
Observe the following example to understand more about Routing −
app/Http/routes.php
<?php
Route::get('/', function () {
   return view('welcome');
});
resources/view/welcome.blade.php
<!DOCTYPE html>
<html>
   <head>
      <title>Laravel</title>
      <link href = "https://fonts.googleapis.com/css?family=Lato:100" rel = "stylesheet"
         type = "text/css">

      <style>
         html, body {
            height: 100%;
         }
         body {
            margin: 0;
            padding: 0;
            width: 100%;
            display: table;
            font-weight: 100;
            font-family: 'Lato';
         }
         .container {
            text-align: center;
            display: table-cell;
            vertical-align: middle;
         }
         .content {
            text-align: center;
            display: inline-block;
         }
         .title {
            font-size: 96px;
         }
      </style>
   </head>

   <body>
      <div class = "container">

         <div class = "content">
            <div class = "title">Laravel 5.1</div>
         </div>

      </div>
   </body>
</html>
The routing mechanism is shown in the image given below −
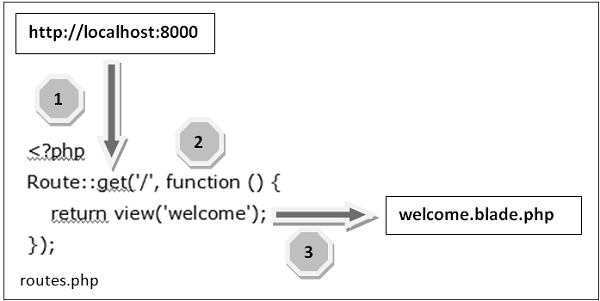
Let us now understand the steps involved in routing mechanism in detail −
Step 1 − Initially, we should execute the root URL of the application.
Step 2 − Now, the executed URL should match with the appropriate method in the route.php file. In the present case, it should match the method and the root (‘/’) URL. This will execute the related function.
Step 3 − The function calls the template file resources/views/welcome.blade.php. Next, the function calls the view()function with argument ‘welcome’ without using the blade.php. This will produce the HTML output as shown in the image below −

Route Parameters
Often in the application, we intend to capture the parameters passed with the URL. To do this, we need to modify the code in routes.php file accordingly. There are two ways by which we can capture the parameters passed with the URL.
You can capture the parameters in routes.php file in two ways as discussed here −
Required Parameters
These parameters are those which should be mandatorily captured for routing the web application. For example, it is important to capture the user’s identification number from the URL. This can be possible by defining route parameters as shown below −
Route::get('ID/{id}',function($id){
   echo 'ID: '.$id;
});
Optional Parameters
Sometimes developers can produce parameters as optional and it is possible with the inclusion of ? after the parameter name in URL. It is important to keep the default value mentioned as a parameter name. Look at the following example that shows how to define an optional parameter −
Route::get('user/{name?}', function ($name = 'TutorialsPoint') { return $name;});
The example above checks if the value matches to TutorialsPoint and accordingly routes to the defined URL.
Named Routes
Named routes allow a convenient way of creating routes. The chaining of routes can be specified using name method onto the route definition. The following code shows an example for creating named routes with controller −
Route::get('user/profile', 'UserController@showProfile')->name('profile');
The user controller will call for the function showProfile with parameter as profile. The parameters use name method onto the route definition.

I think this is an informative post and it is very useful and knowledgeable. therefore, I would like to thank you for the efforts you have made in writing this article.website development agency
ReplyDelete