CoderFunda
  • Home
  • About us
    • Contact Us
    • Disclaimer
    • Privacy Policy
    • About us
  • Home
  • Php
  • HTML
  • CSS
  • JavaScript
    • JavaScript
    • Jquery
    • JqueryUI
    • Stock
  • SQL
  • Vue.Js
  • Python
  • Wordpress
  • C++
    • C++
    • C
  • Laravel
    • Laravel
      • Overview
      • Namespaces
      • Middleware
      • Routing
      • Configuration
      • Application Structure
      • Installation
    • Overview
  • DBMS
    • DBMS
      • PL/SQL
      • SQLite
      • MongoDB
      • Cassandra
      • MySQL
      • Oracle
      • CouchDB
      • Neo4j
      • DB2
      • Quiz
    • Overview
  • Entertainment
    • TV Series Update
    • Movie Review
    • Movie Review
  • More
    • Vue. Js
    • Php Question
    • Php Interview Question
    • Laravel Interview Question
    • SQL Interview Question
    • IAS Interview Question
    • PCS Interview Question
    • Technology
    • Other

24 August, 2020

start xampp in ubuntu

 Programing Coderfunda     August 24, 2020     No comments   

To start XAMPP run the following and the command will return a list of running services:
sudo /opt/lampp/lampp start
Start XAMPP
To stop XAMPP run the command below and it will return a list of the stopped services.
sudo /opt/lampp/lampp stop
Stop XAMPP
You can also stop/start/restart individual services by appending “apache”, “mysql” or “ftp” to the end.
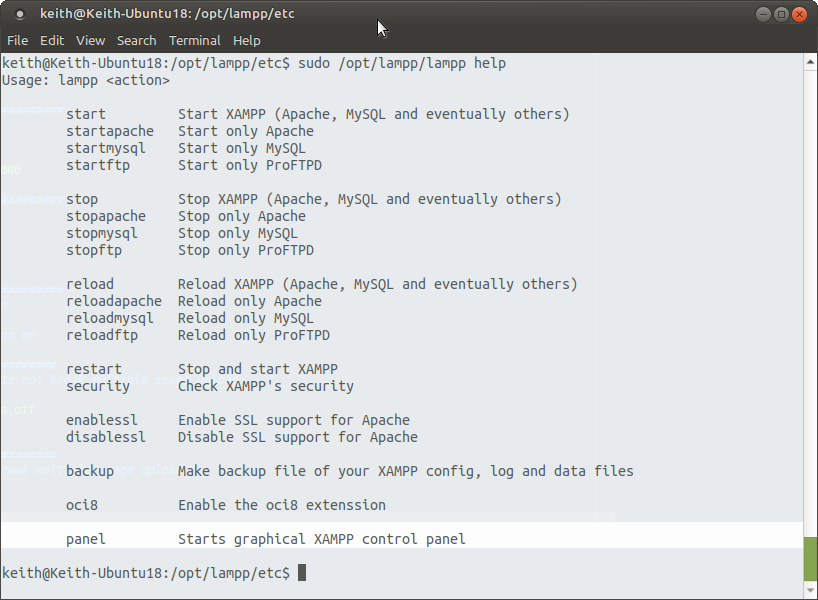
Ubuntu Help screen for XAMPP

Starting

start – Start XAMPP (Apache, MySQL and eventually others)
startapache – Start only Apache
startmysql – Start only MySQL
startftp – Start only ProFTPD

Stopping

stop – Stop XAMPP (Apache, MySQL and eventually others)
stopapache – Stop only Apache
stopmysql – Stop only MySQL
stopftp – Stop only ProFTPD

Restart

reload – Reload XAMPP (Apache, MySQL and eventually others)
reloadapache – Reload only Apache
reloadmysql – Reload only MySQL
reloadftp – Reload only ProFTPD
restart – Stop and start XAMPP

SSL & Security

security – Check XAMPP’s security
enablessl – Enable SSL support for Apache
disablessl – Disable SSL support for Apache

Config

backup – Make backup file of your XAMPP config, log and data files
oci8 – Enable the oci8 extenssion

GUI Panel

panel – Starts graphical XAMPP control panel
Read More
  • Share This:  
  •  Facebook
  •  Twitter
  •  Google+
  •  Stumble
  •  Digg

start xampp in ubuntu

 Programing Coderfunda     August 24, 2020     No comments   

To start XAMPP run the following and the command will return a list of running services:
sudo /opt/lampp/lampp start
Start XAMPP
To stop XAMPP run the command below and it will return a list of the stopped services.
sudo /opt/lampp/lampp stop
Stop XAMPP
You can also stop/start/restart individual services by appending “apache”, “mysql” or “ftp” to the end.
Ubuntu Help screen for XAMPP

Starting

start – Start XAMPP (Apache, MySQL and eventually others)
startapache – Start only Apache
startmysql – Start only MySQL
startftp – Start only ProFTPD

Stopping

stop – Stop XAMPP (Apache, MySQL and eventually others)
stopapache – Stop only Apache
stopmysql – Stop only MySQL
stopftp – Stop only ProFTPD

Restart

reload – Reload XAMPP (Apache, MySQL and eventually others)
reloadapache – Reload only Apache
reloadmysql – Reload only MySQL
reloadftp – Reload only ProFTPD
restart – Stop and start XAMPP

SSL & Security

security – Check XAMPP’s security
enablessl – Enable SSL support for Apache
disablessl – Disable SSL support for Apache

Config

backup – Make backup file of your XAMPP config, log and data files
oci8 – Enable the oci8 extenssion

GUI Panel

panel – Starts graphical XAMPP control panel
Read More
  • Share This:  
  •  Facebook
  •  Twitter
  •  Google+
  •  Stumble
  •  Digg

Running XAMPP on Ubuntu using Terminal

 Programing Coderfunda     August 24, 2020     No comments   

To start XAMPP run the following and the command will return a list of running services:
sudo /opt/lampp/lampp start
Start XAMPP
To stop XAMPP run the command below and it will return a list of the stopped services.
sudo /opt/lampp/lampp stop
Stop XAMPP
You can also stop/start/restart individual services by appending “apache”, “mysql” or “ftp” to the end.
Ubuntu Help screen for XAMPP

Starting

start – Start XAMPP (Apache, MySQL and eventually others)
startapache – Start only Apache
startmysql – Start only MySQL
startftp – Start only ProFTPD

Stopping

stop – Stop XAMPP (Apache, MySQL and eventually others)
stopapache – Stop only Apache
stopmysql – Stop only MySQL
stopftp – Stop only ProFTPD

Restart

reload – Reload XAMPP (Apache, MySQL and eventually others)
reloadapache – Reload only Apache
reloadmysql – Reload only MySQL
reloadftp – Reload only ProFTPD
restart – Stop and start XAMPP

SSL & Security

security – Check XAMPP’s security
enablessl – Enable SSL support for Apache
disablessl – Disable SSL support for Apache

Config

backup – Make backup file of your XAMPP config, log and data files
oci8 – Enable the oci8 extenssion

GUI Panel

panel – Starts graphical XAMPP control panel
Read More
  • Share This:  
  •  Facebook
  •  Twitter
  •  Google+
  •  Stumble
  •  Digg

21 August, 2020

Laravel 7/6 Multi Auth (Authentication) Tutorial

 Programing Coderfunda     August 21, 2020     No comments   

Step 1: Install Laravel 7/6
first of all we need to get fresh Laravel 6 version application using bellow command, So open your terminal OR command prompt and run bellow command:
composer create-project --prefer-dist laravel/laravel blog
Step 2: Database Configuration
In second step, we will make database configuration for example database name, username, password etc for our crud application of laravel 6. So let's open .env file and fill all details like as bellow:
.env
DB_CONNECTION=mysql

DB_HOST=127.0.0.1

DB_PORT=3306

DB_DATABASE=here your database name(blog)

DB_USERNAME=here database username(root)

DB_PASSWORD=here database password(root)
Read Also: 
 
Laravel 7.x - User ACL Roles and Permissions with Middleware using entrust from Scratch Tutorial
 
Step 3: Update Migration and Model
In this step, we need to add new row "is_admin" in users table and model. than we need to run migration. so let's change that on both file.
database/migrations/000_create_users_table.php
<?php


use Illuminate\Database\Migrations\Migration;

use Illuminate\Database\Schema\Blueprint;

use Illuminate\Support\Facades\Schema;


class CreateUsersTable extends Migration

{

/**

* Run the migrations.

*

* @return void

*/

public function up()

{

Schema::create('users', function (Blueprint $table) {

$table->bigIncrements('id');

$table->string('name');

$table->string('email');

$table->timestamp('email_verified_at')->nullable();

$table->boolean('is_admin')->nullable();

$table->string('password');

$table->rememberToken();

$table->timestamps();

});

}


/**

* Reverse the migrations.

*

* @return void

*/

public function down()

{

Schema::dropIfExists('users');

}

}
app/User.php
<?php


namespace App;


use Illuminate\Contracts\Auth\MustVerifyEmail;

use Illuminate\Foundation\Auth\User as Authenticatable;

use Illuminate\Notifications\Notifiable;


class User extends Authenticatable

{

use Notifiable;


/**

* The attributes that are mass assignable.

*

* @var array

*/

protected $fillable = [

'name', 'email', 'password', 'is_admin'

];


/**

* The attributes that should be hidden for arrays.

*

* @var array

*/

protected $hidden = [

'password', 'remember_token',

];


/**

* The attributes that should be cast to native types.

*

* @var array

*/

protected $casts = [

'email_verified_at' => 'datetime',

];

}
Now we need to run migration.
so let's run bellow command:
php artisan migrate
Step 4: Create Auth using scaffold
Now, in this step, we will create auth scaffold command to create login, register and dashboard. so run following commands:
Laravel 6 UI Package
composer require laravel/ui 
Generate auth
php artisan ui bootstrap --auth 
npm install
npm run dev
Step 5: Create IsAdmin Middleware
In this step, we require to create admin middleware that will allows only admin access users to that routes. so let's create admin user with following steps.
php artisan make:middleware IsAdmin
app/Http/middleware/IsAdmin.php
<?php


namespace App\Http\Middleware;


use Closure;


class IsAdmin

{

/**

* Handle an incoming request.

*

* @param \Illuminate\Http\Request $request

* @param \Closure $next

* @return mixed

*/

public function handle($request, Closure $next)

{

if(auth()->user()->is_admin == 1){

return $next($request);

}


return redirect(‘home’)->with(‘error’,"You don't have admin access.");

}

}
app/Http/Kernel.php
....

protected $routeMiddleware = [

'auth' => \App\Http\Middleware\Authenticate::class,

'auth.basic' => \Illuminate\Auth\Middleware\AuthenticateWithBasicAuth::class,

'bindings' => \Illuminate\Routing\Middleware\SubstituteBindings::class,

'cache.headers' => \Illuminate\Http\Middleware\SetCacheHeaders::class,

'can' => \Illuminate\Auth\Middleware\Authorize::class,

'guest' => \App\Http\Middleware\RedirectIfAuthenticated::class,

'signed' => \Illuminate\Routing\Middleware\ValidateSignature::class,

'throttle' => \Illuminate\Routing\Middleware\ThrottleRequests::class,

'verified' => \Illuminate\Auth\Middleware\EnsureEmailIsVerified::class,

'is_admin' => \App\Http\Middleware\IsAdmin::class,

];

....
Step 6: Create Route
Here, we need to add one more route for admin user home page so let's add that route in web.php file.
routes/web.php
Route::get('admin/home', 'HomeController@adminHome')->name('admin.home')->middleware('is_admin');
Step 7: Add Method on Controller
Here, we need add adminHome() method for admin route in HomeController. so let's add like as bellow:
app/Http/Controllers/HomeController.php
<?php


namespace App\Http\Controllers;


use Illuminate\Http\Request;


class HomeController extends Controller

{

/**

* Create a new controller instance.

*

* @return void

*/

public function __construct()

{

$this->middleware('auth');

}


/**

* Show the application dashboard.

*

* @return \Illuminate\Contracts\Support\Renderable

*/

public function index()

{

return view('home');

}


/**

* Show the application dashboard.

*

* @return \Illuminate\Contracts\Support\Renderable

*/

public function adminHome()

{

return view('adminHome');

}


}
Step 8: Create Blade file
In this step, we need to create new blade file for admin and update for user blade file. so let's change it.
resources/views/home.blade.php
@extends('layouts.app')


@section('content')

<div class="container">

<div class="row justify-content-center">

<div class="col-md-8">

<div class="card">

<div class="card-header">Dashboard</div>

<div class="card-body">

You are normal user.

</div>

</div>

</div>

</div>

</div>

@endsection
resources/views/adminHome.blade.php
@extends('layouts.app')


@section('content')

<div class="container">

<div class="row justify-content-center">

<div class="col-md-8">

<div class="card">

<div class="card-header">Dashboard</div>

<div class="card-body">

You are Admin.

</div>

</div>

</div>

</div>

</div>

@endsection
Step 9: Update on LoginController
In this step, we will change on LoginController, when user will login than we redirect according to user access. if normal user than we will redirect to home route and if admin user than we redirect to admin route. so let's change.
app/Http/Controllers/Auth/LoginController.php
<?php


namespace App\Http\Controllers\Auth;


use App\Http\Controllers\Controller;

use Illuminate\Foundation\Auth\AuthenticatesUsers;

use Illuminate\Http\Request;


class LoginController extends Controller

{

/*

|--------------------------------------------------------------------------

| Login Controller

|--------------------------------------------------------------------------

|

| This controller handles authenticating users for the application and

| redirecting them to your home screen. The controller uses a trait

| to conveniently provide its functionality to your applications.

|

*/


use AuthenticatesUsers;


/**

* Where to redirect users after login.

*

* @var string

*/

protected $redirectTo = '/home';


/**

* Create a new controller instance.

*

* @return void

*/

public function __construct()

{

$this->middleware('guest')->except('logout');

}


public function login(Request $request)

{

$input = $request->all();


$this->validate($request, [

'email' => 'required|email',

'password' => 'required',

]);


if(auth()->attempt(array('email' => $input['email'], 'password' => $input['password'])))

{

if (auth()->user()->is_admin == 1) {

return redirect()->route('admin.home');

}else{

return redirect()->route('home');

}

}else{

return redirect()->route('login')

->with('error','Email-Address And Password Are Wrong.');

}


}

}
Step 10: Create Seeder
We will create seeder for create new admin and normal user. so let's create seeder using following command:
php artisan make:seeder CreateUsersSeeder
database/seeds/CreateUsersSeeder.php
<?php


use Illuminate\Database\Seeder;

use App\User;


class CreateUsersSeeder extends Seeder

{

/**

* Run the database seeds.

*

* @return void

*/

public function run()

{

$user = [

[

'name'=>'Admin',

'email'=>'admin@itsolutionstuff.com',

'is_admin'=>'1',

'password'=> bcrypt('123456'),

],

[

'name'=>'User',

'email'=>'user@itsolutionstuff.com',

'is_admin'=>'0',

'password'=> bcrypt('123456'),

],

];


foreach ($user as $key => $value) {

User::create($value);

}

}

}
Now let's run seeder:
php artisan db:seed --class=CreateUsersSeeder
Ok, now we are ready to run.
So let's run project using this command:
php artisan serve
Admin User
Email: admin@itsolutionstuff.com

Password: 123456
Read More
  • Share This:  
  •  Facebook
  •  Twitter
  •  Google+
  •  Stumble
  •  Digg

Laravel 7/6 Multi Auth (Authentication) Tutorial

 Programing Coderfunda     August 21, 2020     No comments   

Step 1: Install Laravel 7/6
first of all we need to get fresh Laravel 6 version application using bellow command, So open your terminal OR command prompt and run bellow command:
composer create-project --prefer-dist laravel/laravel blog
Step 2: Database Configuration
In second step, we will make database configuration for example database name, username, password etc for our crud application of laravel 6. So let's open .env file and fill all details like as bellow:
.env
DB_CONNECTION=mysql
DB_HOST=127.0.0.1
DB_PORT=3306
DB_DATABASE=here your database name(blog)
DB_USERNAME=here database username(root)
DB_PASSWORD=here database password(root)
Read Also: 
 
Laravel 7.x - User ACL Roles and Permissions with Middleware using entrust from Scratch Tutorial
 
Step 3: Update Migration and Model
In this step, we need to add new row "is_admin" in users table and model. than we need to run migration. so let's change that on both file.
database/migrations/000_create_users_table.php
<?php

use Illuminate\Database\Migrations\Migration;
use Illuminate\Database\Schema\Blueprint;
use Illuminate\Support\Facades\Schema;

class CreateUsersTable extends Migration
{
/**
* Run the migrations.
*
* @return void
*/
public function up()
{
Schema::create('users', function (Blueprint $table) {
$table->bigIncrements('id');
$table->string('name');
$table->string('email');
$table->timestamp('email_verified_at')->nullable();
$table->boolean('is_admin')->nullable();
$table->string('password');
$table->rememberToken();
$table->timestamps();
});
}

/**
* Reverse the migrations.
*
* @return void
*/
public function down()
{
Schema::dropIfExists('users');
}
}
app/User.php
<?php

namespace App;

use Illuminate\Contracts\Auth\MustVerifyEmail;
use Illuminate\Foundation\Auth\User as Authenticatable;
use Illuminate\Notifications\Notifiable;

class User extends Authenticatable
{
use Notifiable;

/**
* The attributes that are mass assignable.
*
* @var array
*/
protected $fillable = [
'name', 'email', 'password', 'is_admin'
];

/**
* The attributes that should be hidden for arrays.
*
* @var array
*/
protected $hidden = [
'password', 'remember_token',
];

/**
* The attributes that should be cast to native types.
*
* @var array
*/
protected $casts = [
'email_verified_at' => 'datetime',
];
}
Now we need to run migration.
so let's run bellow command:
php artisan migrate
Step 4: Create Auth using scaffold
Now, in this step, we will create auth scaffold command to create login, register and dashboard. so run following commands:
Laravel 6 UI Package
composer require laravel/ui 
Generate auth
php artisan ui bootstrap --auth 
npm install
npm run dev
Step 5: Create IsAdmin Middleware
In this step, we require to create admin middleware that will allows only admin access users to that routes. so let's create admin user with following steps.
php artisan make:middleware IsAdmin
app/Http/middleware/IsAdmin.php
<?php

namespace App\Http\Middleware;

use Closure;

class IsAdmin
{
/**
* Handle an incoming request.
*
* @param \Illuminate\Http\Request $request
* @param \Closure $next
* @return mixed
*/
public function handle($request, Closure $next)
{
if(auth()->user()->is_admin == 1){
return $next($request);
}

return redirect(‘home’)->with(‘error’,"You don't have admin access.");
}
}
app/Http/Kernel.php
....
protected $routeMiddleware = [
'auth' => \App\Http\Middleware\Authenticate::class,
'auth.basic' => \Illuminate\Auth\Middleware\AuthenticateWithBasicAuth::class,
'bindings' => \Illuminate\Routing\Middleware\SubstituteBindings::class,
'cache.headers' => \Illuminate\Http\Middleware\SetCacheHeaders::class,
'can' => \Illuminate\Auth\Middleware\Authorize::class,
'guest' => \App\Http\Middleware\RedirectIfAuthenticated::class,
'signed' => \Illuminate\Routing\Middleware\ValidateSignature::class,
'throttle' => \Illuminate\Routing\Middleware\ThrottleRequests::class,
'verified' => \Illuminate\Auth\Middleware\EnsureEmailIsVerified::class,
'is_admin' => \App\Http\Middleware\IsAdmin::class,
];
....
Step 6: Create Route
Here, we need to add one more route for admin user home page so let's add that route in web.php file.
routes/web.php
Route::get('admin/home', 'HomeController@adminHome')->name('admin.home')->middleware('is_admin');
Step 7: Add Method on Controller
Here, we need add adminHome() method for admin route in HomeController. so let's add like as bellow:
app/Http/Controllers/HomeController.php
<?php

namespace App\Http\Controllers;

use Illuminate\Http\Request;

class HomeController extends Controller
{
/**
* Create a new controller instance.
*
* @return void
*/
public function __construct()
{
$this->middleware('auth');
}

/**
* Show the application dashboard.
*
* @return \Illuminate\Contracts\Support\Renderable
*/
public function index()
{
return view('home');
}

/**
* Show the application dashboard.
*
* @return \Illuminate\Contracts\Support\Renderable
*/
public function adminHome()
{
return view('adminHome');
}

}
Step 8: Create Blade file
In this step, we need to create new blade file for admin and update for user blade file. so let's change it.
resources/views/home.blade.php
@extends('layouts.app')

@section('content')
<div class="container">
<div class="row justify-content-center">
<div class="col-md-8">
<div class="card">
<div class="card-header">Dashboard</div>
<div class="card-body">
You are normal user.
</div>
</div>
</div>
</div>
</div>
@endsection
resources/views/adminHome.blade.php
@extends('layouts.app')

@section('content')
<div class="container">
<div class="row justify-content-center">
<div class="col-md-8">
<div class="card">
<div class="card-header">Dashboard</div>
<div class="card-body">
You are Admin.
</div>
</div>
</div>
</div>
</div>
@endsection
Step 9: Update on LoginController
In this step, we will change on LoginController, when user will login than we redirect according to user access. if normal user than we will redirect to home route and if admin user than we redirect to admin route. so let's change.
app/Http/Controllers/Auth/LoginController.php
<?php

namespace App\Http\Controllers\Auth;

use App\Http\Controllers\Controller;
use Illuminate\Foundation\Auth\AuthenticatesUsers;
use Illuminate\Http\Request;

class LoginController extends Controller
{
/*
|--------------------------------------------------------------------------
| Login Controller
|--------------------------------------------------------------------------
|
| This controller handles authenticating users for the application and
| redirecting them to your home screen. The controller uses a trait
| to conveniently provide its functionality to your applications.
|
*/

use AuthenticatesUsers;

/**
* Where to redirect users after login.
*
* @var string
*/
protected $redirectTo = '/home';

/**
* Create a new controller instance.
*
* @return void
*/
public function __construct()
{
$this->middleware('guest')->except('logout');
}

public function login(Request $request)
{
$input = $request->all();

$this->validate($request, [
'email' => 'required|email',
'password' => 'required',
]);

if(auth()->attempt(array('email' => $input['email'], 'password' => $input['password'])))
{
if (auth()->user()->is_admin == 1) {
return redirect()->route('admin.home');
}else{
return redirect()->route('home');
}
}else{
return redirect()->route('login')
->with('error','Email-Address And Password Are Wrong.');
}

}
}
Step 10: Create Seeder
We will create seeder for create new admin and normal user. so let's create seeder using following command:
php artisan make:seeder CreateUsersSeeder
database/seeds/CreateUsersSeeder.php
<?php

use Illuminate\Database\Seeder;
use App\User;

class CreateUsersSeeder extends Seeder
{
/**
* Run the database seeds.
*
* @return void
*/
public function run()
{
$user = [
[
'name'=>'Admin',
'email'=>'admin@itsolutionstuff.com',
'is_admin'=>'1',
'password'=> bcrypt('123456'),
],
[
'name'=>'User',
'email'=>'user@itsolutionstuff.com',
'is_admin'=>'0',
'password'=> bcrypt('123456'),
],
];

foreach ($user as $key => $value) {
User::create($value);
}
}
}
Now let's run seeder:
php artisan db:seed --class=CreateUsersSeeder
Ok, now we are ready to run.
So let's run project using this command:
php artisan serve
Admin User
Email: admin@itsolutionstuff.com
Password: 123456
Read More
  • Share This:  
  •  Facebook
  •  Twitter
  •  Google+
  •  Stumble
  •  Digg
Newer Posts Older Posts Home

Meta

Popular Posts

  • Write API Integrations in Laravel and PHP Projects with Saloon
    Write API Integrations in Laravel and PHP Projects with Saloon Saloon  is a Laravel/PHP package that allows you to write your API integratio...
  • Credit card validation in laravel
      Validation rules for credit card using laravel-validation-rules/credit-card package in laravel Install package laravel-validation-rules/cr...
  • iOS 17 Force Screen Rotation not working on iPAD only
    I have followed all the links on Google and StackOverFlow, unfortunately, I could not find any reliable solution Specifically for iPad devic...
  • Fast Excel Package for Laravel
      Fast Excel is a Laravel package for importing and exporting spreadsheets. It provides an elegant wrapper around Spout —a PHP package to ...
  • C++ in Hindi Introduction
    C ++ का परिचय C ++ एक ऑब्जेक्ट ओरिएंटेड प्रोग्रामिंग लैंग्वेज है। C ++ को Bjarne Stroustrup द्वारा विकसित किया गया था। C ++ में आने से पह...

Categories

  • Ajax (26)
  • Bootstrap (30)
  • DBMS (42)
  • HTML (12)
  • HTML5 (45)
  • JavaScript (10)
  • Jquery (34)
  • Jquery UI (2)
  • JqueryUI (32)
  • Laravel (1017)
  • Laravel Tutorials (23)
  • Laravel-Question (6)
  • Magento (9)
  • Magento 2 (95)
  • MariaDB (1)
  • MySql Tutorial (2)
  • PHP-Interview-Questions (3)
  • Php Question (13)
  • Python (36)
  • RDBMS (13)
  • SQL Tutorial (79)
  • Vue.js Tutorial (68)
  • Wordpress (150)
  • Wordpress Theme (3)
  • codeigniter (108)
  • oops (4)
  • php (853)

Social Media Links

  • Follow on Twitter
  • Like on Facebook
  • Subscribe on Youtube
  • Follow on Instagram

Pages

  • Home
  • Contact Us
  • Privacy Policy
  • About us

Blog Archive

  • September (100)
  • August (50)
  • July (56)
  • June (46)
  • May (59)
  • April (50)
  • March (60)
  • February (42)
  • January (53)
  • December (58)
  • November (61)
  • October (39)
  • September (36)
  • August (36)
  • July (34)
  • June (34)
  • May (36)
  • April (29)
  • March (82)
  • February (1)
  • January (8)
  • December (14)
  • November (41)
  • October (13)
  • September (5)
  • August (48)
  • July (9)
  • June (6)
  • May (119)
  • April (259)
  • March (122)
  • February (368)
  • January (33)
  • October (2)
  • July (11)
  • June (29)
  • May (25)
  • April (168)
  • March (93)
  • February (60)
  • January (28)
  • December (195)
  • November (24)
  • October (40)
  • September (55)
  • August (6)
  • July (48)
  • May (2)
  • January (2)
  • July (6)
  • June (6)
  • February (17)
  • January (69)
  • December (122)
  • November (56)
  • October (92)
  • September (76)
  • August (6)

Loading...

Laravel News

Loading...

Copyright © CoderFunda | Powered by Blogger
Design by Coderfunda | Blogger Theme by Coderfunda | Distributed By Coderfunda