
Vue.js Component
Vue.js components are one of Vue.js' most important features and used to create custom elements that can be reused in HTML. Components are the reusable Vue.js instances with a name. We can use a component as a custom element inside a root Vue.js instance.
Following is the syntax to create a component.
Syntax:
Let's create a component to understand it better how components work with Vue.js. See the following example:
Index.html file:
Index.js file:
Let's use a simple CSS file to make the output more attractive.
Index.css file:
After the execution of the program, you will see the following output:
Output:
This is a component example
This is a component example
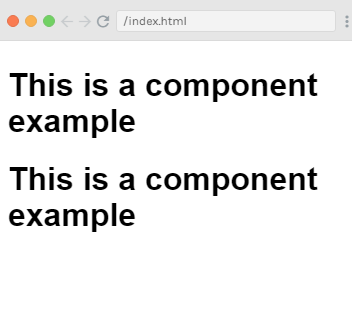
Example Explanation
In the above example, we have created two div with id component_test1 and component_test2 in the Index.html file. Once a component is created, the name of the component becomes the custom element and we can use this custom element in the Vue instance element created, i.e. inside the div with ids component_test1 and component_test2. Here, we have used a test component as the name of the component and the same name is used as the custom element inside the divs.
In the Index .js file, we have created two Vue.js instances with the respective div ids.
We have created a common component to use with both the view instances.
Local registration of Components
We can directly make the components a part of vue.js instance by using the following code in Index.js file. This method is called local registration. Here, the components will be a part of only the created vue instance.
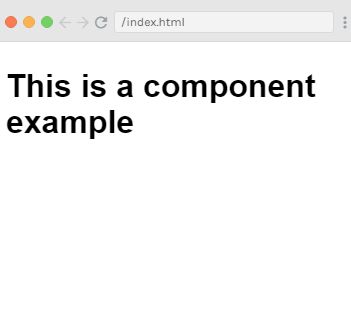
After the execution of the program, you will see the following output:
Output:
Vue.js components with more options
We can add some more options such as data and methods to Vue.js components. It is same as we have added data and methods to Vue.js instance. See the following example:
Index.html file:
Index.js file:
In the above Index.js file, we have added a data in the form of a function that returns an object. The object has a name property, which has assigned the value 'Panda'. See the following template used in the example.
Here, we are using data as a function in components and we also use its properties the same way as we use with direct Vue instance. Here, we have used two methods, changename and originalname. In changename, we are changing the name property, and in originalname we are resetting it back to the original name.
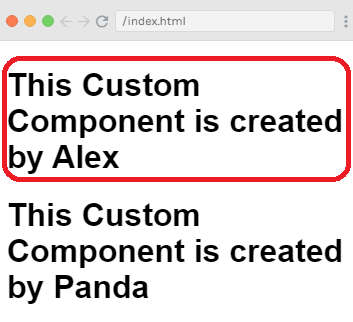
We have also added two events on the div, mouseover and mouseout. Here, mouseover event is used to call changename method and mouseout event is used to call originalname method.
Now, execute the above program to see the output. After the execution of the program, you will see the following output:
Output:
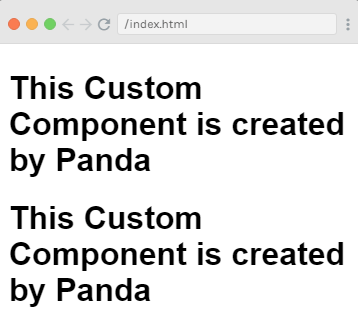
You can see that the output displays the assigned name "Panda" which we have set in the data property in the Index.js file. We have also assigned a mouseover and a mouseout event on the div. So on mouseover, you will see that the name of the components are changed to Alex, and when mouseout, it will remain the same as Panda.
Vue.js Dynamic Components
Dynamic component means, a component which location in the application is not defined at buildtime. We don't define it in any Vue.js template. Instead of this, the dynamic component is instantiated and placed in the application at runtime. In Vue.js, a dynamic component is created using the keyword <component></component> and it is bound using a property. Let's take an example to understand it clearly.
Index.html file:
Index.js file:
Let's use a simple CSS file to make the output more attractive.
Index.css file:
After the execution of the program, you will see the following output:
Output:
This is a Dynamic Component Example
Example explanation
In the above example, you can see that the Dynamic component is created by using the following syntax.
Here, it has v-bind:is = "view", and a value view is assigned to it. View is defined in the Vue instance as follows.
After the execution, you can see that the template displays that "This is a Dynamic Component Example" in the browser.
By Source : javatoint


0 comments:
Post a Comment
Thanks