
Vue.js Form Input Bindings
Vue.js provides a v-model directive that can be used to create two-way data bindings on form inputs, text, textarea, and select fields.
The v-model directive automatically picks the correct way of updating the element according to the input type. It provides two-way data binding by binding the input text element and the value binded to a variable assigned. The v-model directive uses different properties internally and emits different events for different types of input elements. Generally, we use three types of binding in form input binding:
- Textarea Binding: In this binding, we use text and textarea to bind the value property and input event.
- Radio and Select Binding: In this binding, we use checkboxes and radiobuttons to bind the checked property and change event.
- Modifiers Binding: We can also use modifiers like .lazy, .trim, .number, etc. in Form input binding examples.
Textarea Binding
Let's take a simple example to demonstrate textarea binding:
Index.html file:
Index.js file:
Index.css file:
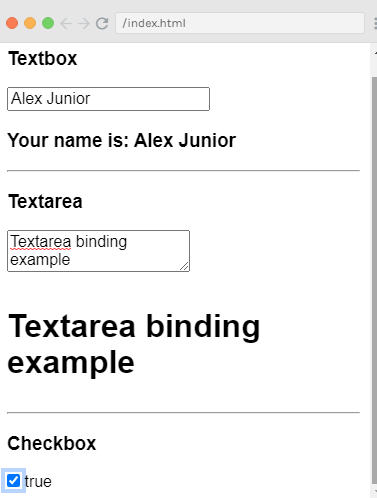
After the execution of the program, you will see the following output:
Output:
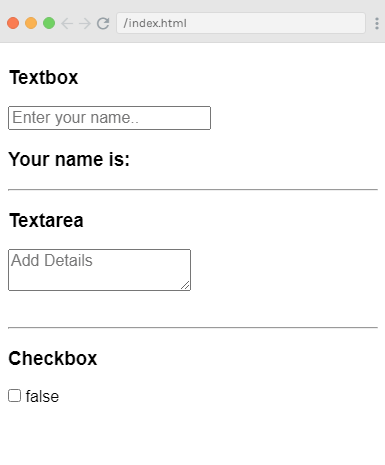
You can see that the textbox and textarea are empty now. The checkbox is also unchecked and shows the false value. Now, type some value in textbox and textarea, the v-model is assigned the value name and the name is displayed in {{name}}, which displays whatever is typed in the textbox. In the same way, the value will be displayed that is written in textarea.
Radio and Select Binding
Let's take a simple example to demonstrate radio and select binding:
Index.html file:
Index.js file:
After the execution of the program, you will see the following output:
Output:
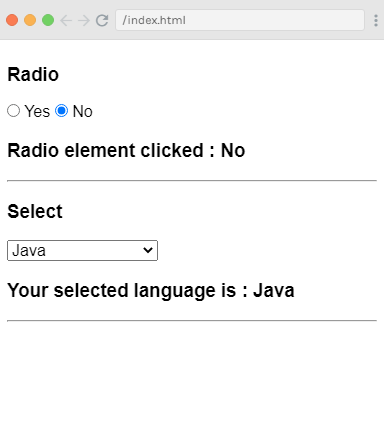
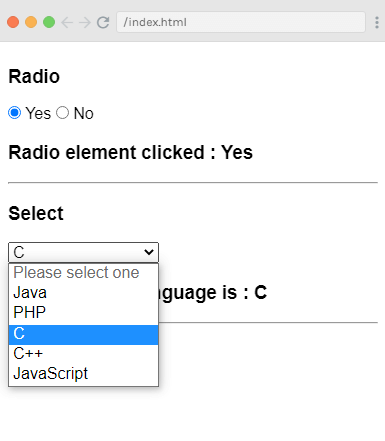
You can see that the default selected radio element is No and selected language is Java. Now, you can change the value as you required. See the following output:
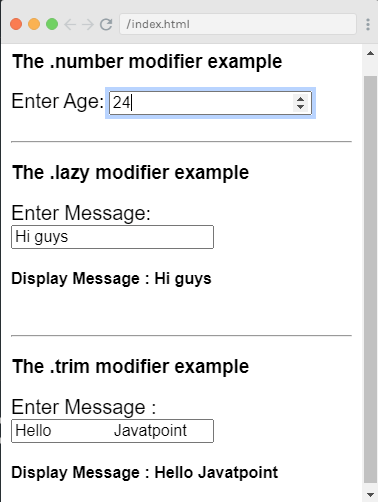
Modifier Binding
Let's see an example to demonstrate all three modifiers .trim, .number, and .lazy altogether.
.number Modifier: It is used when you want user input to be typecast as a number automatically. It allows you to enter numbers only. It does not take any other input besides numbers.
.lazy Modifier: It is used to display the content present in the textbox only after it is fully entered and the user leaves the textbox. The v-model syncs the input with the data after each input event by default.
.trim Modifier: This modifier is used to trim the whitespace from user input automatically. It removes any spaces entered at the start and at the end.
Index.html
Index.js
After the execution of the program, you will see the following output:
Output:
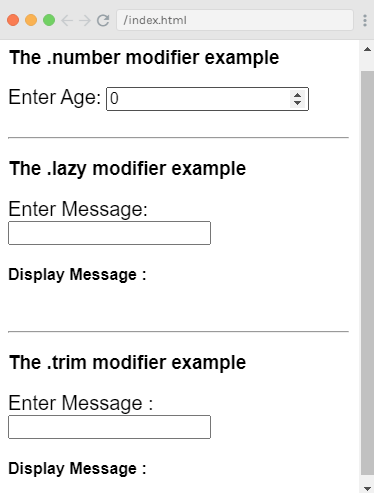
You can see that every modifier is empty. Now, you can enter any values to see the result as the following output.


0 comments:
Post a Comment
Thanks