CoderFunda
  • Home
  • About us
    • Contact Us
    • Disclaimer
    • Privacy Policy
    • About us
  • Home
  • Php
  • HTML
  • CSS
  • JavaScript
    • JavaScript
    • Jquery
    • JqueryUI
    • Stock
  • SQL
  • Vue.Js
  • Python
  • Wordpress
  • C++
    • C++
    • C
  • Laravel
    • Laravel
      • Overview
      • Namespaces
      • Middleware
      • Routing
      • Configuration
      • Application Structure
      • Installation
    • Overview
  • DBMS
    • DBMS
      • PL/SQL
      • SQLite
      • MongoDB
      • Cassandra
      • MySQL
      • Oracle
      • CouchDB
      • Neo4j
      • DB2
      • Quiz
    • Overview
  • Entertainment
    • TV Series Update
    • Movie Review
    • Movie Review
  • More
    • Vue. Js
    • Php Question
    • Php Interview Question
    • Laravel Interview Question
    • SQL Interview Question
    • IAS Interview Question
    • PCS Interview Question
    • Technology
    • Other

28 December, 2020

Vue.js Template

 Programing Coderfunda     December 28, 2020     Vue.js Tutorial     No comments   

Vue.js Template

In the previous Vue.js Instance chapter, we have learned how to get an output in the form of text content on the screen. In this chapter, we will learn how to get an output in the form of an HTML template on the screen. Vue.js uses an HTML-based template syntax that facilitates Vue.js developers to declaratively bind the rendered DOM to the underlying Vue instance's data. All Vue.js templates are valid HTML that can be parsed by spec-compliant browsers and HTML parsers.

If you choose the simple interpolation method i.e., with double curly brackets to display the HTML content on the web browser, it will show the wrong result.

Let's take a simple example and see the output to understand this concept well.

Index.html file:

  1. <html>  
  2.    <head>  
  3.       <title>Vue.js Template</title>  
  4.       <link rel="stylesheet" href="index.css">  
  5.         <script src="https://cdn.jsdelivr.net/npm/vue/dist/vue.js"></script>  
  6.     </head>  
  7.     <body>      
  8.       <div id = "app">  
  9.          <h1>Firstname : {{firstname}}</h1>  
  10.          <h1>Lastname : {{lastname}}</h1>  
  11.          <div>{{htmlcontent}}</div>  
  12.       </div>  
  13.       <script src="index.js"></script>  
  14.    </body>  
  15. </html>  

Index.js file:

  1. var vm = new Vue({  
  2.    el: '#app',  
  3.    data: {  
  4.       firstname : "Albert",  
  5.       lastname : "Pinto",  
  6.       htmlcontent : "<div><h1>This is Vue.js Template Example</h1></div>"  
  7.    }  
  8. })  

Let's use a simple CSS file to make the output more attractive.

Index.css file:

  1. html, body {  
  2.     margin: 5px;  
  3.     padding: 0;  
  4. }  

After the execution of the program, you will see the following output:

Output:

Firstname : Albert
Lastname : Pinto
<div><h1>This is Vue.js Template Example</h1></div>
Vue.js Template

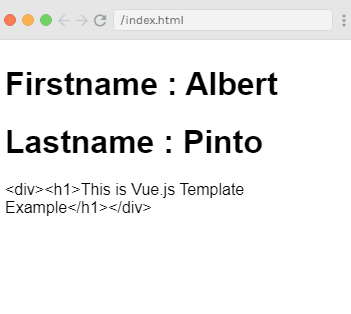
In the above example, you can see that the html content is not shown on the browser as you want to show it. The html content is displayed in the same way you have specified in the variable htmlcontent. This is not what you want. We want to display it in a proper HTML content on the browser.

To resolve this issue, we will have to use v-html directive. When we assign v-html directive to the html element, Vue.js knows that it has to output it as HTML content.

Now, add the v-html directive in the .html file and see the difference in the following example.

Syntax:

  1. <div v-html = "htmlcontent"></div>   

Example2:

Index.html file:

  1. <html>  
  2.    <head>  
  3.       <title>Vue.js Template</title>  
  4.       <link rel="stylesheet" href="index.css">  
  5.         <script src="https://cdn.jsdelivr.net/npm/vue/dist/vue.js"></script>  
  6.     </head>  
  7.     <body>      
  8.       <div id = "app">  
  9.          <h1>Firstname : {{firstname}}</h1>  
  10.          <h1>Lastname : {{lastname}}</h1>  
  11.          <div v-html = "htmlcontent"></div>  
  12.       </div>  
  13.       <script src="index.js"></script>  
  14.    </body>  
  15. </html>  

Index.js file:

  1. var vm = new Vue({  
  2.    el: '#app',  
  3.    data: {  
  4.       firstname : "Albert",  
  5.       lastname : "Pinto",  
  6.       htmlcontent : "<div><h1>This is Vue.js Template Example</h1></div>"  
  7.    }  
  8. })  

After the execution of the program, you will see the following output:

Output:

Firstname : Albert
Lastname : Pinto
This is Vue.js Template Example
Vue.js Template

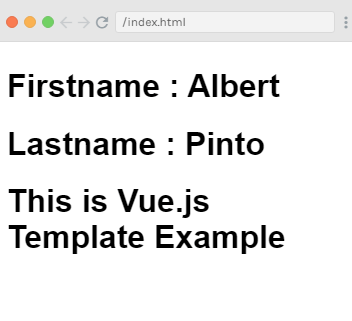
In the above example, you can see that after using the v-html directive, you can successfully add HTML template to the DOM. Now, let's see how to add attributes to the exiting HTML elements.

Add attributes to HTML element

Suppose, we have an image tag in the HTML file and we want to assign src, which is a part of Vue.js. See the following example:

Index.html file:

  1. <html>  
  2.    <head>  
  3.       <title>Vue.js Template</title>  
  4.       <link rel="stylesheet" href="index.css">  
  5.         <script src="https://cdn.jsdelivr.net/npm/vue/dist/vue.js"></script>  
  6.     </head>  
  7.     <body>      
  8.       <div id = "app">  
  9.          <h1>Firstname : {{firstname}}</h1>  
  10.          <h1>Lastname : {{lastname}}</h1>  
  11.          <div v-html = "htmlcontent"></div>  
  12.           <img src = "" width = "300" height = "250" />  
  13.       </div>  
  14.       <script src="index.js"></script>  
  15.    </body>  
  16. </html>  

Index.js file:

  1. var vm = new Vue({  
  2.    el: '#app',  
  3.    data: {  
  4.       firstname : "Albert",  
  5.       lastname : "Pinto",  
  6.       htmlcontent : "<div><h1>This is Vue.js Template Example</h1></div>",  
  7.       imgsrc : "https://www.fiordalisa.ch/wp-content/uploads/2017/12/IMG_4610.jpg"  
  8.    }  
  9. })  

After the execution of the program, you will see the following output:

Output:

Vue.js Template

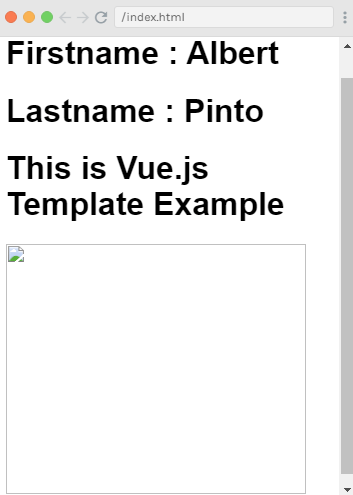
In the above example, you can see that the image is broken. So, we have to use v-bind directive to assign any attribute to the HMTL tag.

Let's add the src to the image with v-bind directive. See the following example:

Example3:

Index.html:

  1. <html>  
  2.    <head>  
  3.       <title>Vue.js Template</title>  
  4.       <link rel="stylesheet" href="index.css">  
  5.         <script src="https://cdn.jsdelivr.net/npm/vue/dist/vue.js"></script>  
  6.     </head>  
  7.     <body>      
  8.       <div id = "app">  
  9.          <h1>Firstname : {{firstname}}</h1>  
  10.          <h1>Lastname : {{lastname}}</h1>  
  11.          <div v-html = "htmlcontent"></div>  
  12.           <img v-bind:src = "imgsrc" width = "300" height = "250" />  
  13.       </div>  
  14.       <script src="index.js"></script>  
  15.    </body>  
  16. </html>  

Index.js:

  1. var vm = new Vue({  
  2.    el: '#app',  
  3.    data: {  
  4.       firstname : "Albert",  
  5.       lastname : "Pinto",  
  6.       htmlcontent : "<div><h1>This is Vue.js Template Example</h1></div>",  
  7.       imgsrc : "https://www.fiordalisa.ch/wp-content/uploads/2017/12/IMG_4610.jpg"  
  8.    }  
  9. })  

After the execution of the program, you will see the following output:

Output:

Vue.js Template

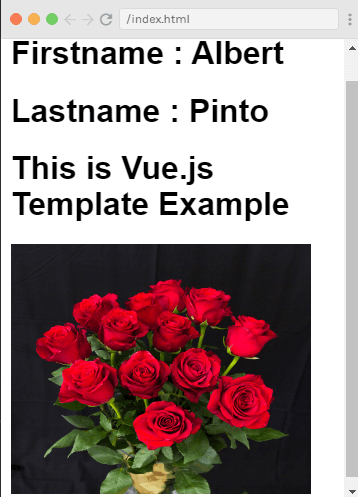
You see that after adding the v-bind directive to the img src, the image is loaded completely.


Source By : Javatpoint

  • Share This:  
  •  Facebook
  •  Twitter
  •  Google+
  •  Stumble
  •  Digg
Email ThisBlogThis!Share to XShare to Facebook
Newer Post Older Post Home

0 comments:

Post a Comment

Thanks

Meta

Popular Posts

  • Write API Integrations in Laravel and PHP Projects with Saloon
    Write API Integrations in Laravel and PHP Projects with Saloon Saloon  is a Laravel/PHP package that allows you to write your API integratio...
  • Features CodeIgniter
    Features CodeIgniter There is a great demand for the CodeIgniter framework in PHP developers because of its features and multiple advan...
  • Laravel Breeze with PrimeVue v4
    This is an follow up to my previous post about a "starter kit" I created with Laravel and PrimeVue components. The project has b...
  • Fast Excel Package for Laravel
      Fast Excel is a Laravel package for importing and exporting spreadsheets. It provides an elegant wrapper around Spout —a PHP package to ...
  • Send message via CANBus
    After some years developing for mobile devices, I've started developing for embedded devices, and I'm finding a new problem now. Th...

Categories

  • Ajax (26)
  • Bootstrap (30)
  • DBMS (42)
  • HTML (12)
  • HTML5 (45)
  • JavaScript (10)
  • Jquery (34)
  • Jquery UI (2)
  • JqueryUI (32)
  • Laravel (1017)
  • Laravel Tutorials (23)
  • Laravel-Question (6)
  • Magento (9)
  • Magento 2 (95)
  • MariaDB (1)
  • MySql Tutorial (2)
  • PHP-Interview-Questions (3)
  • Php Question (13)
  • Python (36)
  • RDBMS (13)
  • SQL Tutorial (79)
  • Vue.js Tutorial (68)
  • Wordpress (150)
  • Wordpress Theme (3)
  • codeigniter (108)
  • oops (4)
  • php (853)

Social Media Links

  • Follow on Twitter
  • Like on Facebook
  • Subscribe on Youtube
  • Follow on Instagram

Pages

  • Home
  • Contact Us
  • Privacy Policy
  • About us

Blog Archive

  • September (100)
  • August (50)
  • July (56)
  • June (46)
  • May (59)
  • April (50)
  • March (60)
  • February (42)
  • January (53)
  • December (58)
  • November (61)
  • October (39)
  • September (36)
  • August (36)
  • July (34)
  • June (34)
  • May (36)
  • April (29)
  • March (82)
  • February (1)
  • January (8)
  • December (14)
  • November (41)
  • October (13)
  • September (5)
  • August (48)
  • July (9)
  • June (6)
  • May (119)
  • April (259)
  • March (122)
  • February (368)
  • January (33)
  • October (2)
  • July (11)
  • June (29)
  • May (25)
  • April (168)
  • March (93)
  • February (60)
  • January (28)
  • December (195)
  • November (24)
  • October (40)
  • September (55)
  • August (6)
  • July (48)
  • May (2)
  • January (2)
  • July (6)
  • June (6)
  • February (17)
  • January (69)
  • December (122)
  • November (56)
  • October (92)
  • September (76)
  • August (6)

Loading...

Laravel News

Loading...

Copyright © CoderFunda | Powered by Blogger
Design by Coderfunda | Blogger Theme by Coderfunda | Distributed By Coderfunda