
Vue.js Custom Directives
Vue.js directives are used in Vue.js applications to make them reusable and straightforward. Directives are just like instructions that can be used in Vue.js applications to do things in a specific way. We have already used simple conditional directives such as v-if, v-show, v-else, v-for, v-bind, v-model, v-on, etc. in our https://coderfunda.blogspot.com/ page.
Here, we will learn how to create custom and global directives and use them just like we did in Vue. js components https://coderfunda.blogspot.com/ because Vue.js allows us to create our own custom directives.
Syntax:
Example Explanation
In the above example, you can see that we have created a custom directive named "changestyle" as following:
- Vue.directive("changestyle",{
- bind(e1,binding, vnode) {
- console.log(e1);
- e1.style.color = "red";
- e1.style.fontSize = "20px";
- }
- });
Now, the custom directive "changestyle" is assigned to a div as follows:
- <div v-changestyle>Vue.js Custom Directive Example</div>
How to pass a value to the custom directive?
We can pass values to the custom directive by binding values to them. Binding is like arguments passed to the custom directive.
Syntax:
- v-changestyle = "{color:'the_color_name'}".
Let's take an example to demonstrate how to pass a value to the custom directive.
Index.html:
- <html>
- <head>
- <title>Vue.js Custom Directive</title>
- <link rel="stylesheet" href="index.css">
- <script src="https://cdn.jsdelivr.net/npm/vue/dist/vue.js"></script>
- </head>
- <body>
- <div id = "directive">
- <div v-changestyle = "{color:'green'}">Passing value to custom directive example</div>
- </div>
- <script type = "text/javascript">
- Vue.directive("changestyle",{
- bind(e1,binding, vnode) {
- console.log(e1);
- console.log(binding.value.color);
- console.log(vnode);
- e1.style.color=binding.value.color;
- e1.style.fontSize = "20px";
- }
- });
- </script>
- <script src="index.js"></script>
- </body>
- </html>
Index.js:
- var vm = new Vue({
- el: '#directive',
- data: {
- },
- methods : {
- },
- })
After the execution of the program, you will see the following output:
Output:
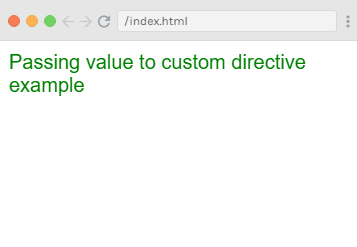
You can see that the value is passed in the directive and the color of the text is changed to green. The value is passed by using the following code:
- <div v-changestyle = "{color:'green'}">Passing value to custom directive example</div>
It is accessed by using the following code:
- Vue.directive("changestyle",{
- bind(e1,binding, vnode) {
- console.log(e1);
- console.log(binding.value.color);
- console.log(vnode);
- e1.style.color=binding.value.color;
- e1.style.fontSize = "20px";
- }
- });
Using Filters with Custom Directives
Vue.js supports filters that can be used in text formatting. The filters are generally used along with v-bind and interpolations ({{}}). We require using a pipe symbol at the end of JavaScript expression for filters.
Let's see an example to demonstrate the use of filters in the custom directive.
Index.html file:
- <html>
- <head>
- <title>Vue.js Custom Directive</title>
- <link rel="stylesheet" href="index.css">
- <script src="https://cdn.jsdelivr.net/npm/vue/dist/vue.js"></script>
- </head>
- <body>
- <div id = "directive">
- <input v-model = "name" placeholder = "Enter Your Name" /><br/>
- <span style = "font-size:20px;"><b>Letter count is : {{name | countletters}}</b></span>
- </div>
- </script>
- <script src="index.js"></script>
- </body>
- </html>
Index.js file:
- var vm = new Vue({
- el: '#directive',
- data: {
- name : ""
- },
- filters : {
- countletters : function(value) {
- return value.length;
- }
- }
- })
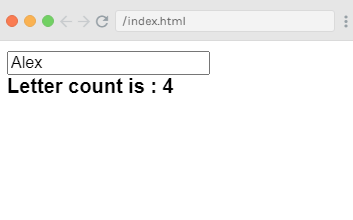
After the execution of the program, you will see the following output:
Output:
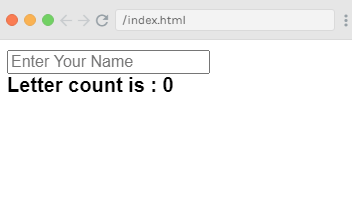
When you type any text in the above box, you can get the letter count as follows:
Example Explanation
In the above example, you can see that we have created a simple filter named "countletters". The countletters filter counts the numbers of characters entered in the textbox. We have to use the filter property and define the used filter as follows:
- filters : {
- countletters : function(value) {
- return value.length;
- }
- }
Here, we have defined the method countletters and then returned the length of the entered string.
Now, we have used the pipe operator and the name of the filter "countletters" to display the filter's result in output:
- <span style = "font-size:20px;"><b>Letter count is : {{name | countletters}}</b></span>
- Vue.directive('name_of_the_directive', {
- bind(e1, binding, vnode) {
- }
- })
To create a custom directive, we have to use Vue.directive and the name of the directive, as shown in the above syntax. Let us see an example to demonstrate how to create a custom directive and how to use it.
Index.html file:
- <html>
- <head>
- <title>Vue.js Custom Directive</title>
- <link rel="stylesheet" href="index.css">
- <script src="https://cdn.jsdelivr.net/npm/vue/dist/vue.js"></script>
- </head>
- <body>
- <div id = "directive">
- <div v-changestyle>Vue.js Custom Directive Example</div>
- </div>
- <script type = "text/javascript">
- Vue.directive("changestyle",{
- bind(e1,binding, vnode) {
- console.log(e1);
- e1.style.color = "red";
- e1.style.fontSize = "20px";
- }
- });
- var vm = new Vue({
- el: '#directive',
- data: {
- },
- methods : {
- },
- });
- </script>
- <script src="index.js"></script>
- </body>
- </html>
Index.js file:
- var vm = new Vue({
- el: '#directive',
- data: {
- },
- methods : {
- },
- })
Let's use a simple CSS file to make the output more attractive.
Index.css file:
- html, body {
- margin: 5px;
- padding: 0;
- }
After the execution of the program, you will see the following output:
Source : javatpoint

0 comments:
Post a Comment
Thanks