
Vue.js Routing
Vue.js does not have a built-in router feature, but you can easily create a single page application that supports routing using the recommended and officially-supported vue-router library.
There are some steps that you have to follow to install the router in Vue.js. You can use router by direct download it from CDN or using NPM or using Github.
Download from CDM directly
You can directly download the latest version of vue-router from CDN. It is available at https://unpkg.com/vue-router/dist/vue-router.js.
The unpkg.com contains the npm-based cdn links and always updated to the recent version. After downloading the unpkg.com file, host it to server, and use it with a script tag along with Vue.js as follows.
- <script src = "/path/to/vue.js"></script>
- <script src = "/path/to/vue-router.js"></script>
If you want to use it without downloading, you can use it as follows:
- <script src="https://unpkg.com/vue-router/dist/vue-router.js"></script>
Install router using NPM
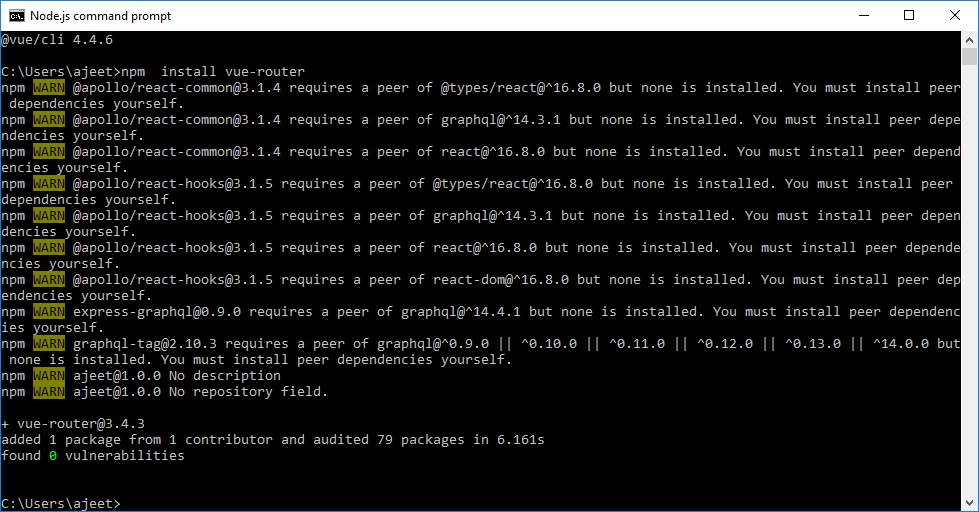
Open the Node.js command prompt and run the following command to install the vue-router.
- npm install vue-router
Install router using GitHub
Run the following commands to clone the router repository from GitHub:
- git clone https://github.com/vuejs/vue-router.git node_modules/vue-router
- cd node_modules/vue-router
- npm install
- npm run build
Let's take a simple example to understand the concept of routing in Vue.js:
Example
Index.html file:
- <html>
- <head>
- <title>Vue.js Routing</title>
- <link rel="stylesheet" href="index.css">
- <script src="https://cdn.jsdelivr.net/npm/vue/dist/vue.js"></script>
- <script src="https://unpkg.com/vue/dist/vue.js"></script>
- <script src="https://unpkg.com/vue-router/dist/vue-router.js"></script>
- </head>
- <body>
- <div id = "router_1">
- <h2>This is Routing Example</h2>
- <p>
- <!-- use router-link component for navigation. -->
- <!-- `<router-link>` will be rendered as an `<a>` tag by default -->
- <router-link to = "/route1">Click on Router Link 1</router-link>
- <router-link to = "/route2"> Click on Router Link 2</router-link>
- </p>
- <!-- route outlet -->
- <!-- component matched by the route will render here -->
- <router-view></router-view>
- </div>
- <script type = "text/javascript">
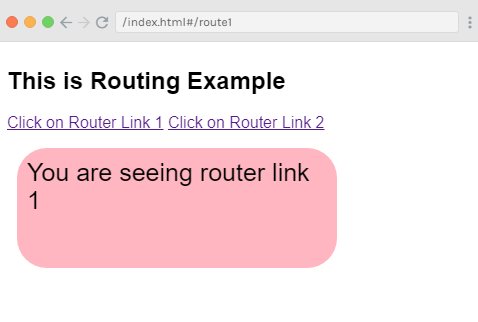
- const Route1 = { template: '<div style = "border-radius:30px;background-color:lightpink;width:300px;height:100px;margin:10px;font-size:25px;padding:10px;">You are seeing router link 1</div>' }
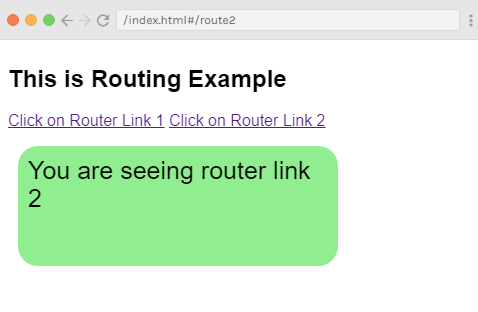
- const Route2 = { template: '<div style = "border-radius:20px;background-color:lightgreen;width:300px;height:100px;margin:10px;font-size:25px;padding:10px;"> You are seeing router link 2</div>' }
- const routes = [
- { path: '/route1', component: Route1 },
- { path: '/route2', component: Route2 }
- ];
- const router = new VueRouter({
- routes // short for `routes: routes`
- });
- </script>
- <script src="index.js"></script>
- </body>
- </html>
Index.js file:
- var vm = new Vue({
- el: '#router_1',
- router
- })
Let's use a simple CSS file to make the output more attractive.
Index.css file:
- html, body {
- margin: 5px;
- padding: 0;
- }
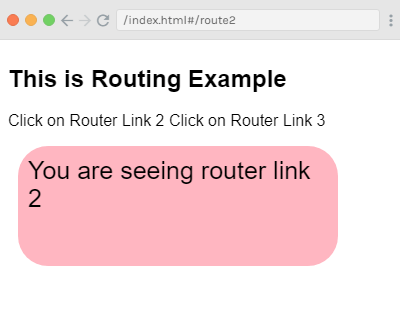
After the execution of the program, you will see the following output:
Output:
Click on the router link 2, and you will see that it is redirected to the following result.
Example Explanation
In the above example, you can see that we have added the vue-router.js file as follows:
- <script src="https://unpkg.com/vue/dist/vue.js"></script>
- <script src="https://unpkg.com/vue-router/dist/vue-router.js"></script>4
In the following code, we have created two router links. We have defined these router links in the body section as follows:
- <router-link to = "/route1">Click on Router Link 1</router-link>
- <router-link to = "/route2"> Click on Router Link 2</router-link>
Here, <router-link> is a component used to navigate to the HTML content and display it to the user. The to property specifies the destination. For example, the file where the link is displayed which you have to click.
The router is initialized in the script section where there are two constants created as follows:
- const Route1 = { template: '<div style = "border-radius:30px;background-color:lightpink;width:300px;height:100px;margin:10px;font-size:25px;padding:10px;">You are seeing router link 1</div>' }
- const Route2 = { template: '<div style = "border-radius:20px;background-color:lightgreen;width:300px;height:100px;margin:10px;font-size:25px;padding:10px;"> You are seeing router link 2</div>' }
In the above code, we have specifies the templates that would be shown when you click on the router link.
Next is the routes const where we have defined the path which have to be displayed in the URL.
- const routes = [
- { path: '/route1', component: Route1 },
- { path: '/route2', component: Route2 }
- ];
Routes are used to define the path and the component. The path will be displayed in the output when the user clicks on the router link.
The component takes the names of the templates to be displayed. The path from the routes needs to match with the router link to the property.
For example,
- <router-link to = "name_of_-the_path"></router-link>
Now, we have created the VueRouter instance using the following code:
- const router = new VueRouter({
- routes // short for `routes: routes`
- });
The VueRouter constructor takes the routes as the param. We have used the following code to assign the router object to the main Vue instance.
- var vm = new Vue({
- el: '#router_1',
- router
- })
After executing the above example, you will see the output in the browser. If you can inspect and check the router link, we will find that it adds class to the active element. The class added is class = "router-link-exact-active router-link-active".
Pass Props to Router Link
Let's see how to pass properties to Router Link. In the above example, we have passed a property "to" to the router link as follows:
- <router-link to = "/route1">Click on Router Link 1</router-link>
- <router-link to = "/route2"> Click on Router Link 2</router-link>
This property can be passed in many other ways to the router link.
The to prop
It is used to specify the destination path given to the <router-link>. When you click on the link, it will pass the value to router.push() internally. The value needs to be a string or a location object. There are three ways to pass the value using the "to" property.
Example 1:
- <router-link to = "/route1">Click on Router Link 1</router-link>
- It is rendered as:
- <a href = "#/route">Router Link </a>
Example 2:
- <router-link v-bind:to = "{path:'/route1'}">Click on Router Link 2</router-link> // When using an object, it is recommended to bind it as shown in e.g. 2.
Example 3:
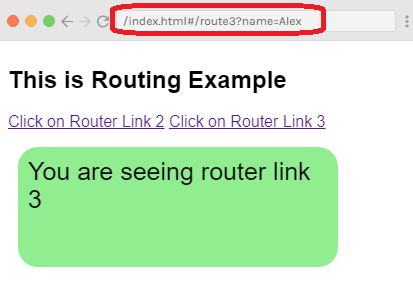
- <router-link v-bind:to = "{path:'/route1', query: { name: 'Alex' }}">Click on Router Link 3</router-link>//You can pass a query string as shown in e.g. 3. This is an example of router link with query string.
We have used the example 1 method in the above examples. Let's see the second and third method in the following example.
Index.html file:
- <html>
- <head>
- <title>Vue.js Routing</title>
- <link rel="stylesheet" href="index.css">
- <script src="https://cdn.jsdelivr.net/npm/vue/dist/vue.js"></script>
- <script src="https://unpkg.com/vue/dist/vue.js"></script>
- <script src="https://unpkg.com/vue-router/dist/vue-router.js"></script>
- </head>
- <body>
- <div id = "router_1">
- <h2>This is Routing Example</h2>
- <p>
- <!-- use router-link component for navigation. -->
- <!-- `<router-link>` will be rendered as an `<a>` tag by default -->
- <router-link v-bind:to = "{path:'/route2'}">Click on Router Link 2</router-link>
- <router-link v-bind:to = "{path:'/route3', query: { name: 'Alex' }}">Click on Router Link 3</router-link>
- </p>
- <!-- route outlet -->
- <!-- component matched by the route will render here -->
- <router-view></router-view>
- </div>
- <script type = "text/javascript">
- const Route2 = { template: '<div style = "border-radius:30px;background-color:lightpink;width:300px;height:100px;margin:10px;font-size:25px;padding:10px;">You are seeing router link 2</div>' }
- const Route3 = { template: '<div style = "border-radius:20px;background-color:lightgreen;width:300px;height:100px;margin:10px;font-size:25px;padding:10px;"> You are seeing router link 3</div>' }
- const routes = [
- { path: '/route2', component: Route2 },
- { path: '/route3', component: Route3 }
- ];
- const router = new VueRouter({
- routes // short for `routes: routes`
- });
- </script>
- <script src="index.js"></script>
- </body>
- </html>
Index.js file:
- var vm = new Vue({
- el: '#router_1',
- router
- })
After the execution of the program, you will see the following output:
Output:
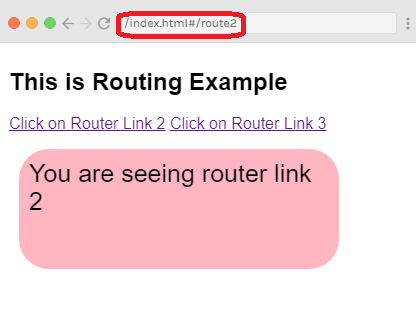
Now, click on the router link 3, and you will see the set name as a query string in the url. See the output:
The replace prop
The replace property is used to replace the router link and call the router.replace() instead of router.push(). If yu use replace prop, the navigation history is not stored.
Index.html file:
- <html>
- <head>
- <title>Vue.js Routing</title>
- <link rel="stylesheet" href="index.css">
- <script src="https://cdn.jsdelivr.net/npm/vue/dist/vue.js"></script>
- <script src="https://unpkg.com/vue/dist/vue.js"></script>
- <script src="https://unpkg.com/vue-router/dist/vue-router.js"></script>
- </head>
- <body>
- <div id = "router_1">
- <h2>This is Routing Example</h2>
- <p>
- <!-- use router-link component for navigation. -->
- <!-- `<router-link>` will be rendered as an `<a>` tag by default -->
- <router-link v-bind:to = "{path:'/route2'}">Click on Router Link 2</router-link>
- <router-link v-bind:to = "{path:'/route3', query: { name: 'Panda' }}" replace>This link is Replaced</router-link>
- </p>
- <!-- route outlet -->
- <!-- component matched by the route will render here -->
- <router-view></router-view>
- </div>
- <script type = "text/javascript">
- const Route2 = { template: '<div style = "border-radius:30px;background-color:lightpink;width:300px;height:100px;margin:10px;font-size:25px;padding:10px;">You are seeing router link 2</div>' }
- const Route3 = { template: '<div style = "border-radius:20px;background-color:lightgreen;width:300px;height:100px;margin:10px;font-size:25px;padding:10px;"> You are seeing router link 3</div>' }
- const routes = [
- { path: '/route2', component: Route2 },
- { path: '/route3', component: Route3 }
- ];
- const router = new VueRouter({
- routes // short for `routes: routes`
- });
- </script>
- <script src="index.js"></script>
- </body>
- </html>
Index.js file will be same.
After the execution of the program, you will see the following output:
Output:
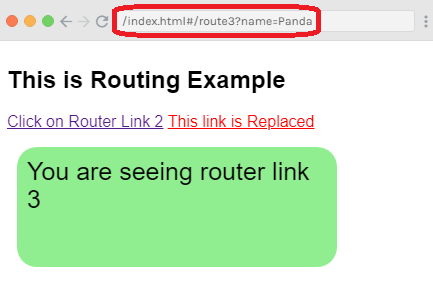
You can see that when you click on the "This link is Replaced" link, the name is changed in the url.
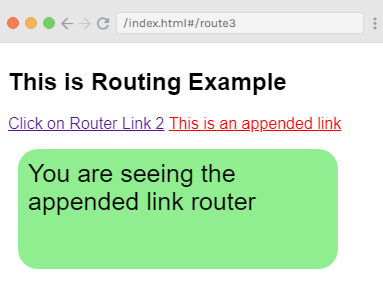
The append prop
The append tag is used to add with the <router-link><router-link> link to make the path relative.
Index.html file:
- <html>
- <head>
- <title>Vue.js Routing</title>
- <link rel="stylesheet" href="index.css">
- <script src="https://cdn.jsdelivr.net/npm/vue/dist/vue.js"></script>
- <script src="https://unpkg.com/vue/dist/vue.js"></script>
- <script src="https://unpkg.com/vue-router/dist/vue-router.js"></script>
- </head>
- <body>
- <div id = "router_1">
- <h2>This is Routing Example</h2>
- <p>
- <!-- use router-link component for navigation. -->
- <!-- `<router-link>` will be rendered as an `<a>` tag by default -->
- <router-link v-bind:to = "{path:'/route2'}">Click on Router Link 2</router-link>
- <router-link v-bind:to = "{ path: '/route3'}" append>This is an appended link</router-link>
- </p>
- <!-- route outlet -->
- <!-- component matched by the route will render here -->
- <router-view></router-view>
- </div>
- <script type = "text/javascript">
- const Route2 = { template: '<div style = "border-radius:30px;background-color:lightpink;width:300px;height:100px;margin:10px;font-size:25px;padding:10px;">You are seeing router link 2</div>' }
- const Route3 = { template: '<div style = "border-radius:20px;background-color:lightgreen;width:300px;height:100px;margin:10px;font-size:25px;padding:10px;"> You are seeing the appended link router</div>' }
- const routes = [
- { path: '/route2', component: Route2 },
- { path: '/route3', component: Route3 }
- ];
- const router = new VueRouter({
- routes // short for `routes: routes`
- });
- </script>
- <script src="index.js"></script>
- </body>
- </html>
Index.js file:
- var vm = new Vue({
- el: '#router_1',
- router
- })
Let's use a simple CSS file to make the output more attractive.
Index.css file:
- html, body {
- margin: 5px;
- padding: 0;
- }
After the execution of the program, you will see the following output:
Output:

The append prop
The append tag is used to add with the <router-link > to make the path relative. Let's take an example.
Example:
Index.html file:
- <html>
- <head>
- <title>Vue.js Routing</title>
- <link rel="stylesheet" href="index.css">
- <script src="https://cdn.jsdelivr.net/npm/vue/dist/vue.js"></script>
- <script src="https://unpkg.com/vue/dist/vue.js"></script>
- <script src="https://unpkg.com/vue-router/dist/vue-router.js"></script>
- </head>
- <body>
- <div id = "router_1">
- <h2>This is Routing Example</h2>
- <p>
- <!-- use router-link component for navigation. -->
- <!-- `<router-link>` will be rendered as an `<a>` tag by default -->
- <router-link v-bind:to = "{path:'/route2'}">Click on Router Link 2</router-link>
- <router-link v-bind:to = "{ path: '/route3'}" append>This is an appended link</router-link>
- </p>
- <!-- route outlet -->
- <!-- component matched by the route will render here -->
- <router-view></router-view>
- </div>
- <script type = "text/javascript">
- const Route2 = { template: '<div style = "border-radius:30px;background-color:lightpink;width:300px;height:100px;margin:10px;font-size:25px;padding:10px;">You are seeing router link 2</div>' }
- const Route3 = { template: '<div style = "border-radius:20px;background-color:lightgreen;width:300px;height:100px;margin:10px;font-size:25px;padding:10px;"> You are seeing the appended link router</div>' }
- const routes = [
- { path: '/route2', component: Route2 },
- { path: '/route3', component: Route3 }
- ];
- const router = new VueRouter({
- routes // short for `routes: routes`
- });
- </script>
- <script src="index.js"></script>
- </body>
- </html>
Index.js file:
- var vm = new Vue({
- el: '#router_1',
- router
- })
Let's use a simple CSS file to make the output more attractive.
Index.css file:
- html, body {
- margin: 5px;
- padding: 0;
- }
After the execution of the program, you will see the following output:
Output:
The tag prop
The <router-link> is rendered as a tag. The tag prop is used when you want to render it as some other tag. For example, if you want to render <router-link> as "span", you should specify it as tag = "span". Let's take a simple example.
Example:
Index.html file:
- <html>
- <head>
- <title>Vue.js Routing</title>
- <link rel="stylesheet" href="index.css">
- <script src="https://cdn.jsdelivr.net/npm/vue/dist/vue.js"></script>
- <script src="https://unpkg.com/vue/dist/vue.js"></script>
- <script src="https://unpkg.com/vue-router/dist/vue-router.js"></script>
- </head>
- <body>
- <div id = "router_1">
- <h2>This is Routing Example</h2>
- <p>
- <router-link v-bind:to = "{ path: '/route2'}" tag = "span">Click on Router Link 2</router-link>
- <router-link v-bind:to = "{ path: '/route3'}" tag = "span">Click on Router Link 3</router-link>
- </p>
- <!-- route outlet -->
- <!-- component matched by the route will render here -->
- <router-view></router-view>
- </div>
- <script type = "text/javascript">
- const Route2 = { template: '<div style = "border-radius:30px;background-color:lightpink;width:300px;height:100px;margin:10px;font-size:25px;padding:10px;">You are seeing router link 2</div>' }
- const Route3 = { template: '<div style = "border-radius:20px;background-color:lightgreen;width:300px;height:100px;margin:10px;font-size:25px;padding:10px;"> You are seeing router link 3</div>' }
- const routes = [
- { path: '/route2', component: Route2 },
- { path: '/route3', component: Route3 }
- ];
- const router = new VueRouter({
- routes // short for `routes: routes`
- });
- </script>
- <script src="index.js"></script>
- </body>
- </html>
Index.js file:
The index.js file would be same as we used in previous examples.
After the execution of the program, you will see the following output:
Output:
In the above example, you can see that the tag displayed now is a span tag. They are not seen as a clickable link but you can click them. Now, click on the router link 3 and see the result.
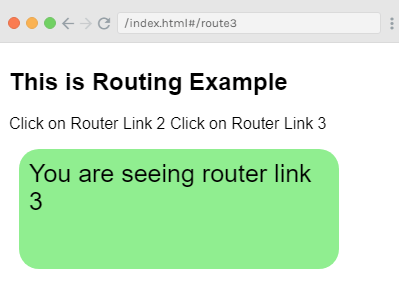
The active-class prop
The active-class property is added to <router-link> when you want to make it active. It is used to show that the router link is active. It is added as active-class = "_active".
The following code specifies how to use it in an example.
Syntax:
- <style>
- ._active{
- background-color : red;
- }
- </style>
- <p>
- <router-link v-bind:to = "{ path: '/route2'}" active-class = "._active">Click on Router Link 2</router-link>
- <router-link v-bind:to = "{ path: '/route3'}" tag = "span">Click on Router Link 3</router-link>
- </p>
It will make the "Click on Router Link 2" path active while "Click on Router Link 3" will be same.
The exact-active-class prop
The exact-active-class configures the active CSS class applied when the link is active with an exact match. The default exact active class is applied as router-link-exact-active.
The following code specifies how to use it in an example.
Syntax:
- <style>
- ._active{
- background-color : red;
- }
- </style>
- <p>
- <router-link v-bind:to = "{ path: '/route2'}" exact-active-class = "._active">Click on Router Link 2</router-link>
- <router-link v-bind:to = "{ path: '/route3'}" tag = "span">Click on Router Link 3</router-link>
- </p>
The event prop
In the previous example you have seen that the by default event for router-link is click event. When you clicked on the link, the router links were shown. You can change this by using the event property. See the following example:
Example:
Index.html file:
- <html>
- <head>
- <title>Vue.js Routing</title>
- <link rel="stylesheet" href="index.css">
- <script src="https://cdn.jsdelivr.net/npm/vue/dist/vue.js"></script>
- <script src="https://unpkg.com/vue/dist/vue.js"></script>
- <script src="https://unpkg.com/vue-router/dist/vue-router.js"></script>
- </head>
- <body>
- <div id = "router_1">
- <h2>This is Routing Example</h2>
- <style>
- ._active{
- background-color : red;
- }
- </style>
- <p>
- <router-link v-bind:to = "{ path: '/route2'}" event = "mouseover">Hover this link</router-link>
- <router-link v-bind:to = "{ path: '/route3'}" tag = "span">Click on Router Link 3</router-link>
- </p>
- <!-- route outlet -->
- <!-- component matched by the route will render here -->
- <router-view></router-view>
- </div>
- <script type = "text/javascript">
- const Route2 = { template: '<div style = "border-radius:30px;background-color:lightpink;width:300px;height:100px;margin:10px;font-size:25px;padding:10px;">You are seeing router link 2</div>' }
- const Route3 = { template: '<div style = "border-radius:20px;background-color:lightgreen;width:300px;height:100px;margin:10px;font-size:25px;padding:10px;"> You are seeing router link 3</div>' }
- const routes = [
- { path: '/route2', component: Route2 },
- { path: '/route3', component: Route3 }
- ];
- const router = new VueRouter({
- routes // short for `routes: routes`
- });
- </script>
- <script src="index.js"></script>
- </body>
- </html>
Index.js file:
The Index.js file will be same as above example.
After the execution of the program, you will see the following output:
Output:
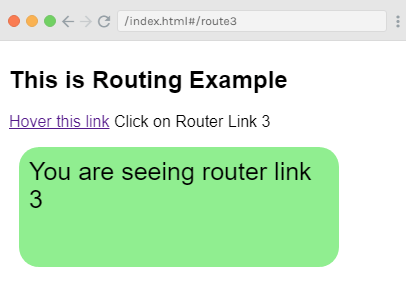
When you hover your mouse cursor on the first link, you will see the following result.
Sources by : javatpoint


0 comments:
Post a Comment
Thanks