CoderFunda
  • Home
  • About us
    • Contact Us
    • Disclaimer
    • Privacy Policy
    • About us
  • Home
  • Php
  • HTML
  • CSS
  • JavaScript
    • JavaScript
    • Jquery
    • JqueryUI
    • Stock
  • SQL
  • Vue.Js
  • Python
  • Wordpress
  • C++
    • C++
    • C
  • Laravel
    • Laravel
      • Overview
      • Namespaces
      • Middleware
      • Routing
      • Configuration
      • Application Structure
      • Installation
    • Overview
  • DBMS
    • DBMS
      • PL/SQL
      • SQLite
      • MongoDB
      • Cassandra
      • MySQL
      • Oracle
      • CouchDB
      • Neo4j
      • DB2
      • Quiz
    • Overview
  • Entertainment
    • TV Series Update
    • Movie Review
    • Movie Review
  • More
    • Vue. Js
    • Php Question
    • Php Interview Question
    • Laravel Interview Question
    • SQL Interview Question
    • IAS Interview Question
    • PCS Interview Question
    • Technology
    • Other

23 February, 2022

4 Steps to Install Magento 2 on XAMPP Windows

 Programing Coderfunda     February 23, 2022     Magento 2, MAGENTO TUTORIALS     No comments   


4 Steps to Install Magento 2 on XAMPP Windows

If you are looking for a complete guide to Install Magento 2 latest version on Windows from Magento repo or Github with Apache/NginX, MySQL/MariaDB and PHP 7.x, check this guide out now. In this post, we will show you how to install Magento 2.3 on an Ubuntu latest with Apache2, MariaDB. You can also read our previous posts, where we talked about how to install Magento 2 on Ubuntu, Centos or Windows.

Magento 2 Requirements

Before digging in, you should double check 8 main requirements for Magento 2 here.

Learn more on how to upgrade to Magento 2

Step 1: Install XAMPP

XAMPP is the most popular local web development solution for Windows. It is free and includes Apache or NginX, PHP or Python, Perl or Ruby.

Step 1.1: Download latest version here

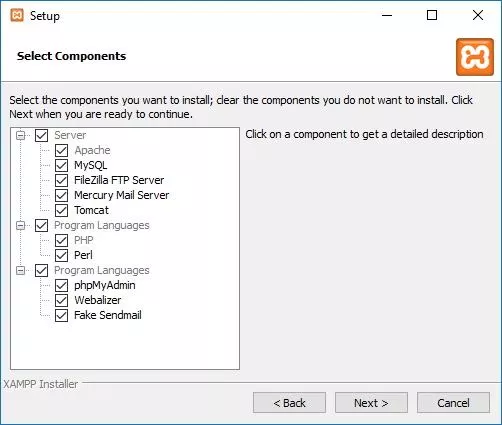
Step 1.2: Open and install XAMPP for your Windows

install XAMPP Install it in C drive. We suppose that the path is: c:\xampp\

Step 1.3: Open XAMPP Controller in XAMPP folder

open XAMPP

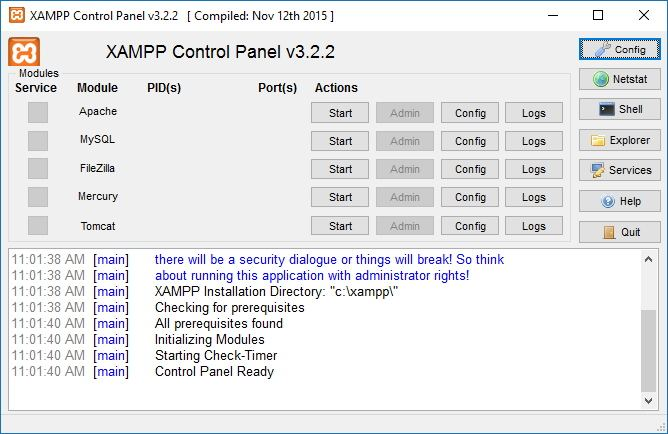
Now you have already set up XAMPP successfully on your Windows.

Step 2: Install Composer (optional)

  • Download Composer and install for windows
  • Direct download composer: Composer stable version
  • or you can use command line to install Composer:
php -r "copy('https://getcomposer.org/installer', 'composer-setup.php');"
php composer-setup.php
php -r "unlink('composer-setup.php');"

Step 3: Download Magento 2 Pack

You can download from one of the following resources:

  • https://magento.com/tech-resources/download
  • https://github.com/magento/magento2/releases
  • https://www.mageplaza.com/download-magento/

After donwloading, you should extract the pack to c:\xampp\htdocs\magento2. E.g you have a folder call: magento2 in c:\xampp\htdocs\

Step 4: Install Magento 2

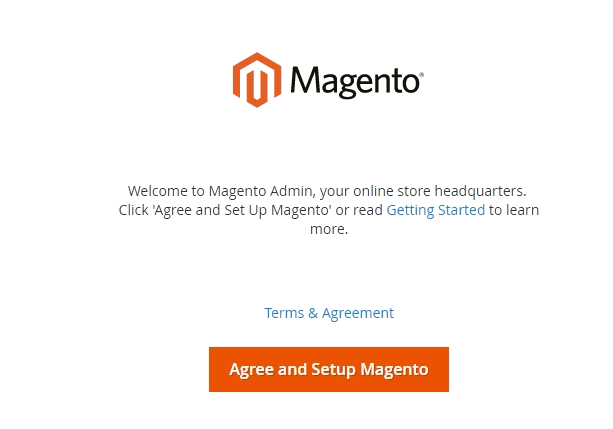
When you get the access to this address http://localhost/magento2, you will see this Magento Setup Wizard as the following:

Running the Magento Setup Wizard

Step 4.1: Start Installing

  • Click Start Readiness Check. If any errors are displayed, you must resolve them before you continue. Click More detail if available to see more information about each check.
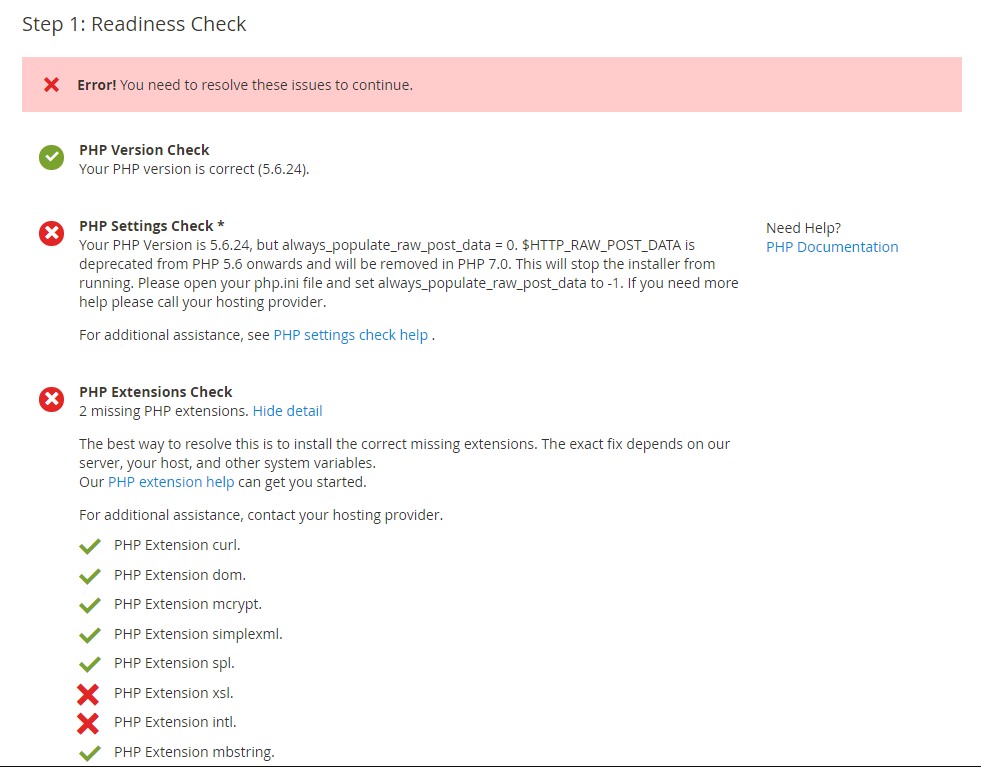
 Readiness Check error
  • Click Next

Step 4.2: Add a Database

Fill database information then click Next

Step 4.3: Web Configuration

  • Enter the following information:
    • Your Store Address: http://localhost
    • Magento Admin Address: Enter the relative URL by which to access the Magento Admin. e.g: secret, backend
  • Then click Next

Step 4.4: Customize Your Store

  • From the Store Default Time Zone list, select the name of your store’s time zone.
  • From the Store Default Currency list, select the default currency to use in your store.
  • From the Store Default Language list, select the default language to use in your store.
  • Expand the Advanced Modules Configuration to optionally enable or disable modules before you install the Magento software.

How to install Magento 2 Magento modules configuration

You can choose to install Sample Data or not in this step.

Click Next

Important Notice: Use Skip dependency check for individual modules with caution. We recommend against it because a typical reason for this error is you manually edited the deployment configuration. Editing the deployment configuration is not recommended because future Magento software updates can undo your changes.

Step 4.5: Create Admin Account

Now enter admin information such as

  • New Username
  • New Email
  • New Password
  • Confirm Password
  • Then click Next

Step 4.6: Install

mageplaza

After completing all previous steps in the Setup Wizard, click Install Now.

Installation Success The message Success will be displayed to indicate a successful installation.

Step 4.7: Check the result

Now go to the frontend and backend to see the result

Frontend

How to install Magento 2 Frontend

Backend

How to install Magento 2 Frontend

That’s all for today. We hope you have gained more insight into how to install Magento 2 on XAMPP Windows. Feel free to leave comments below or contact us if you have any questions or sharing. And stay tuned for next guidance from us!

Get started with Magento 2 - Tutorials

  • Share This:  
  •  Facebook
  •  Twitter
  •  Google+
  •  Stumble
  •  Digg
Email ThisBlogThis!Share to XShare to Facebook

Related Posts:

  • How to Import Configurable Products in Magento 2 How to Import Configurable Products in Magento 2This guide will walk you through how to import configurable products in Magento 2 using CSV file… Read More
  • Magento SEO Checklist: How to Get On Page One Magento SEO Checklist: How to Get On Page OneEvery website needs proper SEO, and it’s even more so for eCommerce stores, as failing to adopt SE… Read More
  • How to Customize Product Page Layout in Magento How to Customize Product Page Layout in MagentoAs you might know, each product requires a particular page layout based on its unique features. S… Read More
  • Understanding PCI Compliance in Magento Understanding PCI Compliance in MagentoWhat is PCI Compliance?PCI stands for Payment Card Industry. PCI Compliance is adherence to a set of se… Read More
  • How to Import Configurable Products in Magento 2How to Import Configurable Products in Magento 2This guide will walk you through how to import configurable products in Magento 2 using CSV file.Step … Read More
Newer Post Older Post Home

0 comments:

Post a Comment

Thanks

Meta

Popular Posts

  • Spring boot app (error: method getFirst()) failed to run at local machine, but can run on server
    The Spring boot app can run on the online server. Now, we want to replicate the same app at the local machine but the Spring boot jar file f...
  • Log activity in a Laravel app with Spatie/Laravel-Activitylog
      Requirements This package needs PHP 8.1+ and Laravel 9.0 or higher. The latest version of this package needs PHP 8.2+ and Laravel 8 or hig...
  • Vue3 :style backgroundImage not working with require
    I'm trying to migrate a Vue 2 project to Vue 3. In Vue 2 I used v-bind style as follow: In Vue 3 this doesn't work... I tried a...
  • Laravel auth login with phone or email
          <?php     Laravel auth login with phone or email     <? php     namespace App \ Http \ Controllers \ Auth ;         use ...
  • Enabling authentication in swagger
    I created a asp.net core empty project running on .net6. I am coming across an issue when I am trying to enable authentication in swagger. S...

Categories

  • Ajax (26)
  • Bootstrap (30)
  • DBMS (42)
  • HTML (12)
  • HTML5 (45)
  • JavaScript (10)
  • Jquery (34)
  • Jquery UI (2)
  • JqueryUI (32)
  • Laravel (1017)
  • Laravel Tutorials (23)
  • Laravel-Question (6)
  • Magento (9)
  • Magento 2 (95)
  • MariaDB (1)
  • MySql Tutorial (2)
  • PHP-Interview-Questions (3)
  • Php Question (13)
  • Python (36)
  • RDBMS (13)
  • SQL Tutorial (79)
  • Vue.js Tutorial (68)
  • Wordpress (150)
  • Wordpress Theme (3)
  • codeigniter (108)
  • oops (4)
  • php (853)

Social Media Links

  • Follow on Twitter
  • Like on Facebook
  • Subscribe on Youtube
  • Follow on Instagram

Pages

  • Home
  • Contact Us
  • Privacy Policy
  • About us

Blog Archive

  • September (100)
  • August (50)
  • July (56)
  • June (46)
  • May (59)
  • April (50)
  • March (60)
  • February (42)
  • January (53)
  • December (58)
  • November (61)
  • October (39)
  • September (36)
  • August (36)
  • July (34)
  • June (34)
  • May (36)
  • April (29)
  • March (82)
  • February (1)
  • January (8)
  • December (14)
  • November (41)
  • October (13)
  • September (5)
  • August (48)
  • July (9)
  • June (6)
  • May (119)
  • April (259)
  • March (122)
  • February (368)
  • January (33)
  • October (2)
  • July (11)
  • June (29)
  • May (25)
  • April (168)
  • March (93)
  • February (60)
  • January (28)
  • December (195)
  • November (24)
  • October (40)
  • September (55)
  • August (6)
  • July (48)
  • May (2)
  • January (2)
  • July (6)
  • June (6)
  • February (17)
  • January (69)
  • December (122)
  • November (56)
  • October (92)
  • September (76)
  • August (6)

  • Failed to install 'cordova-plugin-firebase': CordovaError: Uh oh - 9/21/2024
  • pyspark XPath Query Returns Lists Omitting Missing Values Instead of Including None - 9/20/2024
  • SQL REPL from within Python/Sqlalchemy/Psychopg2 - 9/20/2024
  • MySql Explain with Tobias Petry - 9/20/2024
  • How to combine information from different devices into one common abstract virtual disk? [closed] - 9/20/2024

Laravel News

  • Chargebee Starter Kit for Billing in Laravel - 5/20/2025
  • Streamline Pipeline Cleanup with Laravel's finally Method - 5/18/2025
  • Validate Controller Requests with the Laravel Data Package - 5/19/2025
  • Deployer - 5/18/2025
  • Transform JSON into Typed Collections with Laravel's AsCollection::of() - 5/18/2025

Copyright © 2025 CoderFunda | Powered by Blogger
Design by Coderfunda | Blogger Theme by Coderfunda | Distributed By Coderfunda