CoderFunda
  • Home
  • About us
    • Contact Us
    • Disclaimer
    • Privacy Policy
    • About us
  • Home
  • Php
  • HTML
  • CSS
  • JavaScript
    • JavaScript
    • Jquery
    • JqueryUI
    • Stock
  • SQL
  • Vue.Js
  • Python
  • Wordpress
  • C++
    • C++
    • C
  • Laravel
    • Laravel
      • Overview
      • Namespaces
      • Middleware
      • Routing
      • Configuration
      • Application Structure
      • Installation
    • Overview
  • DBMS
    • DBMS
      • PL/SQL
      • SQLite
      • MongoDB
      • Cassandra
      • MySQL
      • Oracle
      • CouchDB
      • Neo4j
      • DB2
      • Quiz
    • Overview
  • Entertainment
    • TV Series Update
    • Movie Review
    • Movie Review
  • More
    • Vue. Js
    • Php Question
    • Php Interview Question
    • Laravel Interview Question
    • SQL Interview Question
    • IAS Interview Question
    • PCS Interview Question
    • Technology
    • Other

23 February, 2022

How to Create a Custom Widget in Magento 2

 Programing Coderfunda     February 23, 2022     Magento 2, MAGENTO TUTORIALS     No comments   


How to Create a Custom Widget in Magento 2

Widget is a greater tool to insert or edit content into a CMS Page Block or Page, so I am so happy to bring you Create Widget in Magento 2 topic. Reading the post will help you understand: “What are the widgets in Magento 2?” and “How to use them on Magento 2 store”. With this simple instruction, it is easy to create and customize new custom widgets in Magento 2.

Table contents

  • What is the widget in Magento 2
  • How to create widget in Magento 2
    • Step 1: Declare widget
    • Step 2: Create a widget template file
    • Step 3: Create widget Block class
    • Step 4: Flush cache and posts

What is the widget in Magento 2?

Firstly, we all will get to know the definition of Widget in Magento 2.

Widgets are the powerful functionalities in Magento 2 configuration. As a store admin, you can take the advantage of the widget to improve the storefront under the lively interface. The widgets allow showing static information or dynamic content to CMS pages or blocks. You can add widgets in any CMS block of Magento 2 to display such content or elements, for example:

  • Dynamic product data
  • Dynamic lists of the recently viewed products
  • Promotional banners
  • Interactive navigation elements and action blocks
  • Dynamic flash elements that are inserted in content pages

The customization of the widgets in Magento 2 is similar to an optimized front-end extension with a simple module. It’s hassle-free to create a Magento 2 widget because it is the same as when you create a HelloWorld excepting from some additional files. Hence, although you don’t have any experience in programming, it is easy to improve your storefront with the dynamic blocks of content.

Here are available default widgets:

  • CMS Static Block
  • CMS Page Link
  • Recently Compared Products
  • Recently Viewed Products
  • Catalog Products List
  • Catalog Product Link
  • Catalog New Products List
  • Catalog Category Link

With this guide below, you can create your own widget in Magento 2 easily and quickly.

4 steps to creating a widget in Magento 2

  • Step 1: Declare widget
  • Step 2: Create a widget template file
  • Step 3: Create widget Block class
  • Step 4: Flush cache and posts

Step 1: Declare widget widget.xml

Create a file etc/widget.xml with the following content

<?xml version="1.0" ?>
<widgets xmlns:xsi="http://www.w3.org/2001/XMLSchema-instance" xsi:noNamespaceSchemaLocation="urn:magento:helloworld:Magento_Widget:etc/widget.xsd">
	<widget class="Mageplaza\HelloWorld\Block\Widget\Posts" id="mageplaza_helloworld_posts">
		<label>Blog Posts</label>
		<description>Posts</description>
		<parameters>
			<parameter name="posts" sort_order="10" visible="true" xsi:type="text">
				<label>Custom Posts Label</label>
			</parameter>
		</parameters>
	</widget>
</widgets>

Step 2: Create a widget template file in Magento 2

File: view/frontend/templates/widget/posts.phtml

<?php if($block->getData('posts')): ?>
	<h2 class='posts'><?php echo $block->getData('posts'); ?></h2>
	<p>This is sample widget. Perform your code here.</p>
<?php endif; ?>

Step 3: Create widget Block class

Create block file: Block/Widget/Posts.php

<?php 
namespace Mageplaza\HelloWorld\Block\Widget;

use Magento\Framework\View\Element\Template;
use Magento\Widget\Block\BlockInterface; 
 
class Posts extends Template implements BlockInterface {

	protected $_template = "widget/posts.phtml";

}

Step 4: Flush cache and posts

  • You should flush Magento cache, read this tutorial: Flush Magento cache
  • Run a posts.

Go to admin panel > Content > Pages > Home page > Edit

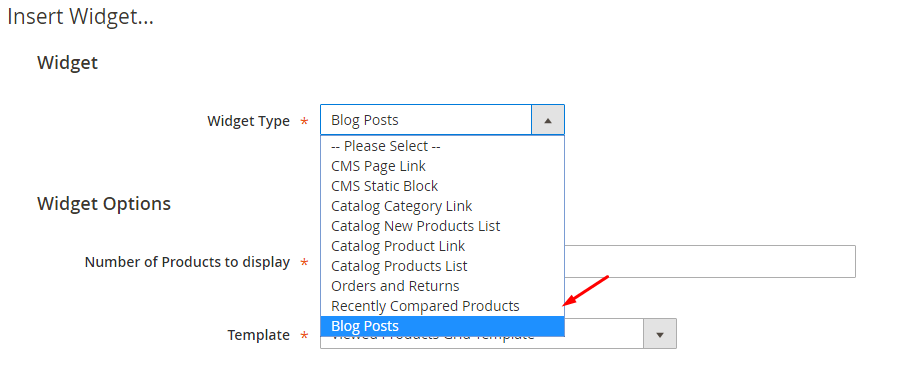
In Content tab, click on Insert Widget icon

Magento 2 insert widget

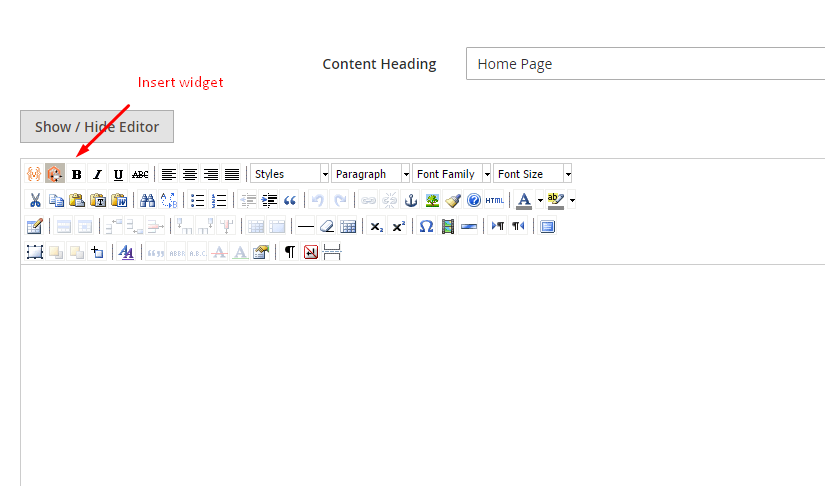
You will see the Blog posts in widget list

magento 2 widgets

Conclusion

Though it requires no high level of programming for the store admins to add features and interactive content to the website by widgets, they still need to understand how it works in Magento 2 to create a widget. This guide gets you through the process of utilizing widgets from the functionality standpoint to streamline your Magento 2 store. If you have any questions, let us know in the comment section. Thanks for reading

  • Share This:  
  •  Facebook
  •  Twitter
  •  Google+
  •  Stumble
  •  Digg
Email ThisBlogThis!Share to XShare to Facebook
Newer Post Older Post Home

0 comments:

Post a Comment

Thanks

Meta

Popular Posts

  • Write API Integrations in Laravel and PHP Projects with Saloon
    Write API Integrations in Laravel and PHP Projects with Saloon Saloon  is a Laravel/PHP package that allows you to write your API integratio...
  • Features CodeIgniter
    Features CodeIgniter There is a great demand for the CodeIgniter framework in PHP developers because of its features and multiple advan...
  • Laravel Breeze with PrimeVue v4
    This is an follow up to my previous post about a "starter kit" I created with Laravel and PrimeVue components. The project has b...
  • Fast Excel Package for Laravel
      Fast Excel is a Laravel package for importing and exporting spreadsheets. It provides an elegant wrapper around Spout —a PHP package to ...
  • Send message via CANBus
    After some years developing for mobile devices, I've started developing for embedded devices, and I'm finding a new problem now. Th...

Categories

  • Ajax (26)
  • Bootstrap (30)
  • DBMS (42)
  • HTML (12)
  • HTML5 (45)
  • JavaScript (10)
  • Jquery (34)
  • Jquery UI (2)
  • JqueryUI (32)
  • Laravel (1017)
  • Laravel Tutorials (23)
  • Laravel-Question (6)
  • Magento (9)
  • Magento 2 (95)
  • MariaDB (1)
  • MySql Tutorial (2)
  • PHP-Interview-Questions (3)
  • Php Question (13)
  • Python (36)
  • RDBMS (13)
  • SQL Tutorial (79)
  • Vue.js Tutorial (68)
  • Wordpress (150)
  • Wordpress Theme (3)
  • codeigniter (108)
  • oops (4)
  • php (853)

Social Media Links

  • Follow on Twitter
  • Like on Facebook
  • Subscribe on Youtube
  • Follow on Instagram

Pages

  • Home
  • Contact Us
  • Privacy Policy
  • About us

Blog Archive

  • September (100)
  • August (50)
  • July (56)
  • June (46)
  • May (59)
  • April (50)
  • March (60)
  • February (42)
  • January (53)
  • December (58)
  • November (61)
  • October (39)
  • September (36)
  • August (36)
  • July (34)
  • June (34)
  • May (36)
  • April (29)
  • March (82)
  • February (1)
  • January (8)
  • December (14)
  • November (41)
  • October (13)
  • September (5)
  • August (48)
  • July (9)
  • June (6)
  • May (119)
  • April (259)
  • March (122)
  • February (368)
  • January (33)
  • October (2)
  • July (11)
  • June (29)
  • May (25)
  • April (168)
  • March (93)
  • February (60)
  • January (28)
  • December (195)
  • November (24)
  • October (40)
  • September (55)
  • August (6)
  • July (48)
  • May (2)
  • January (2)
  • July (6)
  • June (6)
  • February (17)
  • January (69)
  • December (122)
  • November (56)
  • October (92)
  • September (76)
  • August (6)

Loading...

Laravel News

Loading...

Copyright © CoderFunda | Powered by Blogger
Design by Coderfunda | Blogger Theme by Coderfunda | Distributed By Coderfunda