CoderFunda
  • Home
  • About us
    • Contact Us
    • Disclaimer
    • Privacy Policy
    • About us
  • Home
  • Php
  • HTML
  • CSS
  • JavaScript
    • JavaScript
    • Jquery
    • JqueryUI
    • Stock
  • SQL
  • Vue.Js
  • Python
  • Wordpress
  • C++
    • C++
    • C
  • Laravel
    • Laravel
      • Overview
      • Namespaces
      • Middleware
      • Routing
      • Configuration
      • Application Structure
      • Installation
    • Overview
  • DBMS
    • DBMS
      • PL/SQL
      • SQLite
      • MongoDB
      • Cassandra
      • MySQL
      • Oracle
      • CouchDB
      • Neo4j
      • DB2
      • Quiz
    • Overview
  • Entertainment
    • TV Series Update
    • Movie Review
    • Movie Review
  • More
    • Vue. Js
    • Php Question
    • Php Interview Question
    • Laravel Interview Question
    • SQL Interview Question
    • IAS Interview Question
    • PCS Interview Question
    • Technology
    • Other

23 February, 2022

Magento 2 Add Category Attributes Programmatically

 Programing Coderfunda     February 23, 2022     Magento 2, MAGENTO TUTORIALS     No comments   


Magento 2 Add Category Attributes Programmatically

Default Magento 2 category attributes are good but sometimes it’s necessary to add new ones. Today we’ll show you how to add category attributes to Magento 2 programmatically.

Magento 2 Category Attributes Programmatically is a timely topic so that you can work on custom Magento 2 extension, for example, in the right way. Welcome here, Mageplaza Tutorial! The exact steps are listed with the specific script in PHP to create the category attributes. By the availability of the setup scripts, there is no need to waste time learning or modifying anything while you don’t have experience in coding. The only thing you need to do is copying and pasting the following snippets to your module. Here are the snippets that you can achieve immediately.

How to Add Category Attribute Programmatically in Magento 2

  • Step 1: Create file InstallData.php
  • Step 2: Define the install() method
  • Step 3: Create the category attribute
  • Step 4: Display the category attribute

In this article, we will use the Mageplaza HelloWorld module to learn how to add a category attribute.

Create file InstallData.php

We will start with the InstallData class which located in app/code/Mageplaza/HelloWorld/Setup/InstallData.php. The content for this file:

<?php
namespace Mageplaza\HelloWorld\Setup;

use Magento\Eav\Setup\EavSetupFactory;
use Magento\Framework\Setup\InstallDataInterface;
use Magento\Framework\Setup\ModuleContextInterface;
use Magento\Framework\Setup\ModuleDataSetupInterface;

class InstallData implements InstallDataInterface
{
	private $eavSetupFactory;

	public function __construct(EavSetupFactory $eavSetupFactory)
	{
		$this->eavSetupFactory = $eavSetupFactory;
	}
	
}

Define the install() method

<?php
	
public function install(ModuleDataSetupInterface $setup, ModuleContextInterface $context)
{
	
}

Create Category Attribute Programmatically

<?php
namespace Mageplaza\HelloWorld\Setup;

use Magento\Framework\Setup\InstallDataInterface;
use Magento\Framework\Setup\ModuleContextInterface;
use Magento\Framework\Setup\ModuleDataSetupInterface;
use Magento\Eav\Setup\EavSetupFactory;

class InstallData implements InstallDataInterface
{

	private $eavSetupFactory;

	public function __construct(EavSetupFactory $eavSetupFactory)
	{
		$this->eavSetupFactory = $eavSetupFactory;
	}

	public function install(
		ModuleDataSetupInterface $setup,
		ModuleContextInterface $context
	)
	{
		$eavSetup = $this->eavSetupFactory->create(['setup' => $setup]);

		$eavSetup->addAttribute(
			\Magento\Catalog\Model\Category::ENTITY,
			'mp_new_attribute',
			[
				'type'         => 'varchar',
				'label'        => 'Mageplaza Attribute',
				'input'        => 'text',
				'sort_order'   => 100,
				'source'       => '',
				'global'       => 1,
				'visible'      => true,
				'required'     => false,
				'user_defined' => false,
				'default'      => null,
				'group'        => '',
				'backend'      => ''
			]
		);
	}
}

Display the category attribute

The category UI Component is rendered with configuration from the category_form.xml file. All files with that name are merged together. As a result, We will add a field by creating a category_form.xml file in the app/code/Mageplaza/HelloWorld/view/adminhtml/ui_component/ directory.

Here is a full example of adding a field under the “general” group. It is important to note that mp_new_attribute should match the ID of the attribute that you created in the install script.

<?xml version="1.0" ?>
<form xmlns:xsi="http://www.w3.org/2001/XMLSchema-instance" xsi:noNamespaceSchemaLocation="urn:magento:module:Magento_Ui:etc/ui_configuration.xsd">
    <fieldset name="general">
        <field name="mp_new_attribute">
            <argument name="data" xsi:type="array">
                <item name="config" xsi:type="array">
                    <item name="required" xsi:type="boolean">false</item>
                    <item name="validation" xsi:type="array">
                        <item name="required-entry" xsi:type="boolean">false</item>
                    </item>
                    <item name="sortOrder" xsi:type="number">333</item>
                    <item name="dataType" xsi:type="string">string</item>
                    <item name="formElement" xsi:type="string">input</item>
                    <item name="label" translate="true" xsi:type="string">Mageplaza new attribute</item>
                </item>
            </argument>
        </field>
    </fieldset>
</form>

All done, please run the upgrade, flush cache, and check the result.

  1. Flush Cache Run flush cache here

  2. Run upgrade command line:

Then go to Product > Categories from the admin to check the result. It will show like this:

create category attribute

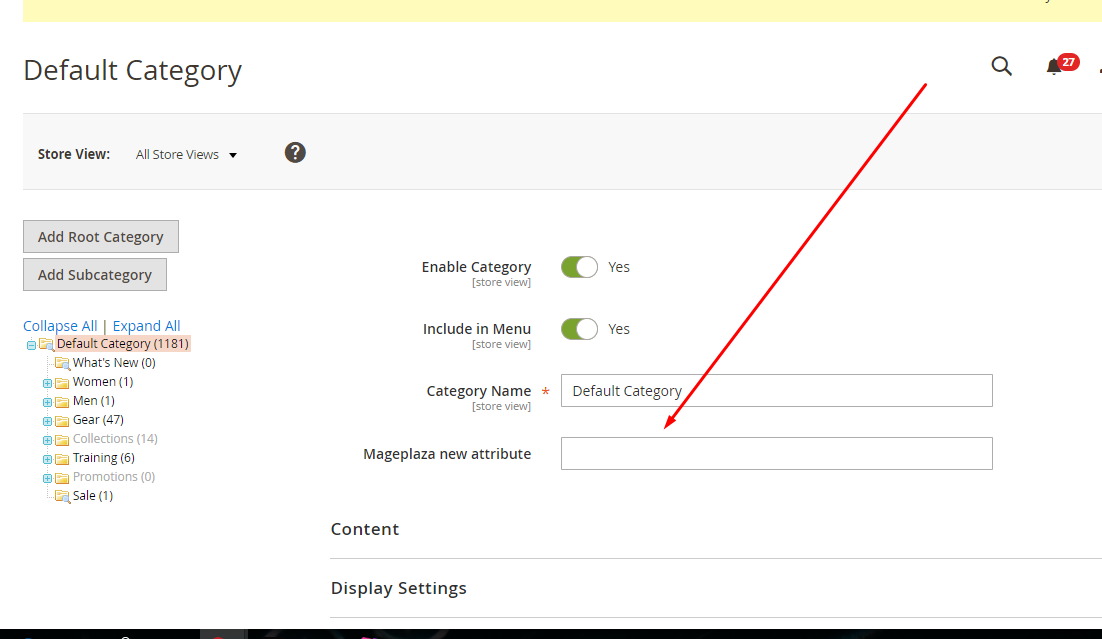
Check carefully if you can see and edit the new category attribute.

Conclusion

That’s how you can programmatically add category attributes to Magento 2. Hope you find this tutorial helpful. Happy reading.


  • Share This:  
  •  Facebook
  •  Twitter
  •  Google+
  •  Stumble
  •  Digg
Email ThisBlogThis!Share to XShare to Facebook
Newer Post Older Post Home

0 comments:

Post a Comment

Thanks

Meta

Popular Posts

  • Blade Component to Render Markdown in Laravel
      Laravel Markdown   is a highly configurable markdown renderer and Blade component for Laravel by the folks at   Spatie : The package featu...
  • Real-Time Chat Package for Laravel
      Chatify   is a Laravel package by   Munaf Aqeel Mahdi   that adds a complete real-time chat system to your application without any additio...
  • Using Laravel Model Factories in your tests
    Laravel Model factories are one of the best features you can use in your application when it comes to testing. They provide a way to define ...
  • Laravel Packages - Variable Validation & Sanitization
    Self-taught Noob question... I'm probably over thinking this and being too paranoid, but something along the way gave me the impression ...
  • Detecting .NET8 with Inno Setup and InnoDependenciyInstaller
    I am looking at using InnoDependencyInstaller and it has a function that it uses under the hood: Dependency_AddDotNet80 procedure Depend...

Categories

  • Ajax (26)
  • Bootstrap (30)
  • DBMS (42)
  • HTML (12)
  • HTML5 (45)
  • JavaScript (10)
  • Jquery (34)
  • Jquery UI (2)
  • JqueryUI (32)
  • Laravel (1017)
  • Laravel Tutorials (23)
  • Laravel-Question (6)
  • Magento (9)
  • Magento 2 (95)
  • MariaDB (1)
  • MySql Tutorial (2)
  • PHP-Interview-Questions (3)
  • Php Question (13)
  • Python (36)
  • RDBMS (13)
  • SQL Tutorial (79)
  • Vue.js Tutorial (69)
  • Wordpress (150)
  • Wordpress Theme (3)
  • codeigniter (108)
  • oops (4)
  • php (853)

Social Media Links

  • Follow on Twitter
  • Like on Facebook
  • Subscribe on Youtube
  • Follow on Instagram

Pages

  • Home
  • Contact Us
  • Privacy Policy
  • About us

Blog Archive

  • July (4)
  • September (100)
  • August (50)
  • July (56)
  • June (46)
  • May (59)
  • April (50)
  • March (60)
  • February (42)
  • January (53)
  • December (58)
  • November (61)
  • October (39)
  • September (36)
  • August (36)
  • July (34)
  • June (34)
  • May (36)
  • April (29)
  • March (82)
  • February (1)
  • January (8)
  • December (14)
  • November (41)
  • October (13)
  • September (5)
  • August (48)
  • July (9)
  • June (6)
  • May (119)
  • April (259)
  • March (122)
  • February (368)
  • January (33)
  • October (2)
  • July (11)
  • June (29)
  • May (25)
  • April (168)
  • March (93)
  • February (60)
  • January (28)
  • December (195)
  • November (24)
  • October (40)
  • September (55)
  • August (6)
  • July (48)
  • May (2)
  • January (2)
  • July (6)
  • June (6)
  • February (17)
  • January (69)
  • December (122)
  • November (56)
  • October (92)
  • September (76)
  • August (6)

Loading...

Laravel News

Loading...

Copyright © CoderFunda | Powered by Blogger
Design by Coderfunda | Blogger Theme by Coderfunda | Distributed By Coderfunda