CoderFunda
  • Home
  • About us
    • Contact Us
    • Disclaimer
    • Privacy Policy
    • About us
  • Home
  • Php
  • HTML
  • CSS
  • JavaScript
    • JavaScript
    • Jquery
    • JqueryUI
    • Stock
  • SQL
  • Vue.Js
  • Python
  • Wordpress
  • C++
    • C++
    • C
  • Laravel
    • Laravel
      • Overview
      • Namespaces
      • Middleware
      • Routing
      • Configuration
      • Application Structure
      • Installation
    • Overview
  • DBMS
    • DBMS
      • PL/SQL
      • SQLite
      • MongoDB
      • Cassandra
      • MySQL
      • Oracle
      • CouchDB
      • Neo4j
      • DB2
      • Quiz
    • Overview
  • Entertainment
    • TV Series Update
    • Movie Review
    • Movie Review
  • More
    • Vue. Js
    • Php Question
    • Php Interview Question
    • Laravel Interview Question
    • SQL Interview Question
    • IAS Interview Question
    • PCS Interview Question
    • Technology
    • Other

23 February, 2022

Magento 2 Add Customer Attribute Programmatically

 Programing Coderfunda     February 23, 2022     Magento 2, MAGENTO TUTORIALS     No comments   


Magento 2 Add Customer Attribute Programmatically

This article will guide you how to add customer attribute in Magento 2 programatically. Please follow our previous article to create a simple module which we will use to demo coding for this lesson and how to create the setup script classes. In this article, we will use the sample module Mageplaza_HelloWorld and the InstallDataclass.

Recommend:

Use Magento 2 Customer Attributes to adding extra attribute fields to collect valuable customer information on registration or account page.

Overview of Adding Customer Attribute Programmatically

  • Step 1: Create setup file InstallData.php
  • Step 2: Define the install() method
  • Step 3: Create custom attribute

Step 1: Create setup file InstallData.php

Firstly, we will create the InstallData.php file:

File: app/code/Mageplaza/HelloWorld/Setup/InstallData.php

<?php
namespace Mageplaza\HelloWorld\Setup;

use Magento\Eav\Setup\EavSetup;
use Magento\Eav\Setup\EavSetupFactory;
use Magento\Framework\Setup\InstallDataInterface;
use Magento\Framework\Setup\ModuleContextInterface;
use Magento\Framework\Setup\ModuleDataSetupInterface;

class InstallData implements InstallDataInterface
{
	private $eavSetupFactory;

	public function __construct(EavSetupFactory $eavSetupFactory)
	{
		$this->eavSetupFactory = $eavSetupFactory;
	}

}

In this class, we define the EAV setup model which will be use to interact with Magento 2 attribute.

Step 2: Define the install() method

After that, we have to define the install() method and create eav setup model:

public function install(ModuleDataSetupInterface $setup, ModuleContextInterface $context)
	{
		$eavSetup = $this->eavSetupFactory->create(['setup' => $setup]);
	}
	Next, we will use eavSetup object to add attribute:
public function install(ModuleDataSetupInterface $setup, ModuleContextInterface $context)
	{
		$eavSetup = $this->eavSetupFactory->create(['setup' => $setup]);
		$eavSetup->addAttribute(
			\Magento\Customer\Model\Customer::ENTITY,
			'sample_attribute',
			[
				'type'         => 'varchar',
				'label'        => 'Sample Attribute',
				'input'        => 'text',
				'required'     => false,
				'visible'      => true,
				'user_defined' => true,
				'position'     => 999,
				'system'       => 0,
			]
		);
}

Step 3: Create custom attribute

Finally, we need to set the forms in which the attributes will be used. In this step, we need define the eavConfig object which allow us to call the attribute back and set the data for it. And the full code to create customer attribute is:

File: app/code/Mageplaza/HelloWorld/Setup/InstallData.php

<?php

namespace Mageplaza\HelloWorld\Setup;

use Magento\Eav\Setup\EavSetup;
use Magento\Eav\Setup\EavSetupFactory;
use Magento\Framework\Setup\InstallDataInterface;
use Magento\Framework\Setup\ModuleContextInterface;
use Magento\Framework\Setup\ModuleDataSetupInterface;
use Magento\Eav\Model\Config;
use Magento\Customer\Model\Customer;

class InstallData implements InstallDataInterface
{
	private $eavSetupFactory;

	public function __construct(EavSetupFactory $eavSetupFactory, Config $eavConfig)
	{
		$this->eavSetupFactory = $eavSetupFactory;
		$this->eavConfig       = $eavConfig;
	}

	public function install(ModuleDataSetupInterface $setup, ModuleContextInterface $context)
	{
		$eavSetup = $this->eavSetupFactory->create(['setup' => $setup]);
		$eavSetup->addAttribute(
			\Magento\Customer\Model\Customer::ENTITY,
			'sample_attribute',
			[
				'type'         => 'varchar',
				'label'        => 'Sample Attribute',
				'input'        => 'text',
				'required'     => false,
				'visible'      => true,
				'user_defined' => true,
				'position'     => 999,
				'system'       => 0,
			]
		);
		$sampleAttribute = $this->eavConfig->getAttribute(Customer::ENTITY, 'sample_attribute');

		// more used_in_forms ['adminhtml_checkout','adminhtml_customer','adminhtml_customer_address','customer_account_edit','customer_address_edit','customer_register_address']
		$sampleAttribute->setData(
			'used_in_forms',
			['adminhtml_customer']

		);
		$sampleAttribute->save();
	}
}


Now, let run comman line to install the module: php magento setup:upgrade and php bin/magento setup:static-content:deploy Then check the result. It will show like this:
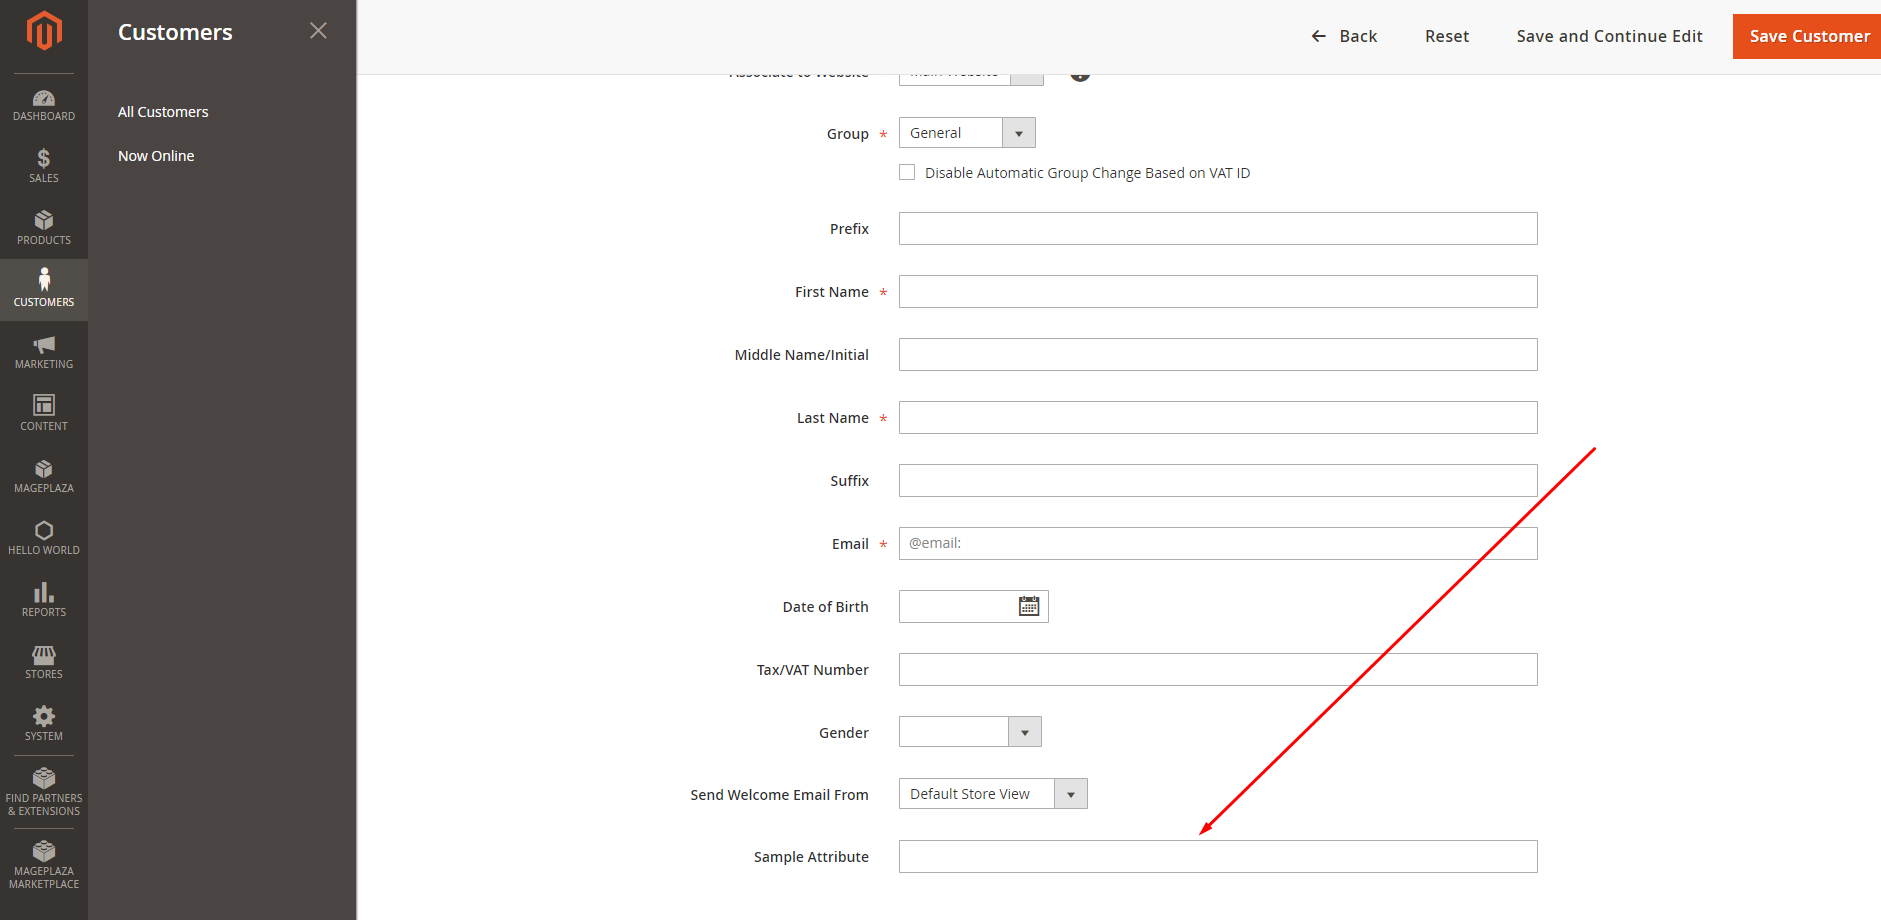
customer attribute

Explore Magento 2 Customer Attributes


  • Share This:  
  •  Facebook
  •  Twitter
  •  Google+
  •  Stumble
  •  Digg
Email ThisBlogThis!Share to XShare to Facebook

Related Posts:

  • How to Create Module in Magento 2 - Helloworld development series - Completed Guide How to Create Module in Magento 2 - Helloworld development series - Completed GuideWe will discuss the topic of how to create Hello World m… Read More
  • Magento 2 Add Product Attribute Programmatically Magento 2 Add Product Attribute ProgrammaticallyIn this article, we will find out how to create a product attribute in Magento 2 programati… Read More
  • Magento 2 Module Creator Magento 2 Module CreatorMagento 2 Module Creator is a helpful tool for Newbies who start learning Magento 2 module development or… Read More
  • How to use Command Line Interface CLI How to use Command Line Interface CLIIn this tutorial, we will talk about Command Line Interface (CLI) in Magento 2. As you know, from Mage… Read More
  • Magento 2 Add Customer Attribute Programmatically Magento 2 Add Customer Attribute ProgrammaticallyThis article will guide you how to add customer attribute in Magento 2 programaticall… Read More
Newer Post Older Post Home

0 comments:

Post a Comment

Thanks

Meta

Popular Posts

  • Vue3 :style backgroundImage not working with require
    I'm trying to migrate a Vue 2 project to Vue 3. In Vue 2 I used v-bind style as follow: In Vue 3 this doesn't work... I tried a...
  • SQL ORDER BY Keyword
      The SQL ORDER BY Keyword The ORDER BY keyword is used to sort the result-set in ascending or descending order. The ORDER BY keyword sorts ...
  • Enabling authentication in swagger
    I created a asp.net core empty project running on .net6. I am coming across an issue when I am trying to enable authentication in swagger. S...
  • failed to load storage framework cache laravel excel
       User the export file and controller function  ..         libxml_use_internal_errors ( true ); ..Good To Go   public function view () : ...
  • AdminJS not overriding default dashboard with custom React component
    So, I just started with adminjs and have been trying to override the default dashboard with my own custom component. I read the documentatio...

Categories

  • Ajax (26)
  • Bootstrap (30)
  • DBMS (42)
  • HTML (12)
  • HTML5 (45)
  • JavaScript (10)
  • Jquery (34)
  • Jquery UI (2)
  • JqueryUI (32)
  • Laravel (1017)
  • Laravel Tutorials (23)
  • Laravel-Question (6)
  • Magento (9)
  • Magento 2 (95)
  • MariaDB (1)
  • MySql Tutorial (2)
  • PHP-Interview-Questions (3)
  • Php Question (13)
  • Python (36)
  • RDBMS (13)
  • SQL Tutorial (79)
  • Vue.js Tutorial (68)
  • Wordpress (150)
  • Wordpress Theme (3)
  • codeigniter (108)
  • oops (4)
  • php (853)

Social Media Links

  • Follow on Twitter
  • Like on Facebook
  • Subscribe on Youtube
  • Follow on Instagram

Pages

  • Home
  • Contact Us
  • Privacy Policy
  • About us

Blog Archive

  • September (100)
  • August (50)
  • July (56)
  • June (46)
  • May (59)
  • April (50)
  • March (60)
  • February (42)
  • January (53)
  • December (58)
  • November (61)
  • October (39)
  • September (36)
  • August (36)
  • July (34)
  • June (34)
  • May (36)
  • April (29)
  • March (82)
  • February (1)
  • January (8)
  • December (14)
  • November (41)
  • October (13)
  • September (5)
  • August (48)
  • July (9)
  • June (6)
  • May (119)
  • April (259)
  • March (122)
  • February (368)
  • January (33)
  • October (2)
  • July (11)
  • June (29)
  • May (25)
  • April (168)
  • March (93)
  • February (60)
  • January (28)
  • December (195)
  • November (24)
  • October (40)
  • September (55)
  • August (6)
  • July (48)
  • May (2)
  • January (2)
  • July (6)
  • June (6)
  • February (17)
  • January (69)
  • December (122)
  • November (56)
  • October (92)
  • September (76)
  • August (6)

  • Failed to install 'cordova-plugin-firebase': CordovaError: Uh oh - 9/21/2024
  • pyspark XPath Query Returns Lists Omitting Missing Values Instead of Including None - 9/20/2024
  • SQL REPL from within Python/Sqlalchemy/Psychopg2 - 9/20/2024
  • MySql Explain with Tobias Petry - 9/20/2024
  • How to combine information from different devices into one common abstract virtual disk? [closed] - 9/20/2024

Laravel News

  • Efficiently remove expired cache data with Laravel Cache Evict - 6/3/2025
  • Test Job Failures Precisely with Laravel's assertFailedWith Method - 5/31/2025
  • Prism Relay - 6/2/2025
  • Enhance Collection Validation with containsOneItem() Closure Support - 5/31/2025
  • Filament Is Now Running Natively on Mobile - 5/31/2025

Copyright © 2025 CoderFunda | Powered by Blogger
Design by Coderfunda | Blogger Theme by Coderfunda | Distributed By Coderfunda