
While building web application, we need to store some data for only one time and after that we want to remove that data. For example, to display some error message or information message. In PHP, we have to do it manually but CodeIgniter has made this job simple for us. In CodeIgniter, flashdata will only be available until the next request, and it will get deleted automatically.
Add Flashdata
We can simply store flashdata as shown below.
$this->session->mark_as_flash('item');
- mark_as_flash() function is used for this purpose, which takes only one argument of the value to be stored. We can also pass an array to store multiple values.
- set_flashdata() function can also be used, which takes two arguments, name and value, as shown below. We can also pass an array.
$this->session->set_flashdata('item','value');
Retrieve Flashdata
Flashdata can be retrieved using the flashdata() function which takes one argument of the item to be fetched as shown below. flashdata() function makes sure that you are getting only flash data and not any other data.
$this->session->flashdata('item');
If you do not pass any argument, then you can get an array with the same function.
Example
Create a class called FlashData_Controller.php and save it at application/controller/FlashData_Controller.php.
<?php
   class FlashData_Controller extends CI_Controller {

      public function index() {
         //Load session library
         $this->load->library('session');

         //redirect to home page
         $this->load->view('flashdata_home');
      }

      public function add() {
         //Load session library
         $this->load->library('session');
         $this->load->helper('url');

         //add flash data
         $this->session->set_flashdata('item','item-value');

         //redirect to home page
         redirect('flashdata');
      }
   }
?>
Create a view file called flashdata_home.php and save it in application/views/ flashdata_home.php
<!DOCTYPE html>
<html lang = "en">

   <head>
      <meta charset = "utf-8">
      <title>CodeIgniter Flashdata Example</title>
   </head>

   <body>
      Flash Data Example
      <h2><?php echo $this->session->flashdata('item'); ?></h2>
      <a href = 'flashdata/add'>Click Here</a> to add flash data.
   </body>

</html>
Make the changes in the routes.php file in application/config/routes.phpand add the following line at the end of the file.
$route['flashdata'] = 'FlashData_Controller';
$route['flashdata/add'] = 'FlashData_Controller/add';
Execute the above example by visiting the following link. Replace the yoursite.com with the URL of your site.
http://yoursite.com/index.php/flashdata
After visiting the above URL, you will see a screen as shown below.
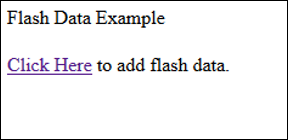
Click on “Click Here” link and you will see a screen as shown below. Here, in this screen you will see a value of flash data variable. Refresh the page again and you will see a screen like above and flash data variable will be removed automatically.


