CoderFunda
  • Home
  • About us
    • Contact Us
    • Disclaimer
    • Privacy Policy
    • About us
  • Home
  • Php
  • HTML
  • CSS
  • JavaScript
    • JavaScript
    • Jquery
    • JqueryUI
    • Stock
  • SQL
  • Vue.Js
  • Python
  • Wordpress
  • C++
    • C++
    • C
  • Laravel
    • Laravel
      • Overview
      • Namespaces
      • Middleware
      • Routing
      • Configuration
      • Application Structure
      • Installation
    • Overview
  • DBMS
    • DBMS
      • PL/SQL
      • SQLite
      • MongoDB
      • Cassandra
      • MySQL
      • Oracle
      • CouchDB
      • Neo4j
      • DB2
      • Quiz
    • Overview
  • Entertainment
    • TV Series Update
    • Movie Review
    • Movie Review
  • More
    • Vue. Js
    • Php Question
    • Php Interview Question
    • Laravel Interview Question
    • SQL Interview Question
    • IAS Interview Question
    • PCS Interview Question
    • Technology
    • Other

16 June, 2021

WordPress Posts

 Programing Coderfunda     June 16, 2021     Wordpress, wordpress-tutorial     No comments   

WordPress Posts

Posts allow you to write a blog and post it on your site. They are listed in reverse chronological order in front page of your blog.

Wordpress Post1

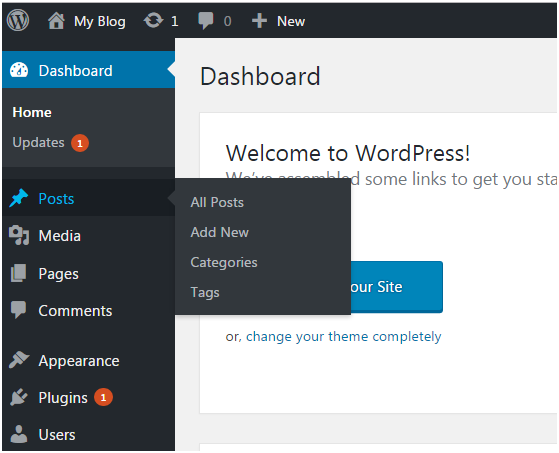
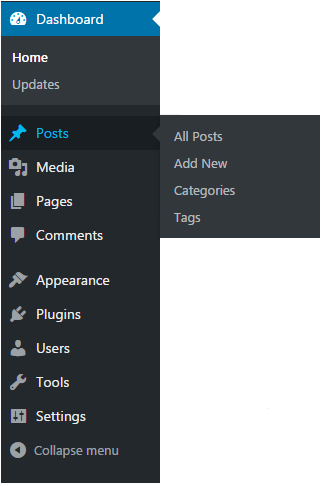
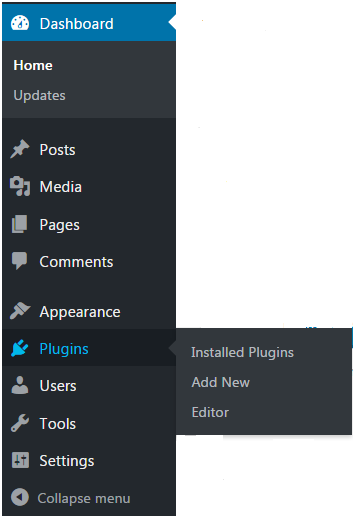
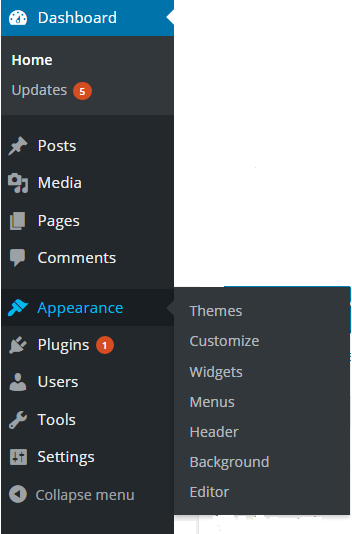
Look at the above snapshot, these are the sub-menus of posts.


How to Adding new Post

Go to Posts > Add New.

Wordpress Post2

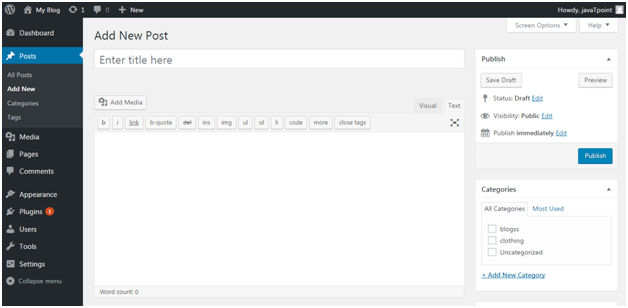
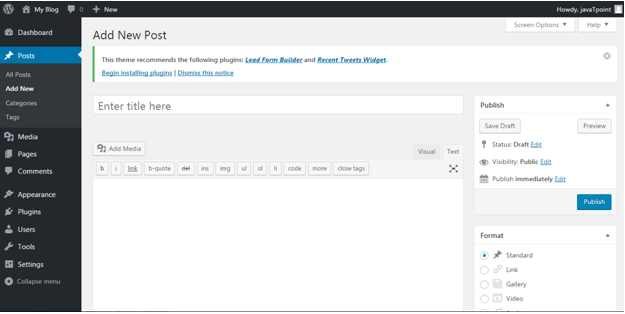
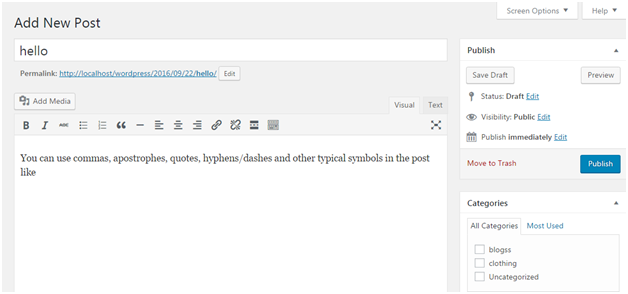
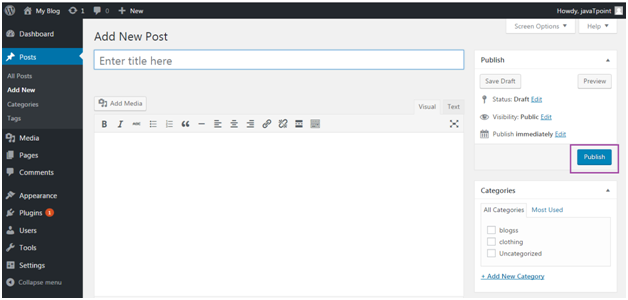
Look at the above snapshot, editor page will appear in front of you. There are two fields,

Title - Enter the title of your post

Content - Here you have to write content of your post.

In Visual mode, you can write in normal format.

In Text mode, you can write in HTML format.

Preview - This button allows you to have a look on your post before publishing it.


How to Publishing Post

After filling above two fields click on Publish button. It means you are ready to publish your blog on your site.

Wordpress Post3

Look at the above snapshot, there are some other options available in publish section.

Preview Post/Preview - Let you see a preview of your post before publishing it

Permalink - It stands for permanent link. It contains a user-friendly post name derived from post title. This can be edited using "Edit" button.

Save Draft - A post can be saved here

Status - Let you change the status of your post to Pending and Draft.

Visibility - Change visibility to Public, Password protected and Private.

Publish - Change the post publish date and time


How to Edit Post

To edit post, go to Posts > All Posts.

Wordpress Post4

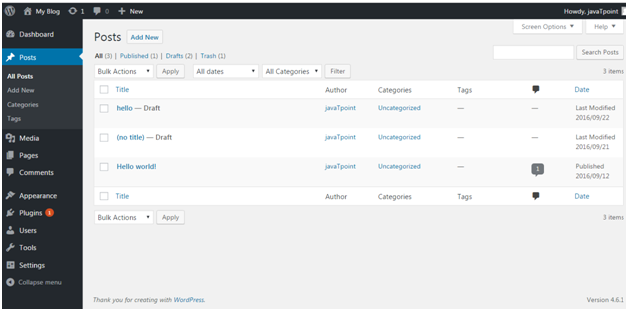
Look at the above snapshot, this is the list of all the created posts. Bring your mouse above a post, following options will appear.

Wordpress Post5

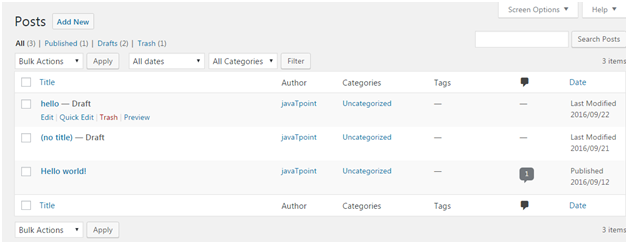
Look at the above snapshot, there are two options to edit. One is Edit and other one is Quick Edit.

On clicking Edit, following page will appear.

Wordpress Post6

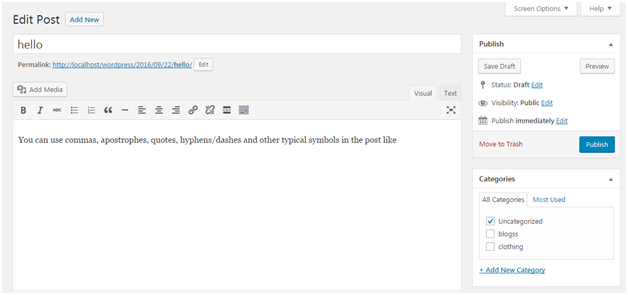
Look at the above snapshot, here you can edit title or content of your post.

On clicking Quick Edit, following page will appear.

Wordpress Post7

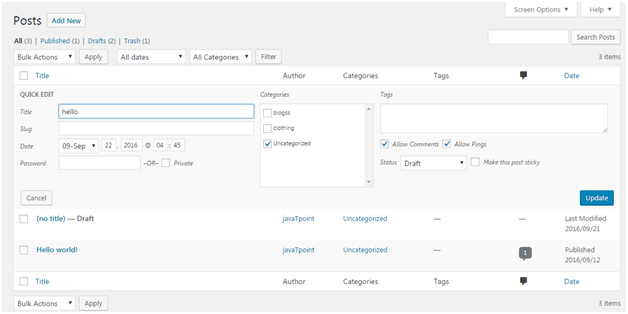
Look at the above snapshot, here you can edit title, date and slug of your post. And if want, you can also change category for your post.


How to Deleting a Post

To delete a post, go to Posts > All Posts

Wordpress Post8

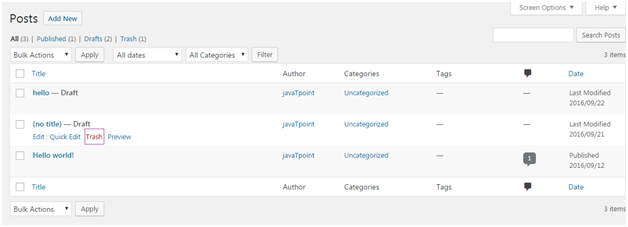
Look at the above snapshot, Trash option will let you delete the respective post.


How to Preview Post

Preview option helps to see you your post before publishing it to the public. It is better to have a look on your post that how it looks before publishing it to the world.

Go to Posts > All Posts

Wordpress Post9

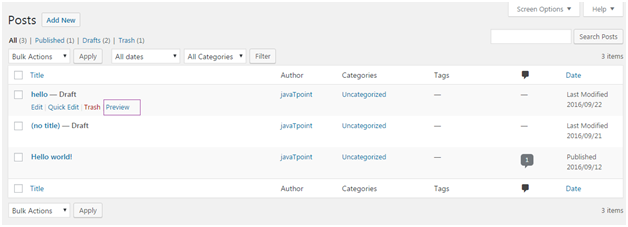
Look at the above snapshot, on clocking Preview, following page will appear.

Wordpress Post10

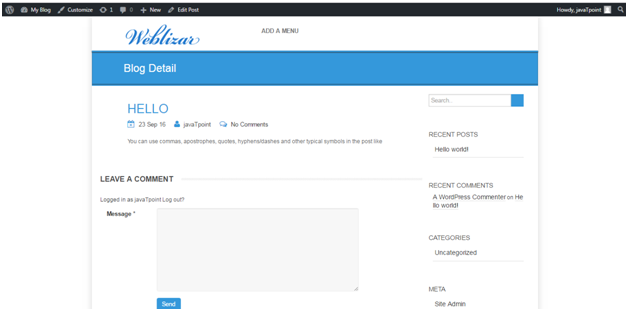
Look at the above snapshpot, this is the preview of our post. It gives you an idea whether your post need an edit or not.


How to Publish Post

From Publish button you can make your post available to your viewers.

Go to Posts > Add New

Wordpress Post11

Look at the above snapshot, after writing your post click on Publish button. And your post will be published publically.

Read More
  • Share This:  
  •  Facebook
  •  Twitter
  •  Google+
  •  Stumble
  •  Digg

How to create a WordPress website

 Programing Coderfunda     June 16, 2021     Wordpress, wordpress-tutorial     No comments   

How to create a WordPress website

Creating a site on WordPress is very easy. WordPress is designed in such a way that even non-tech users can also design their own websites easily and attractively.

Here, we'll discuss each and every step involved in creating a WordPress site.

  • Selecting a right platform
  • Choosing a domain name and host
  • Choosing a theme/template
  • Creating new pages
  • Adding Content
  • Adding Media
  • Installing plugins

Selecting a right platform

First you have to decide a suitable platform to build your website with. Here platform means either you want to create your website using HTML, CSS or using a CMS (Content Management Systems).

There are various popular CMS in the market like WordPress, Drupal, Joomla, DotNetNuke, etc.

Why choosing WordPress

For a beginner WordPress will be the best as it doesn't need any technical skills and due to its flexibility it is suited for all type of users.


You'll get a lot of options to select a theme as a wide range of community design themes for WordPress. It can handle any type of website whether large or small. Most known websites like CNN, NASA, eBay use WordPress.

Above all, it gives you a responsive site which makes it compatible with small screen devices like mobile phones and tablets.

Shared hosting is best choice for beginners. You can later upgrade your site's hosting according to the site's traffic.


Choosing a domain name and host

You need a domain name and a hosting space to get your website online.

Domain name enables you to give your site your own name while hosting gives a space to your site on a server which makes sure your website loads quickly and won't go down for hours.

Domain name should be short and easy to remember, brand able and catchy which defines your business.

Choosing a domain name is not easy with fulfilling all the criteria as million of domain names are active.


Choosing a theme/template


After installing WordPress, a site appears very plain. To make it more attractive, users install best suitable themes for their site. It adds visuals and views to the front page.

First of all, login to your WordPress site. By default, first screen will be your dashboard.

Wordpress How to create a wordpress site1

Accessing Free themes

After login, you'll get access for 150 free themes.

Wordpress How to create a wordpress site2

Look at the above snapshot, to look at the free themes, got the side bar menu of your dashboard, select Appearance >Themes.

Below screen will appear including all the installed themes.

Wordpress How to create a wordpress site3

Look at the above snapshot, if you want to install more themes click on Add New button above and install it.

To install a theme, click on Install followed by Activate button.


Creating new pages

Wordpress How to create a wordpress site4

Look at the above snapshot, go the sidebar menu, click Pages > Add New option.


Adding Content

Wordpress How to create a wordpress site5

Adding new post

At the end we all will come to this point to make our site popular. We need to post different things to increase the popularity of our site.

Wordpress How to create a wordpress site6

Clicking on Post > Add New option, the above page will appear on the screen.

There are two ways to write a post, either you may write in Visual editor or in Text editor (in HTML format). Currently this snapshot is of Text editor.

Adding Categories

You can divide your content in different categories by adding categories to them. This tool is handy when you are publishing content for more than one field.

Wordpress How to create a wordpress site7

Click on Posts > Categories, you will be directed to the above page.

Here, in Name add a title to your new category. In Slug, you can add some words which will become part of URL while searching.

Tags

Tags are very much similar to Categories with only one difference that each post has its own set of tags.

Enabling or Disabling Comment

Comment creates a debate on some posts or sites. Some users don't want their visitors to comment. They can shut comment off in WordPress.

Wordpress How to create a wordpress site8

To disable a comment for a particular page

  • Go to Pages > Add New
  • Click on Screen Options on top right
  • Tick on Discussions box
  • Scroll down, untick Allow Comments option
  • To disable a comment by default

    Wordpress How to create a wordpress site9
  • Go to Settings > Discussions
  • Untick "Allow people to post comments on new articles"

Editing sidebar

Sidebar which generally appears on the right side (sometimes appears on left) contains widgets like Archives, Categories and Meta, etc.

To edit the side bar, go to Appearance > Widgets

Use drag n drop method to either use a widget or remove a widget.

Adding Media

Wordpress How to create a wordpress site10

Every website needs some photos and videos to describe its content and value. WordPress also provide functionality to add a media. You can add image caption, title and description along with media. Also add alt text helps search engine to identify the image.


Installing plugins

Plugins are the extensions in the WordPress with certain piece of coding expanding specific function to you site. They are not built-in.

There are almost 25,000 different plugins options to choose from.

Installation a plugin is very simple. Click Plugins. You will see three options, as shown in the snapshot below.

Wordpress How to create a wordpress site11

Click on Plugins > Add New. Following screen will appear in front of you.

Wordpress How to create a wordpress site12

You can choose a plugin from the given options. Just click Install Now and you will be able to use it.

Read More
  • Share This:  
  •  Facebook
  •  Twitter
  •  Google+
  •  Stumble
  •  Digg

WordPress Dashboard

 Programing Coderfunda     June 16, 2021     Wordpress, wordpress-tutorial     No comments   

 WordPress Dashboard allows full access to manage a website behind the scenes. It is the default page in admin panel which comes right after the login page. It mainly represents everything that is happening with your blog. You can check everything here related to your post. It gives you the updates about your website. If you want to change your password or change any type of setting this is the place where you need to come.

All the content of dashboard is grouped into widgets. You can be hide/show these widgets as per your requirement. Their positions can also be changed using drag and drop action.

Wordpress Dashboard1

Look at the above snapshot, this is the login page for WordPress. After filling information click on Log In button, you will be directed to Dashboard screen which is shown below.

Wordpress Dashboard2

The above snapshot is the dashboard of WordPress.

We'll explain following points from the dashboard.

  • Admin bar
  • Sidebar Menu
  • Welcome to WordPress
  • At a Glance
  • Activity
  • Quick Draft
  • WordPress News
  • Screen Options

Admin Bar

The black bar at the top represents admin bar. It only displays when admin is logged in. That's why this is called admin bar.

WordPress Dashboard allows full access to manage a website behind the scenes. It is the default page in admin panel which comes right after the login page. It mainly represents everything that is happening with your blog. You can check everything here related to your post. It gives you the updates about your website. If you want to change your password or change any type of setting this is the place where you need to come.

All the content of dashboard is grouped into widgets. You can be hide/show these widgets as per your requirement. Their positions can also be changed using drag and drop action.

Wordpress Dashboard1

Look at the above snapshot, this is the login page for WordPress. After filling information click on Log In button, you will be directed to Dashboard screen which is shown below.

Wordpress Dashboard2

The above snapshot is the dashboard of WordPress.

We'll explain following points from the dashboard.

  • Admin bar
  • Sidebar Menu
  • Welcome to WordPress
  • At a Glance
  • Activity
  • Quick Draft
  • WordPress News
  • Screen Options

Admin Bar

The black bar at the top represents admin bar. It only displays when admin is logged in. That's why this is called admin bar.

Wordpress Dashboard3

Look at the above snapshot, this is the admin bar displayed at our account.

It contains the following items:

  • A WordPress icon - It contains information about WordPress, WordPress.org, documentation, etc.
  • Home of your site - It brings you to the Home page of your site
  • Notifications - All the notifications will be shown here. We have 5 notifications here.
  • Comments - Display comments on your blog where you can edit, reply or delete a comment.
  • New - You can add up a new page, post, media or user.
  • Admin name - It is displayed at the right end of the admin bar showing logged in user name (currently logged in user name is JTP). You can edit your profile and Logout from here.

Sidebar Menu

Wordpress Dashboard4

Look at the above snapshot, it is the side menu of the dashboard which contains full menu of options. These options allow easy access to different areas of your site.

A sub-menu list may appear on selecting an option. Like here we have shown sub-menu list of Appearance.


Menu content:

Dashboard - Display received updates

Posts - Manage posts on your blog

Media - Manage media content library like images, audio and video

Pages - creating and managing pages

Comments - display all the comments on your blog

Appearance - change the appearance of your site

Plugins - extend capabilities of the website and manage them

Users - shows all your site's users. Allows editing your site by changing password and name

Tools - setting of website

Welcome to WordPress

Wordpress Dashboard5

This is displayed at the top middle of the dashboard. There is a button to customize your site using different themes. It contains different links to create blog, view your site and many more as shown above.


There is an option at the top right corner to remove this widget. If you want to remove it you can. But if you want it back, click on screen options drop-down menu.


At a Glance

Wordpress Dashboard6

You can have a look on how many posts, pages and comments are there in your site. These comments also include spammed comments. It tells about which theme is currently running on your site.

It also tells about some additional information if some plugins are installed.


Activity

This widget provides you information about some of your recent posts. It displays the recent comment on your post.

Wordpress Dashboard7

Look at the above snapshot, there is one recent comment in our activity widget.

On doing hover with mouse at a comment, different actions appear below the comment like editing, deleting, replying, etc.

Wordpress Dashboard8


Quick Draft

Wordpress Dashboard9

Quick draft widget is a way through which you can write your ideas and save it in a draft form. Later you can write a blog on it.


WordPress News

Wordpress Dashboard10

This widget displays latest blog posts from the WordPress official blogs. Look at the top right corner if you'll click on this arrow, this widget will hide.


Screen Options

Wordpress Dashboard11

As you already know each of the widget can be enabled and disabled in your dashboard area. To do so, there is Screen Options widget which allows you to enable or disable different widgets.

You can also minimize or drag a widget according to your need.

Read More
  • Share This:  
  •  Facebook
  •  Twitter
  •  Google+
  •  Stumble
  •  Digg
Newer Posts Older Posts Home

Meta

Popular Posts

  • Write API Integrations in Laravel and PHP Projects with Saloon
    Write API Integrations in Laravel and PHP Projects with Saloon Saloon  is a Laravel/PHP package that allows you to write your API integratio...
  • Credit card validation in laravel
      Validation rules for credit card using laravel-validation-rules/credit-card package in laravel Install package laravel-validation-rules/cr...
  • iOS 17 Force Screen Rotation not working on iPAD only
    I have followed all the links on Google and StackOverFlow, unfortunately, I could not find any reliable solution Specifically for iPad devic...
  • C++ in Hindi Introduction
    C ++ का परिचय C ++ एक ऑब्जेक्ट ओरिएंटेड प्रोग्रामिंग लैंग्वेज है। C ++ को Bjarne Stroustrup द्वारा विकसित किया गया था। C ++ में आने से पह...
  • Python AttributeError: 'str' has no attribute glob
    I am trying to look for a folder in a directory but I am getting the error.AttributeError: 'str' has no attribute glob Here's ...

Categories

  • Ajax (26)
  • Bootstrap (30)
  • DBMS (42)
  • HTML (12)
  • HTML5 (45)
  • JavaScript (10)
  • Jquery (34)
  • Jquery UI (2)
  • JqueryUI (32)
  • Laravel (1017)
  • Laravel Tutorials (23)
  • Laravel-Question (6)
  • Magento (9)
  • Magento 2 (95)
  • MariaDB (1)
  • MySql Tutorial (2)
  • PHP-Interview-Questions (3)
  • Php Question (13)
  • Python (36)
  • RDBMS (13)
  • SQL Tutorial (79)
  • Vue.js Tutorial (68)
  • Wordpress (150)
  • Wordpress Theme (3)
  • codeigniter (108)
  • oops (4)
  • php (853)

Social Media Links

  • Follow on Twitter
  • Like on Facebook
  • Subscribe on Youtube
  • Follow on Instagram

Pages

  • Home
  • Contact Us
  • Privacy Policy
  • About us

Blog Archive

  • July (2)
  • September (100)
  • August (50)
  • July (56)
  • June (46)
  • May (59)
  • April (50)
  • March (60)
  • February (42)
  • January (53)
  • December (58)
  • November (61)
  • October (39)
  • September (36)
  • August (36)
  • July (34)
  • June (34)
  • May (36)
  • April (29)
  • March (82)
  • February (1)
  • January (8)
  • December (14)
  • November (41)
  • October (13)
  • September (5)
  • August (48)
  • July (9)
  • June (6)
  • May (119)
  • April (259)
  • March (122)
  • February (368)
  • January (33)
  • October (2)
  • July (11)
  • June (29)
  • May (25)
  • April (168)
  • March (93)
  • February (60)
  • January (28)
  • December (195)
  • November (24)
  • October (40)
  • September (55)
  • August (6)
  • July (48)
  • May (2)
  • January (2)
  • July (6)
  • June (6)
  • February (17)
  • January (69)
  • December (122)
  • November (56)
  • October (92)
  • September (76)
  • August (6)

Loading...

Laravel News

Loading...

Copyright © CoderFunda | Powered by Blogger
Design by Coderfunda | Blogger Theme by Coderfunda | Distributed By Coderfunda