CoderFunda
  • Home
  • About us
    • Contact Us
    • Disclaimer
    • Privacy Policy
    • About us
  • Home
  • Php
  • HTML
  • CSS
  • JavaScript
    • JavaScript
    • Jquery
    • JqueryUI
    • Stock
  • SQL
  • Vue.Js
  • Python
  • Wordpress
  • C++
    • C++
    • C
  • Laravel
    • Laravel
      • Overview
      • Namespaces
      • Middleware
      • Routing
      • Configuration
      • Application Structure
      • Installation
    • Overview
  • DBMS
    • DBMS
      • PL/SQL
      • SQLite
      • MongoDB
      • Cassandra
      • MySQL
      • Oracle
      • CouchDB
      • Neo4j
      • DB2
      • Quiz
    • Overview
  • Entertainment
    • TV Series Update
    • Movie Review
    • Movie Review
  • More
    • Vue. Js
    • Php Question
    • Php Interview Question
    • Laravel Interview Question
    • SQL Interview Question
    • IAS Interview Question
    • PCS Interview Question
    • Technology
    • Other

01 February, 2022

How to Customize Product Page Layout in Magento

 Programing Coderfunda     February 01, 2022     MAGENTO TUTORIALS     No comments   


How to Customize Product Page Layout in Magento


As you might know, each product requires a particular page layout based on its unique features. So the thing here is to customize a specific product page layout for several products under a category without changing the category layout.

To do that, we’ll need to go through the basics, and only from there, we will learn to customize product page layout with layout files.

About layout files

In Magento, layout files are .XML files which are used to define the structure of a given page. Layout files are classified into:

  • Base layouts: the layout files provided by modules
TypeLocation
Page configuration & generic layout files<module_dir>/view/frontend/layout
Page layout files<module_dir>/view/frontend/page_layout
  • Theme layouts: the layout files provided by themes
TypeLocation
Page configuration & generic layout files<theme_dir>/<Namespace>_<Module>/layout
Page layout files<theme_dir>/<Namespace>_<Module>/page_layout

How to customize product page layout

To customize the layout of a given page, you’ll need to override that page’s layout file with a custom one. To do so, you’ll need to locate the layout files for your theme’s product page. 

Customize product page layout for all product types

What if you want to customize the product page layout for all of your product types? 

This is the easy part, as you’ll only need to make changes to the common layout file i.e., catalog_product_view.xml (located in /theme_dir/Magento_Catalog/layout/) for the change to be reflected on all of your product types.

Structure content in the layout using containers

The layout of your product pages is structured using containers, which can be referenced or has more blocks added into it.

Example:

<move element="product.info.social" destination="product.info.main" before="product.info.price"/>

Here are the common containers used in product page layout:

  • product.info.main
  • product.info.price
  • product.info.stock.sku
  • product.info.form.content
  • product.info.extrahint
  • product.info.social
  • product.info.media

Customize product page layout for a specific product

There are two ways you can go about customizing your product page’s layout for a specific product, both involve putting files in a specified /layout/ folder.

Method 1: Create a custom layout update

Starting with Magento 2.3.4, the Layout Update XML field in Magento Admin Panel is now converted into a selector, which means you can no longer freely add code into this field anymore.

design page layout
Custom layout update for product pages is now converted into a selector

In order to apply custom layout updates for your product pages, you’ll need to put an .XML file in a specified folder (app/design/frontend/<Vendor>/<Theme>/Magento_Catalog/layout/). The layout update from that .XML file will then appear under Custom Layout Update as a selectable option.

The rule for custom layout update file names

Your custom layout update file names will need to adhere to the following rule:

catalog_product_view_selectable_<Product SKU>_<Name for Layout Update>.xml

where: 

  • <Product_SKU>: is the SKU of the product that you want to apply custom layout update
  • <Name for Layout Update>: is the name of this layout which will be shown in the Custom Layout Update selector

For example, if we want to apply a new custom layout update for this SKU: MH05. We’ll need to put a custom layout file named catalog_product_view_selectable_ MH05_test.xml in /theme_dir/Magento_Catalog/layout/, with the content like below:

MH05 file
<?xml version="1.0"?>
<page layout="1column" xmlns:xsi="http://www.w3.org/2001/XMLSchema-instance" xsi:noNamespaceSchemaLocation="urn:magento:framework:View/Layout/etc/page_configuration.xsd">
<body>
<move element="page.main.title" destination="product.info.main" before="-"/>
<move element="product.info.stock.sku" destination="product.info.price" after="product.price.final"/>
<move element="product.info.review" destination="product.info.main" before="product.info.price"/>
<referenceContainer name="page.wrapper">
<referenceBlock name="breadcrumbs" remove="true"/>
</referenceContainer>
</body>
</page>

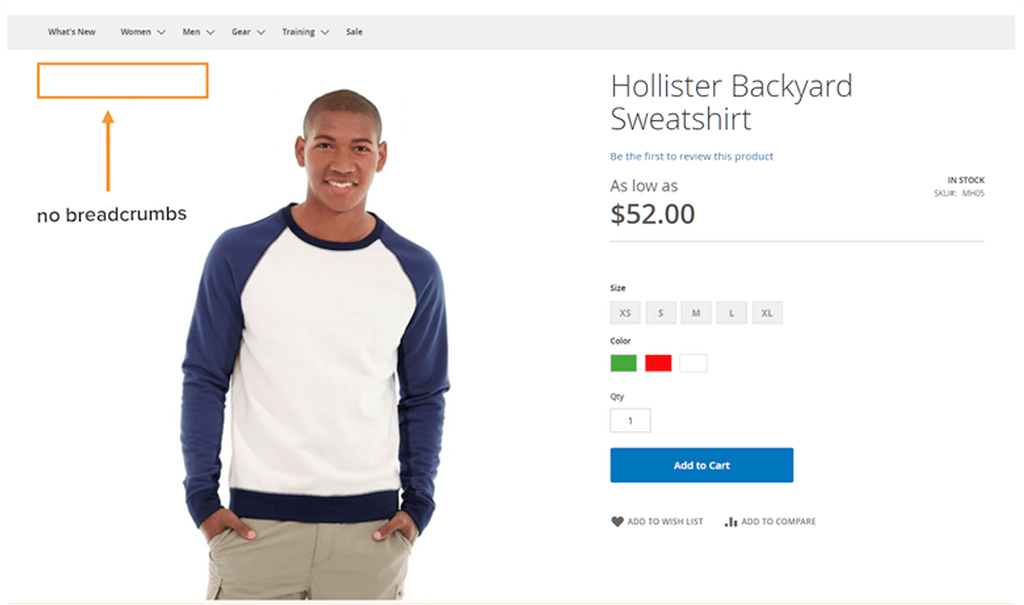
What this test layout will do is it’ll remove the breadcrumbs from Product SKU MH05’s product page.

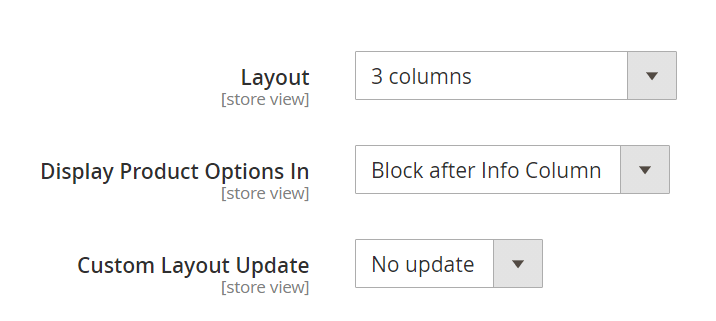
Next, in Catalog > Products, choose the product with SKU MH05. You should now be able to see a custom layout update named test:

design test file

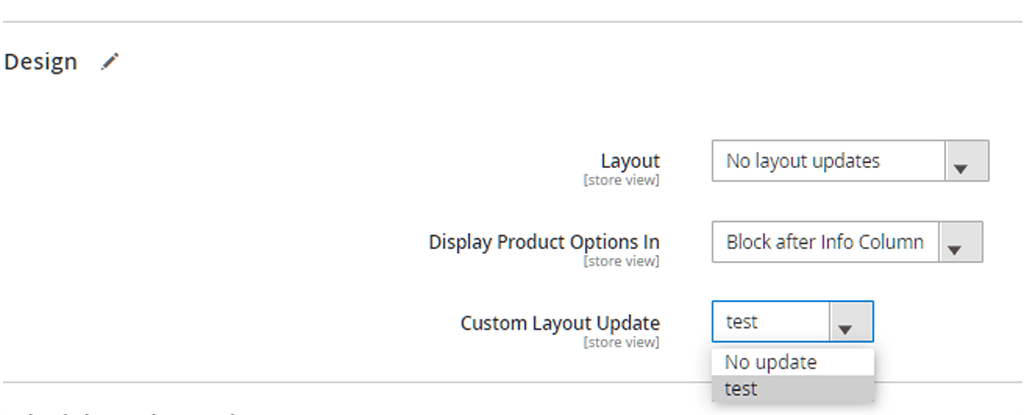
Choose this new custom layout update and Save the changes. 

Now clear your cache using:

php bin/magento cache:flush

And the changes should now be reflected on your frontend.

no breadcrumbs
Our product (SKU MH05) with a custom layout update to remove breadcrumbs

Method 2: Overriding layout

With the addPageLayoutHandles method, you can override the layout using:

  • Product ID 
  • Product SKU
  • Product TYPE

For example, if you want to customize the product page layout for a product with ID 68, the layout file’s name will need to adhere to the following format:

catalog_product_view_id_number.xml

e.g., catalog_product_view_id_68

And the file will need to be in the following part:

/theme_dir/Magento_Catalog/layout/

layout id 68
Customize product page layout for specific product ID/SKU/type

Clear the cache following the system’s message. If not, you can go to the frontend to check out the new customized page layout for the specific product. 

For product type, you can follow the same steps and change the file’s name accordingly. For example, use catalog_product_view_type_bundle.xml to apply the new page layout for bundled products.

Hope you enjoy your new page layout for your lovely items!


By simicart . com


Read More
  • Share This:  
  •  Facebook
  •  Twitter
  •  Google+
  •  Stumble
  •  Digg

How to Import Configurable Products in Magento 2

 Programing Coderfunda     February 01, 2022     MAGENTO TUTORIALS     No comments   

How to Import Configurable Products in Magento 2


This guide will walk you through how to import configurable products in Magento 2 using CSV file.

Step 1: Prepare your CSV file

Go to your Magento Admin > System > Data Transfer > Import.

From the Entity Type drop-down selections, choose Products and make sure your File Format is CSV.

magento import configurable products

In Import Behavior, click and choose Add/Update.

import behaviour

After which, click on the Download sample file and you’ll receive a .CSV file containing the products whose SKUs you just put down.

Step 2: Complete the CSV file

Open your downloaded CSV file.

magento sample file

You’ll see that other fields in the CSV import file of configurable products are the same as the file of simple products. Yet, with configurable products, you’ll need to add some fields and follow the instructions:

additional columns
  1. List children products before configurable ones
  2. Make sure the value in the ‘attribute_set_code’ column matches the name of the Attribute Set.
  3. Add the ‘additional_attributes’ column and enumerate all the attribute set values for each child product. Put the attributes in the format as attribute_label=atrribute_value, separated by a comma.
  4. Add the ‘configurable_variations’ column and fill in the set of SKU and Option (only for the parent products). Put the products in the format as SKU = child_sku, attribute_label=attribute_value, separate by ‘|”. The value attribute must correspond to the product value.
  5. Add and check the correlation between the Attribute Code and the Label name in the ‘configurable_variation_labels’ column (only for the parent products). Here you’ll declare an attribute in the format as attribute_code=attribute_label, separated by a comma.

Step 3: Import CSV file

Go back to your Magento backend, go to System > Data Transfer > Import.

magento data import menu

Then go to File to Import > Select File to Import. Select the file you want to import into your Magento store system.

file to import

And click on Check Data on the right corner.

check data

You can leave other fields as they already are by default.

After the data checking process completes, you can proceed to import if the checking result is valid, else you need to edit your CSV file until it is free of error.

magento validation result

Click Import to start the import process. When everything’s done you will receive the below success message.

magento import success

Now you can go to your frontend to check the result.


By simicart . com

Read More
  • Share This:  
  •  Facebook
  •  Twitter
  •  Google+
  •  Stumble
  •  Digg
Newer Posts Older Posts Home

Meta

Popular Posts

  • Write API Integrations in Laravel and PHP Projects with Saloon
    Write API Integrations in Laravel and PHP Projects with Saloon Saloon  is a Laravel/PHP package that allows you to write your API integratio...
  • Credit card validation in laravel
      Validation rules for credit card using laravel-validation-rules/credit-card package in laravel Install package laravel-validation-rules/cr...
  • iOS 17 Force Screen Rotation not working on iPAD only
    I have followed all the links on Google and StackOverFlow, unfortunately, I could not find any reliable solution Specifically for iPad devic...
  • Fast Excel Package for Laravel
      Fast Excel is a Laravel package for importing and exporting spreadsheets. It provides an elegant wrapper around Spout —a PHP package to ...
  • C++ in Hindi Introduction
    C ++ का परिचय C ++ एक ऑब्जेक्ट ओरिएंटेड प्रोग्रामिंग लैंग्वेज है। C ++ को Bjarne Stroustrup द्वारा विकसित किया गया था। C ++ में आने से पह...

Categories

  • Ajax (26)
  • Bootstrap (30)
  • DBMS (42)
  • HTML (12)
  • HTML5 (45)
  • JavaScript (10)
  • Jquery (34)
  • Jquery UI (2)
  • JqueryUI (32)
  • Laravel (1017)
  • Laravel Tutorials (23)
  • Laravel-Question (6)
  • Magento (9)
  • Magento 2 (95)
  • MariaDB (1)
  • MySql Tutorial (2)
  • PHP-Interview-Questions (3)
  • Php Question (13)
  • Python (36)
  • RDBMS (13)
  • SQL Tutorial (79)
  • Vue.js Tutorial (68)
  • Wordpress (150)
  • Wordpress Theme (3)
  • codeigniter (108)
  • oops (4)
  • php (853)

Social Media Links

  • Follow on Twitter
  • Like on Facebook
  • Subscribe on Youtube
  • Follow on Instagram

Pages

  • Home
  • Contact Us
  • Privacy Policy
  • About us

Blog Archive

  • September (100)
  • August (50)
  • July (56)
  • June (46)
  • May (59)
  • April (50)
  • March (60)
  • February (42)
  • January (53)
  • December (58)
  • November (61)
  • October (39)
  • September (36)
  • August (36)
  • July (34)
  • June (34)
  • May (36)
  • April (29)
  • March (82)
  • February (1)
  • January (8)
  • December (14)
  • November (41)
  • October (13)
  • September (5)
  • August (48)
  • July (9)
  • June (6)
  • May (119)
  • April (259)
  • March (122)
  • February (368)
  • January (33)
  • October (2)
  • July (11)
  • June (29)
  • May (25)
  • April (168)
  • March (93)
  • February (60)
  • January (28)
  • December (195)
  • November (24)
  • October (40)
  • September (55)
  • August (6)
  • July (48)
  • May (2)
  • January (2)
  • July (6)
  • June (6)
  • February (17)
  • January (69)
  • December (122)
  • November (56)
  • October (92)
  • September (76)
  • August (6)

Loading...

Laravel News

Loading...

Copyright © CoderFunda | Powered by Blogger
Design by Coderfunda | Blogger Theme by Coderfunda | Distributed By Coderfunda