CoderFunda
  • Home
  • About us
    • Contact Us
    • Disclaimer
    • Privacy Policy
    • About us
  • Home
  • Php
  • HTML
  • CSS
  • JavaScript
    • JavaScript
    • Jquery
    • JqueryUI
    • Stock
  • SQL
  • Vue.Js
  • Python
  • Wordpress
  • C++
    • C++
    • C
  • Laravel
    • Laravel
      • Overview
      • Namespaces
      • Middleware
      • Routing
      • Configuration
      • Application Structure
      • Installation
    • Overview
  • DBMS
    • DBMS
      • PL/SQL
      • SQLite
      • MongoDB
      • Cassandra
      • MySQL
      • Oracle
      • CouchDB
      • Neo4j
      • DB2
      • Quiz
    • Overview
  • Entertainment
    • TV Series Update
    • Movie Review
    • Movie Review
  • More
    • Vue. Js
    • Php Question
    • Php Interview Question
    • Laravel Interview Question
    • SQL Interview Question
    • IAS Interview Question
    • PCS Interview Question
    • Technology
    • Other

01 February, 2022

How to Configure Magento CAPTCHA Settings for Admin and Customers

 Programing Coderfunda     February 01, 2022     No comments   


How to Configure Magento CAPTCHA Settings for Admin and Customers


A CAPTCHA is a program that protects websites against bots by generating and grading tests that humans can pass but current computer programs cannot. The term “CAPTCHA” is an acronym for “Completely Automated Public Turing Test to Tell Computers and Humans Apart.”

magento captcha

In Magento, CAPTCHA can be used for both the Admin and customers. This tutorial will guide you to configure CAPTCHA for Admin and customers in Magento 2.

Configuring CAPTCHA for Admin in Magento 2

Before going into configuring CAPTCHA for your Magento store, first, you’ll need to have an API key pair (Google API website key & Google API secret key) for your website. This key pair is necessary for invoking Google’s reCAPTCHA service, as well as for verifying the user’s response.

Step 1: Go to Stores > Settings > Configuration in your Magento backend.

On the left side navigation panel, expand Advanced and choose Admin.

Go to CAPTCHA and you’ll see a section like below:

magento 2 captcha

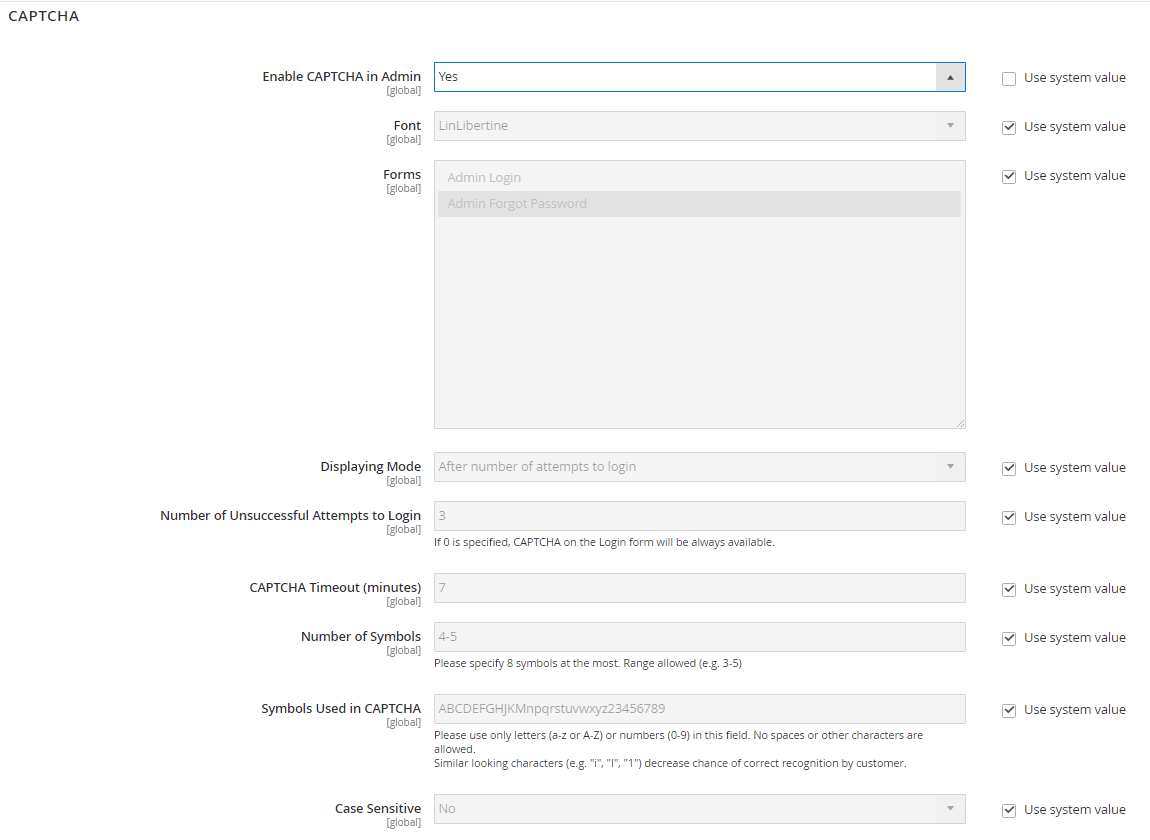
Step 2: On the upper-left corner, set Store View to “Default Config”.

Step 3: Configure fields to your requirements

  • Enable CAPTCHA in Admin: choose Yes
  • Font: set the font for CAPTCHA (or tick on Use default value)
  • Forms: choose the forms in which the CAPTCHA is applicable. To choose multiple forms, hold the Ctrl key (PC) or Command key (Mac).
  • Displaying mode: choose either ‘Always’ or ‘After a number of attempts to login’
  • Number of unsuccessful attempts to login: enter the number of attempts before CAPTCHA appears. If the number is 0, CAPTCHA is always required.
  • CAPTCHA timeout: enter the minutes before a CAPTCHA expires. If the CAPTCHA is expired, the user needs to reload the page for a new one.
  • Number of symbols: fill in the number of symbols that appear in each CAPTCHA (up to 8). For a variable number of symbols that changes with each CAPTCHA, enter a range (such as 4-8).
  • Symbols used in CAPTCHA: specify the symbols that can be used in the CAPTCHA.
  • Case sensitive: Set to Yes if you want to require administrators to enter the characters in upper/ lowercase exactly as shown in the CAPTCHA.

Step 4: After you complete all the fields, click Save Config.

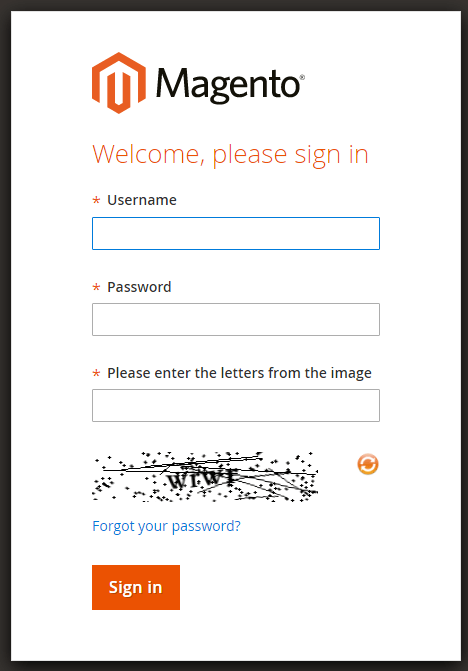
Enable CAPTCHA for customers

CAPTCHA for customers are usually required in these cases:

  • Customer sign up for an account
  • When they log in into their account
  • Forgot password 
  • Checkout as guest
  • Register during checkout

The steps to configure CAPTCHA for customers are quite similar to those for admin.

Step 1: Go to Stores > Settings > Configuration in your Magento backend.

On the left side navigation panel, expand Advanced and choose Customers > Customer configuration.

Go to the CAPTCHA section. 

magento 2 customer captcha

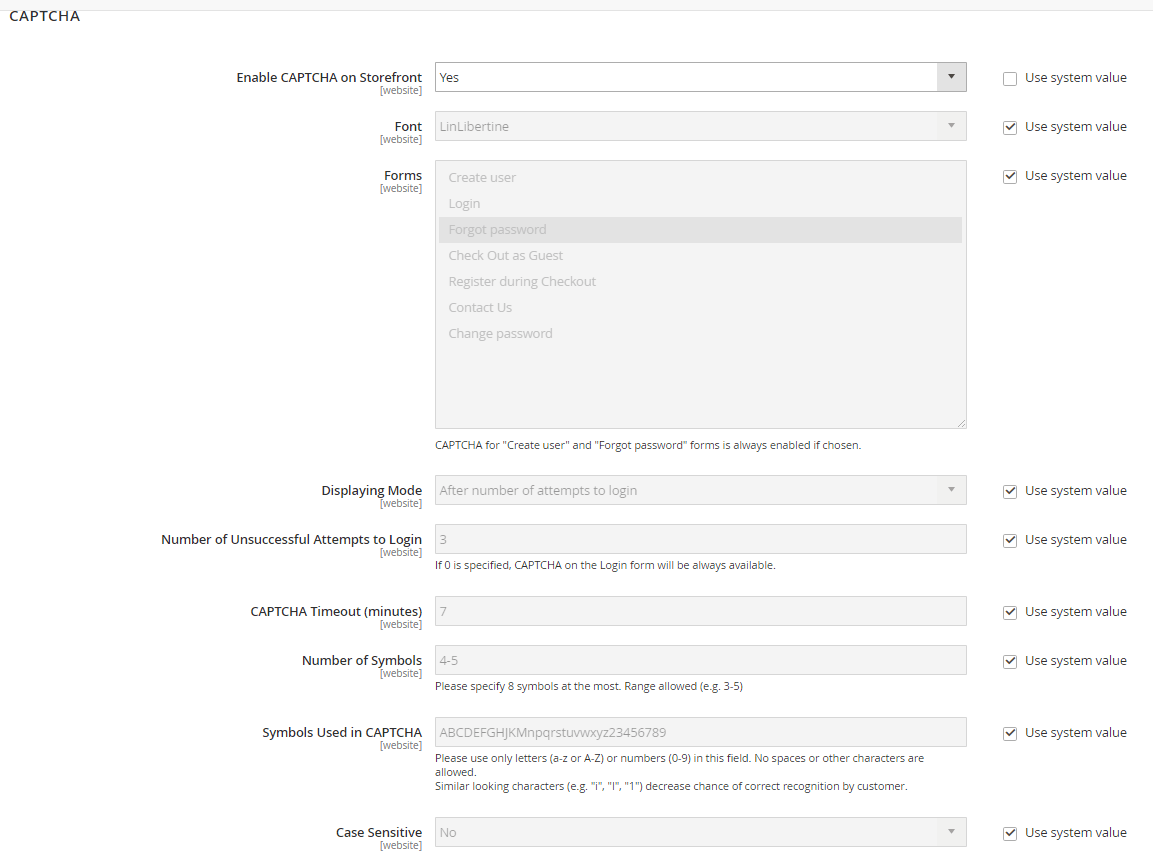
Step 2: Configure the fields in this CAPTCHA section (similar to configuring CAPTCHA for admin) :

  • Enable CAPTCHA on Storefront: change to Yes
  • Font
  • Forms: choose the cases that a CAPTCHA will appear – Checkout; Login; Forget password, etc. Hold the Ctrl key (PC) or Command key (Mac) and click to choose multiple options. 
  • Displaying mode
  • Number of unsuccessful attempts to login
  • CAPTCHA timeout
  • Number of symbols
  • Symbols used in CAPTCHA
  • Case sensitive

Step 3: When finished, click Save Config.

  • Share This:  
  •  Facebook
  •  Twitter
  •  Google+
  •  Stumble
  •  Digg
Email ThisBlogThis!Share to XShare to Facebook
Newer Post Older Post Home

0 comments:

Post a Comment

Thanks

Meta

Popular Posts

  • What is WordPress
      What is WordPress WordPress is a free and open-source  C ontent  M anagement  S ystem (CMS). It is an online site based on PHP and MySQL. ...
  • HTTP Client That Handles Retries and Logging
      Gustavo Ocanto   created an HTTP client on top of Guzzle that handles retries and logging. Typically you’d have some code like the followi...
  • JqueryUI Tutorial
    JqueryUI Tutorial    JqueryUI is the most popular front end frameworks currently. It is sleek, intuitive, and powerful mobile first fr...
  • Coderfunda - The Best Portal to Learn Technologies
      WordPress Tutorial WordPress tutorial provides basic and advanced concepts of WordPress. Our WordPress tutorial is designed for beginners ...
  • Three schema Architecture
      Three schema Architecture The three schema architecture is also called ANSI/SPARC architecture or three-level architecture. This framework...

Categories

  • Ajax (26)
  • Bootstrap (30)
  • DBMS (42)
  • HTML (12)
  • HTML5 (45)
  • JavaScript (10)
  • Jquery (34)
  • Jquery UI (2)
  • JqueryUI (32)
  • Laravel (1017)
  • Laravel Tutorials (23)
  • Laravel-Question (6)
  • Magento (9)
  • Magento 2 (95)
  • MariaDB (1)
  • MySql Tutorial (2)
  • PHP-Interview-Questions (3)
  • Php Question (13)
  • Python (36)
  • RDBMS (13)
  • SQL Tutorial (79)
  • Vue.js Tutorial (69)
  • Wordpress (150)
  • Wordpress Theme (3)
  • codeigniter (108)
  • oops (4)
  • php (853)

Social Media Links

  • Follow on Twitter
  • Like on Facebook
  • Subscribe on Youtube
  • Follow on Instagram

Pages

  • Home
  • Contact Us
  • Privacy Policy
  • About us

Blog Archive

  • July (4)
  • September (100)
  • August (50)
  • July (56)
  • June (46)
  • May (59)
  • April (50)
  • March (60)
  • February (42)
  • January (53)
  • December (58)
  • November (61)
  • October (39)
  • September (36)
  • August (36)
  • July (34)
  • June (34)
  • May (36)
  • April (29)
  • March (82)
  • February (1)
  • January (8)
  • December (14)
  • November (41)
  • October (13)
  • September (5)
  • August (48)
  • July (9)
  • June (6)
  • May (119)
  • April (259)
  • March (122)
  • February (368)
  • January (33)
  • October (2)
  • July (11)
  • June (29)
  • May (25)
  • April (168)
  • March (93)
  • February (60)
  • January (28)
  • December (195)
  • November (24)
  • October (40)
  • September (55)
  • August (6)
  • July (48)
  • May (2)
  • January (2)
  • July (6)
  • June (6)
  • February (17)
  • January (69)
  • December (122)
  • November (56)
  • October (92)
  • September (76)
  • August (6)

Loading...

Laravel News

Loading...

Copyright © CoderFunda | Powered by Blogger
Design by Coderfunda | Blogger Theme by Coderfunda | Distributed By Coderfunda