CoderFunda
  • Home
  • About us
    • Contact Us
    • Disclaimer
    • Privacy Policy
    • About us
  • Home
  • Php
  • HTML
  • CSS
  • JavaScript
    • JavaScript
    • Jquery
    • JqueryUI
    • Stock
  • SQL
  • Vue.Js
  • Python
  • Wordpress
  • C++
    • C++
    • C
  • Laravel
    • Laravel
      • Overview
      • Namespaces
      • Middleware
      • Routing
      • Configuration
      • Application Structure
      • Installation
    • Overview
  • DBMS
    • DBMS
      • PL/SQL
      • SQLite
      • MongoDB
      • Cassandra
      • MySQL
      • Oracle
      • CouchDB
      • Neo4j
      • DB2
      • Quiz
    • Overview
  • Entertainment
    • TV Series Update
    • Movie Review
    • Movie Review
  • More
    • Vue. Js
    • Php Question
    • Php Interview Question
    • Laravel Interview Question
    • SQL Interview Question
    • IAS Interview Question
    • PCS Interview Question
    • Technology
    • Other

23 February, 2022

Magento 2 Admin ACL Access Control Lists

 Programing Coderfunda     February 23, 2022     Magento 2, MAGENTO TUTORIALS     No comments   


Magento 2 Admin ACL Access Control Lists

Magento 2 admin acl use an authentication system and a robust system for create Access Control List Rules (ACL) which allows a store owner to create fine grained roles for each and every user in their system.

Magento 2 Admin ACL panel use an authentication system and a robust system for create Access Control List Rules (ACL) which allows a store owner to create fine grained roles for each and every user in their system. In this article, we will find how it work and how to add ACL for our custom module.

Magento 2 Access Control List Rules

The Magento 2 Admin ACL resources are visible under the Magento 2 admin System > Permissions > User Roles area. When we click on the Add New Role button or access to a role, you will see the page look like:

magento 2 admin acl

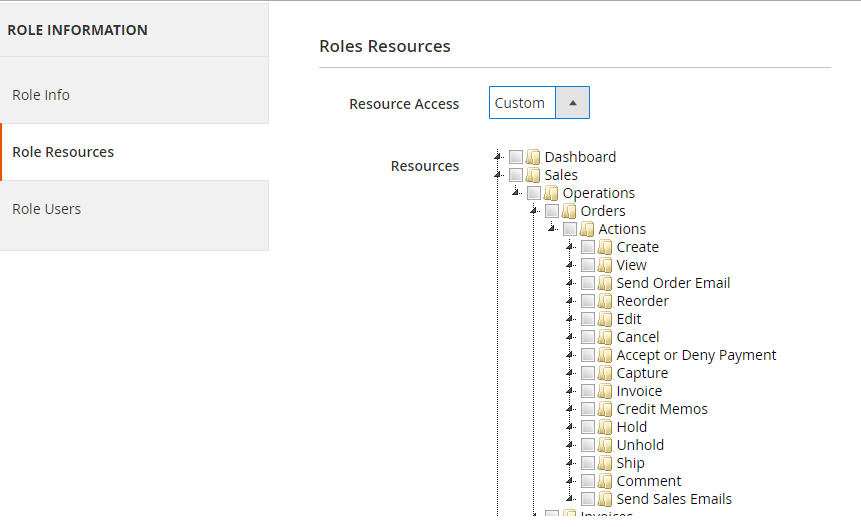
In this resources tab, you can see a tree-list of all the available resources in your system. You can choose all Resource or some of them for this role and select the user for this role in Role Users tab. All of the user who belong to this role will be limit access to the resource which you choose. They cannot see and access to other one.

To Create Admin Admin ACL

  • Step 1: Create ACL rule
  • Step 2: Flush Magento cache
  • Step 3: Check ACL rule

Step 1: Create ACL rule

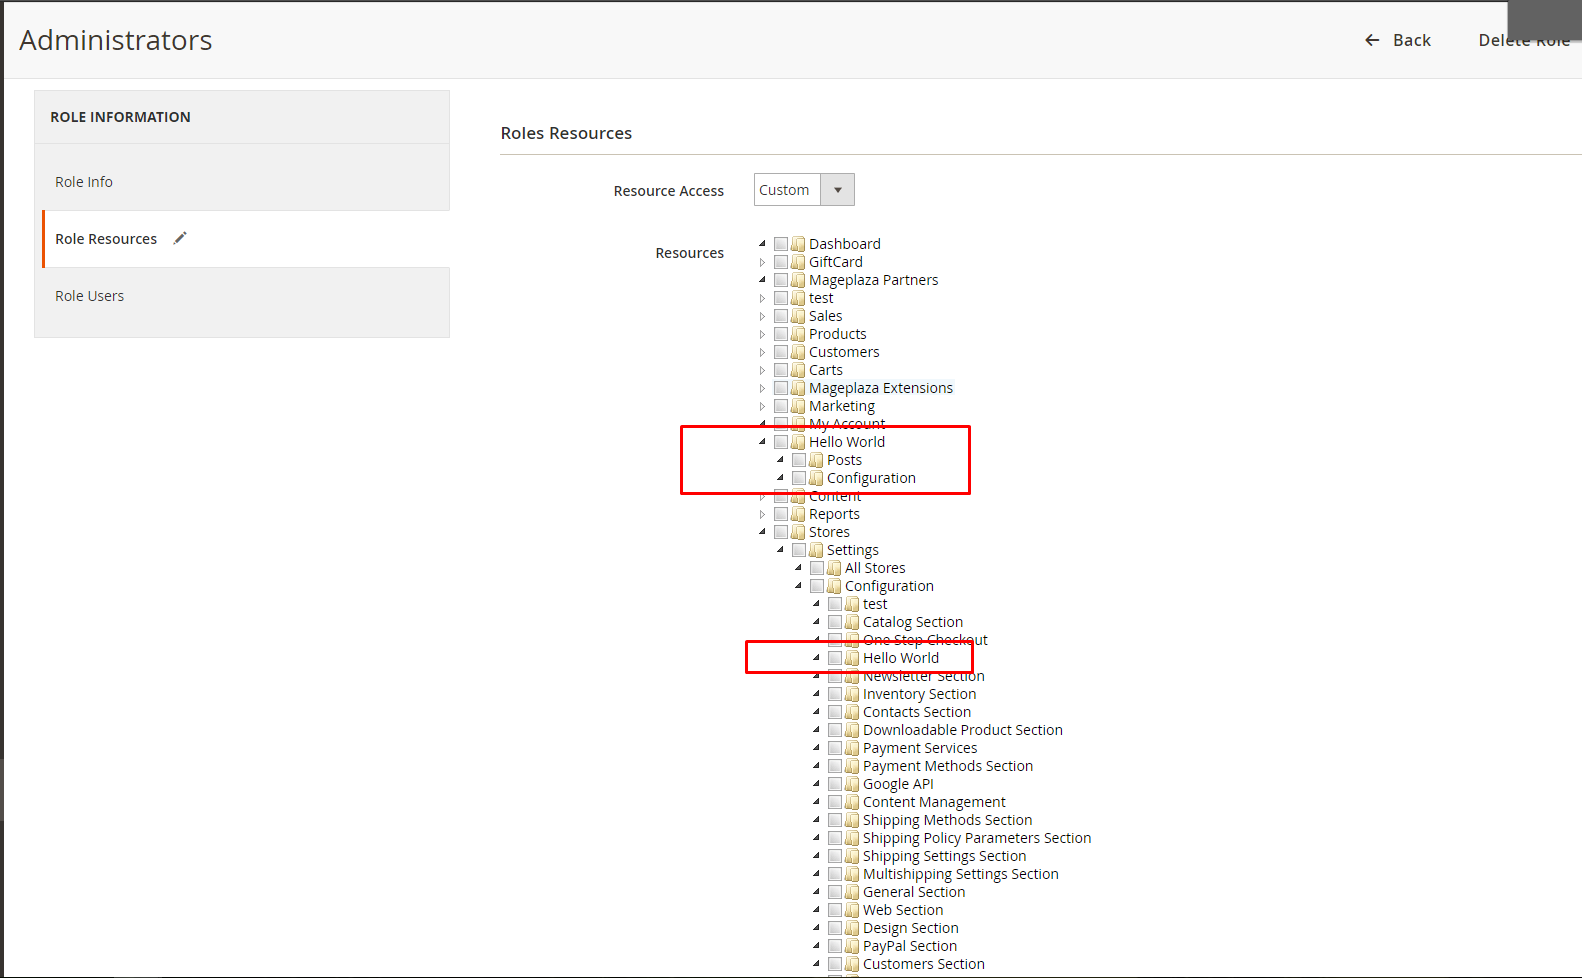
Now, we will see how to add our module to ACL role. We will use a previous simple module HelloWorld to do this. As in the Admin Menu and System Configuration article, you saw that we alway have a resource attribute when create it. Now we will register that resources to the system, so Magento can realize and let us set a role for them. To register the resource, we use the acl.xml file which located in app/code/{namespace}/{module}/etc/acl.xml. Let’s create this file for our simple Module:

File: app/code/Mageplaza/HelloWorld/etc/acl.xml

Contents would be:

<?xml version="1.0"?>
<config xmlns:xsi="http://www.w3.org/2001/XMLSchema-instance" xsi:noNamespaceSchemaLocation="urn:magento:framework:Acl/etc/acl.xsd">
    <acl>
        <resources>
            <resource id="Magento_Backend::admin">
                <resource id="Mageplaza_HelloWorld::helloworld" title="Hello World" sortOrder="51">
                    <resource id="Mageplaza_HelloWorld::post" title="Posts" sortOrder="10"/>
                    <resource id="Mageplaza_HelloWorld::helloworld_configuration" title="Configuration" sortOrder="99" />
                </resource>
                <resource id="Magento_Backend::stores">
                    <resource id="Magento_Backend::stores_settings">
                        <resource id="Magento_Config::config">
                            <resource id="Mageplaza_HelloWorld::helloworld_config" title="Hello World"/>
                        </resource>
                    </resource>
                </resource>
            </resource>
        </resources>
    </acl>
</config>

Our resource will be placed as child of Magento_Backend::admin. Each resource will have an Id, title and sortOrder attribute:

  • Id attribute is the identify of this resource. You can use this when define resource in Admin menu, configuration and limit access to your module controller. This is a unique string and should be in this format: Vendor_ModuleName::resource_name.
  • Title attribute is the label of this resource when showing in resource tree.
  • sortOrder attribute define the position of this resource in tree.

After this done, please refresh the cache and see the result on resource tree

magento 2 admin acl

Step 2: Flush Magento cache

Make sure it admin menu items are displayed on Magento 2 admin, you should try to flush Magento 2 cache.

Step 3: Check ACL rule

There are some place where we put the ACL resource to make it limit the access:

Admin menu: Put the ACL resource to hide the menu if it’s not allowed by store owner.

File: app/code/Mageplaza/HelloWorld/etc/adminhtml/menu.xml

<add id="Mageplaza_HelloWorld::helloworld" title="Hello World" module="Mageplaza_HelloWorld" sortOrder="51" resource="Mageplaza_HelloWorld::helloworld"/>

System configuration: Put the ACL resource to limit access to this section page.

File: app/code/Mageplaza/HelloWorld/etc/adminhtml/system.xml

<section id="helloworld" translate="label" sortOrder="130" showInDefault="1" showInWebsite="1" showInStore="1">
        ….
            <resource>Mageplaza_HelloWorld::helloworld_configuration</resource>
        ….
</section>

We will use Mageplaza_HelloWorld::helloworld_configuration in Magento 2 How to Create System.xml Configuration

With resource it also use on controller.

In admin controllers: Magento provides an abstract type Magento\Framework\AuthorizationInterface which you can use to validate the currently logged in user against a specific ACL. You can call that object by use the variable: $this->_authorization. In the controller, you have to write a protected function to check the resource:

Example: File: vendor/magento/module-customer/Controller/Adminhtml/Index.php

protected function _isAllowed()
{
 return $this->_authorization->isAllowed('Magento_Customer::manage');
}
  • Share This:  
  •  Facebook
  •  Twitter
  •  Google+
  •  Stumble
  •  Digg
Email ThisBlogThis!Share to XShare to Facebook

Related Posts:

  • Enable/ Disable Magento 2 Developer Mode Enable/ Disable Magento 2 Developer ModeThe Magento 2 platform offers three modes for users which are default mode, developer mode, and pro… Read More
  • How To Add CMS Block In Checkout Page Magento 2 How To Add CMS Block In Checkout Page Magento 2CMS blocks were one of the reasons which made Magento was and is that popular. Site administ… Read More
  • How To Add Custom Columns To Magento 2 How To Add Custom Columns To Magento 2If the value that you want to display in the column is a product attribute, it’s not too difficu… Read More
  • How to make Sidebar sticky in Magento 2 How to make Sidebar sticky in Magento 2In today’s post, I will talk about how to make Sidebar sticky in Magento 2.Sticky sidebar, just similar t… Read More
  • How to Add Custom Tab in Product Page Magento 2 How to Add Custom Tab in Product Page Magento 2Product details play an important role in customer experience, so it’s critical to let customers … Read More
Newer Post Older Post Home

0 comments:

Post a Comment

Thanks

Meta

Popular Posts

  • Spring boot app (error: method getFirst()) failed to run at local machine, but can run on server
    The Spring boot app can run on the online server. Now, we want to replicate the same app at the local machine but the Spring boot jar file f...
  • Log activity in a Laravel app with Spatie/Laravel-Activitylog
      Requirements This package needs PHP 8.1+ and Laravel 9.0 or higher. The latest version of this package needs PHP 8.2+ and Laravel 8 or hig...
  • Failed to install 'cordova-plugin-firebase': CordovaError: Uh oh
    I had follow these steps to install an configure firebase to my cordova project for cloud messaging. https://medium.com/@felipepucinelli/how...
  • Laravel auth login with phone or email
          <?php     Laravel auth login with phone or email     <? php     namespace App \ Http \ Controllers \ Auth ;         use ...
  • Vue3 :style backgroundImage not working with require
    I'm trying to migrate a Vue 2 project to Vue 3. In Vue 2 I used v-bind style as follow: In Vue 3 this doesn't work... I tried a...

Categories

  • Ajax (26)
  • Bootstrap (30)
  • DBMS (42)
  • HTML (12)
  • HTML5 (45)
  • JavaScript (10)
  • Jquery (34)
  • Jquery UI (2)
  • JqueryUI (32)
  • Laravel (1017)
  • Laravel Tutorials (23)
  • Laravel-Question (6)
  • Magento (9)
  • Magento 2 (95)
  • MariaDB (1)
  • MySql Tutorial (2)
  • PHP-Interview-Questions (3)
  • Php Question (13)
  • Python (36)
  • RDBMS (13)
  • SQL Tutorial (79)
  • Vue.js Tutorial (68)
  • Wordpress (150)
  • Wordpress Theme (3)
  • codeigniter (108)
  • oops (4)
  • php (853)

Social Media Links

  • Follow on Twitter
  • Like on Facebook
  • Subscribe on Youtube
  • Follow on Instagram

Pages

  • Home
  • Contact Us
  • Privacy Policy
  • About us

Blog Archive

  • September (100)
  • August (50)
  • July (56)
  • June (46)
  • May (59)
  • April (50)
  • March (60)
  • February (42)
  • January (53)
  • December (58)
  • November (61)
  • October (39)
  • September (36)
  • August (36)
  • July (34)
  • June (34)
  • May (36)
  • April (29)
  • March (82)
  • February (1)
  • January (8)
  • December (14)
  • November (41)
  • October (13)
  • September (5)
  • August (48)
  • July (9)
  • June (6)
  • May (119)
  • April (259)
  • March (122)
  • February (368)
  • January (33)
  • October (2)
  • July (11)
  • June (29)
  • May (25)
  • April (168)
  • March (93)
  • February (60)
  • January (28)
  • December (195)
  • November (24)
  • October (40)
  • September (55)
  • August (6)
  • July (48)
  • May (2)
  • January (2)
  • July (6)
  • June (6)
  • February (17)
  • January (69)
  • December (122)
  • November (56)
  • October (92)
  • September (76)
  • August (6)

  • Failed to install 'cordova-plugin-firebase': CordovaError: Uh oh - 9/21/2024
  • pyspark XPath Query Returns Lists Omitting Missing Values Instead of Including None - 9/20/2024
  • SQL REPL from within Python/Sqlalchemy/Psychopg2 - 9/20/2024
  • MySql Explain with Tobias Petry - 9/20/2024
  • How to combine information from different devices into one common abstract virtual disk? [closed] - 9/20/2024

Laravel News

  • Arr::from() Method in Laravel 12.14 - 5/14/2025
  • Streamline API Resources with Laravel's Fluent Methods - 5/13/2025
  • Customize URL Handling with Laravel's Macroable URI Class - 5/13/2025
  • Use Passkeys in Your Laravel App - 5/13/2025
  • Laravel Seeder Generator - 5/12/2025

Copyright © 2025 CoderFunda | Powered by Blogger
Design by Coderfunda | Blogger Theme by Coderfunda | Distributed By Coderfunda