CoderFunda
  • Home
  • About us
    • Contact Us
    • Disclaimer
    • Privacy Policy
    • About us
  • Home
  • Php
  • HTML
  • CSS
  • JavaScript
    • JavaScript
    • Jquery
    • JqueryUI
    • Stock
  • SQL
  • Vue.Js
  • Python
  • Wordpress
  • C++
    • C++
    • C
  • Laravel
    • Laravel
      • Overview
      • Namespaces
      • Middleware
      • Routing
      • Configuration
      • Application Structure
      • Installation
    • Overview
  • DBMS
    • DBMS
      • PL/SQL
      • SQLite
      • MongoDB
      • Cassandra
      • MySQL
      • Oracle
      • CouchDB
      • Neo4j
      • DB2
      • Quiz
    • Overview
  • Entertainment
    • TV Series Update
    • Movie Review
    • Movie Review
  • More
    • Vue. Js
    • Php Question
    • Php Interview Question
    • Laravel Interview Question
    • SQL Interview Question
    • IAS Interview Question
    • PCS Interview Question
    • Technology
    • Other

23 February, 2022

How to add custom shipping validations Magento 2

 Programing Coderfunda     February 23, 2022     Magento 2, MAGENTO TUTORIALS     No comments   

 In Magento 2, it’s possible to set shipping validations. This action is also essential because it ensures the transparance and right form of required shipping information.

For developers, this shipping validator will trigger the checkout module to load (ajax) the shipping method details when users entering information.
This is an essential part of the bigger task of adding a custom shipping method to your Magento store.

In this article, we will take a look at Magento default/native carriers and then implement our own rules/validator.

Having issues with adding custom shipping validations in Magento 2? Don’t worry! This tutorial is all you need.

Customize shipping carrier validator.

  • Step 1: Understand TableRate validators.
  • Step 2: Add our custom rules/validator.
    • 2.1 Add Shipping rate validation rules
    • 2.2: Add Shipping Rates Validator
    • 2.3: Registering our validator
    • 2.4 Add the validation to the checkout layout
  • Step 3: Flush cache and test result

You should know how to create a basic Magento 2 module. All of customized files will be inside this module.

Let’s begin.

Step 1: Understand TableRate validator.

Since the validator bases on the rules we will check the rules first.
Just bear with me a bit, we will know exactly what they are soon.

The code from the TableRate Rules js/model/shipping-rates-validation-rules/tablerate.js as below

/**
 * Copyright © 2013-2017 Magento, Inc. All rights reserved.
 * See COPYING.txt for license details.
 */
/*global define*/
define(
    [],
    function () {
        "use strict";
        return {
            getRules: function() {
                return {
                    'postcode': {
                        'required': true
                    },
                    'country_id': {
                        'required': true
                    },
                    'region_id': {
                        'required': true
                    },
                    'region_id_input': {
                        'required': true
                    }
                };
            }
        };
    }
);

Only one defined function getRules, this is where we define our rules.
For the tableRate, it requires country, state, postcode to be filled in before loading/triggering the Shipping method details.

This is the code from TableRate Validator /js/model/shipping-rates-validator/tablerate.js

/**
 * Copyright © 2013-2017 Magento, Inc. All rights reserved.
 * See COPYING.txt for license details.
 */
/*global define*/
define(
    [
        'jquery',
        'mageUtils',
        '../shipping-rates-validation-rules/tablerate',
        'mage/translate'
    ],
    function ($, utils, validationRules, $t) {
        'use strict';
        return {
            validationErrors: [],
            validate: function (address) {
                var self = this;
                this.validationErrors = [];
                $.each(validationRules.getRules(), function (field, rule) {
                    if (rule.required && utils.isEmpty(address[field])) {
                        var message = $t('Field ') + field + $t(' is required.');
                        var regionFields = ['region', 'region_id', 'region_id_input'];
                        if (
                            $.inArray(field, regionFields) === -1
                            || utils.isEmpty(address['region']) && utils.isEmpty(address['region_id'])
                        ) {
                            self.validationErrors.push(message);
                        }
                    }
                });
                return !Boolean(this.validationErrors.length);
            }
        };
    }
);

The main method here is the validate method, this method is required for every validator.
The code is simple, what it does is checking whether those required fields have been fulfilled.

Here is the price information bases on each country/region
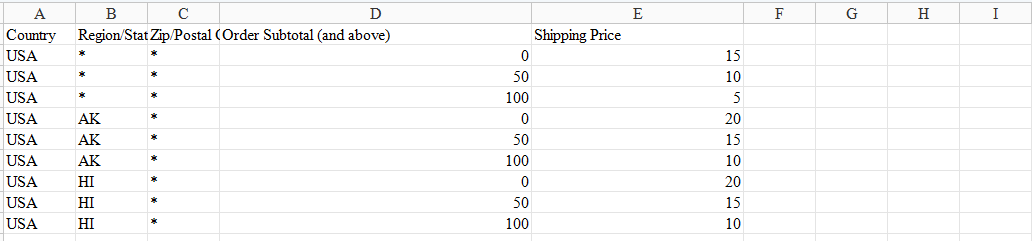
tableRate information

To test this validator, you should use TableRates as the only Shipping Carrier. Read more about Shipping Settings here

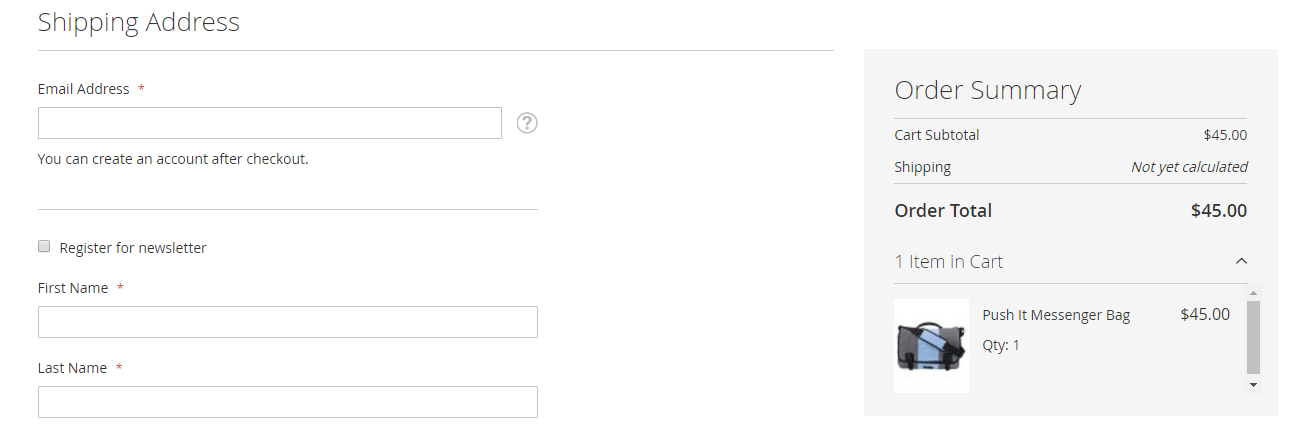
First, I add a $45 item to the cart which will result in $15 shipping price, fill in all required information except for State/Province information. When I change the State to Alaska (abbr: AK), the shipping method will reload.
Here is the video that demonstrates step by step: https://www.screencast.com/t/PuK9hy5zYaP

Step 2: Create a custom rule/validator.

We need 3 files: 2 files to define getRules and validate functions. The last file is responsible for letting Magento knows the existence of our new code (Registering our validator).
Since we don’t have a new carrier, we will overwrite tablerate. Instead of using Magento’s table rate rules and validator, it will use our created rules and validator.

Step 2.1 Add Shipping rate validation rules

Create the tablerate.js file under Mageplaza/HelloWorld/view/frontend/web/js/model/shipping-rates-validation-rules directory.

define(
    [],
    function () {
        "use strict";
        return {
            getRules: function() {
                return {
                    'region_id': {
                        'required': true
                    },
                    'region_id_input': {
                        'required': true
                    },
                    'telephone': {
                        'required': true
                    }
                };
            }
        };
    }
);

Step 2.2: Add Shipping Rates Validator

Create the tablerate.js file under Mageplaza/HelloWorld/view/frontend/web/js/model/shipping-rates-validator directory.

define(
    [
        'jquery',
        'mageUtils',
        '../shipping-rates-validation-rules/tablerate',
        'mage/translate'
    ],
    function ($, utils, validationRules, $t) {
        'use strict';
        return {
            validationErrors: [],
            validate: function (address) {
                var self = this;
                this.validationErrors = [];

                $.each(validationRules.getRules(), function (field, rule) {
                    if (rule.required && field === 'telephone' & address[field] !== '911') {
                        self.validationErrors.push(1);
                    }
                });
                return !!!(this.validationErrors.length);
            }
        };
    }
);

Step 2.3: Registering our validator

To register our new validator, we must add it to the pool of validators.
To do this, in the Mageplaza/HelloWorld/view/frontend/web/js/view directory create a new tablerate.js file with the following content:

define(
    [
        'uiComponent',
        'Magento_Checkout/js/model/shipping-rates-validator',
        'Magento_Checkout/js/model/shipping-rates-validation-rules',
        '../model/shipping-rates-validator/tablerate',
        '../model/shipping-rates-validation-rules/tablerate'
    ],
    function (
        Component,
        defaultShippingRatesValidator,
        defaultShippingRatesValidationRules,
        shippingRatesValidator,
        shippingRatesValidationRules
    ) {
        'use strict';
        defaultShippingRatesValidator.registerValidator('tablerate', shippingRatesValidator);
        defaultShippingRatesValidationRules.registerRules('tablerate', shippingRatesValidationRules);
        return Component;
    }
);

Step 2.4 Add the validation to the checkout layout

Add the following code to Mageplaza/HelloWorld/view/frontend/layout/checkout_index_index.xml

 <page xmlns:xsi="http://www.w3.org/2001/XMLSchema-instance" layout="1column" xsi:noNamespaceSchemaLocation="urn:magento:framework:View/Layout/etc/page_configuration.xsd">
     <body>
         <referenceBlock name="checkout.root">
                 <arguments>
                     <argument name="jsLayout" xsi:type="array">
                         <item name="components" xsi:type="array">
                             <item name="checkout" xsi:type="array">
                                 <item name="children" xsi:type="array">
                                     <item name="steps" xsi:type="array">
                                         <item name="children" xsi:type="array">
                                             <item name="shipping-step" xsi:type="array">
                                                 <item name="children" xsi:type="array">
                                                     <!-- add a new validator-->
                                                     <item name="step-config" xsi:type="array">
                                                         <item name="children" xsi:type="array">
                                                             <item name="shipping-rates-validation" xsi:type="array">
                                                                 <item name="children" xsi:type="array">
                                                                     <item name="tablerate" xsi:type="array">
                                                                         <item name="component" xsi:type="string">Mageplaza_HelloWorld/js/view/tablerate</item>
                                                                     </item>
                                                                 </item>
                                                             </item>
                                                         </item>
                                                     </item>
                                                 </item>
                                             </item>
                                         </item>
                                     </item>
                                 </item>
                             </item>
                         </item>
                     </argument>
                 </arguments>
         </referenceBlock>
     </body>
 </page>

The code is simple, it only applies TableRate when the telephone field has the value of 911.

Step 3: Flush cache and test result

Now time to flush cache and test your result. If you have any issue, feel free to leave a comment below, Mageplaza and Magento community are willing to help.

Final words

That’s all about custom shipping validations in Magento 2. I hope this tutorial is helpful for you. If you have any questions, feel free to let me know in the comment section. Thanks for reading!


by mageplaza.com
Read More
  • Share This:  
  •  Facebook
  •  Twitter
  •  Google+
  •  Stumble
  •  Digg

How to customize a checkout step in Magento 2

 Programing Coderfunda     February 23, 2022     Magento 2, MAGENTO TUTORIALS     No comments   

How to edit the custom style of checkout step

Customize the style of a checkout step means removing , disabling or adding a component in the checkout page.

Using custom checkout steps enables you to create special checkout steps that are visible to your customers and support them during the checkout process.

You can explore more about Magento 2 One-step checkout module

Since the topic covers quite a wide range, We will start with the example from Magento Official Devdocs document. And then we will add our own component (newsletter register component)

Related Topics

  • Magento 2 Customize Checkout topic
  • Add a custom checkout field in Magento 2
  • Magento 2 Optimized Checkout Page
  • How to add a new input form to checkout
  • Customization Checkout Page
  • Checkout Page 2 Columns
  • How to add a new step in checkout page

Customize the style of a checkout step.

  • Step 1: Understand the example from Devdocs document
  • Step 2: Add our new Newsletter Register component
    • Step 2.1: Create a js file
    • Step 2.2: Create the template html file
    • Step 2.3: Add our component to the checkout page’s layout
    • Step 2.4: Disable newsletter register component
    • Step 2.5: Remove our component

You should know how to create a basic Magento 2 module. All of customized files will be inside this module.

Let’s begin.

Step 1: Understand the example from Devdocs document.

Devdocs gives us the example from Magento Shipping module which creates a policy component.
Here is the code that adds the component to the layout.

<item name="shipping_policy" xsi:type="array">
  <item name="component" xsi:type="string">Magento_Shipping/js/view/checkout/shipping/shipping-policy</item>
</item>

As you can see, the component is just a javascript file (js). Let’s open it vendor/magento/module-shipping/view/frontend/web/js/view/checkout/shipping/shipping-policy.js

/**
 * Copyright © 2013-2017 Magento, Inc. All rights reserved.
 * See COPYING.txt for license details.
 */
define([
    'uiComponent',
    'Magento_Shipping/js/model/config'

], function (Component, config) {
    'use strict';

    return Component.extend({
        defaults: {
            template: 'Magento_Shipping/checkout/shipping/shipping-policy'
        },
        config: config()
    });
});

Not much here, it just defines its template vendor/magento/module-shipping/view/frontend/web/template/checkout/shipping/shipping-policy.html

So to conclude, a component contains a js and take a html file as its template.

Step 2: Add our new Newsletter Register component.

Step 2.1: Create a js file.

Create the newsletter.js file under Mageplaza/HelloWorld/view/frontend/web/js/view directory.
The code:

define(
    [
        'ko',
        'uiComponent'
    ],
    function (ko, Component) {
        "use strict";

        return Component.extend({
            defaults: {
                template: 'Mageplaza_HelloWorld/newsletter'
            },
            isRegisterNewsletter: true
        });
    }
);

Step 2.2: Create the template html file.

Create the newsletter.html file under Mageplaza/HelloWorld/view/frontend/web/template directory.
The code:

<div class="col-mp mp-12">
    <input type="checkbox" name="newsletter" data-bind="checked: isRegisterNewsletter, attr: {id: 'place-order-newsletter'}"/>
    <label data-bind="attr: {for: 'place-order-newsletter'}"><span data-bind="i18n: 'Register for newsletter'"></span></label>
</div>

Step 2.3: Add our component to the checkout page’s layout.

Add the following code to Mageplaza/HelloWorld/view/frontend/layout/checkout_index_index.xml
We add our component just before the shippingMethod form.

<page xmlns:xsi="http://www.w3.org/2001/XMLSchema-instance" layout="1column" xsi:noNamespaceSchemaLocation="urn:magento:framework:View/Layout/etc/page_configuration.xsd">
    <body>
        <referenceBlock name="checkout.root">
                <arguments>
                    <argument name="jsLayout" xsi:type="array">
                        <item name="components" xsi:type="array">
                            <item name="checkout" xsi:type="array">
                                <item name="children" xsi:type="array">
                                    <item name="steps" xsi:type="array">
                                        <item name="children" xsi:type="array">
                                            <!-- Modifying an existing step-->
                                            <item name="shipping-step" xsi:type="array">
                                                <item name="children" xsi:type="array">
                                                    <item name="shippingAddress" xsi:type="array">
                                                        <item name="children" xsi:type="array">
                                                            <item name="before-form" xsi:type="array">
                                                                <item name="children" xsi:type="array">
                                                                    <item name="newsletter" xsi:type="array">
                                                                        <item name="component" xsi:type="string">Mageplaza_HelloWorld/js/view/newsletter</item>
                                                                    </item>
                                                                </item>
                                                            </item>
                                                        </item>
                                                    </item>
                                                </item>
                                            </item>

                                        </item>
                                    </item>
                                </item>
                            </item>
                        </item>
                    </argument>
                </arguments>
        </referenceBlock>
    </body>
</page>

Clean cache, refresh your browser, the result will appear like this
newsletter component

Step 2.4: Disable newsletter register component.

Here is the code to disable a component.

<item name="config" xsi:type="array">
       <item name="componentDisabled" xsi:type="boolean">true</item>
</item>

How it is in the whole node

<item name="newsletter" xsi:type="array">
       <item name="component" xsi:type="string">Mageplaza_HelloWorld/js/view/newsletter</item>
       <item name="config" xsi:type="array">
             <item name="componentDisabled" xsi:type="boolean">true</item>
       </item>
</item>

Step 2.5: Remove our component.

To remove a component, you need to create a plugin for the \Magento\Checkout\Block\Checkout\LayoutProcessor::process method. And implement the around method. This is what Devdocs advices.

As suggested, we implement the aroundProcess method and add the following code

public function aroundProcess($subject, $proceed, $jsLayout)
{
        unset($jsLayout['components']['checkout']['children']['steps']['children']['shipping-step']['children']['shippingAddress']['children']['before-form']['children']['newsletter']);
        $returnValue = $proceed($jsLayout);
        return $returnValue;
}

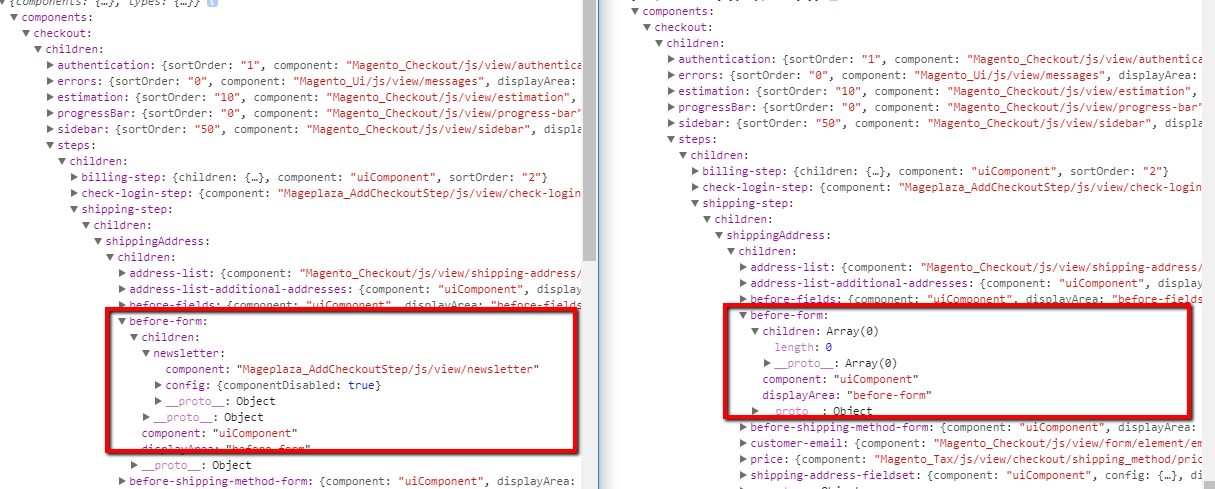
Here is the difference between Disabling and Removing a component when rendering in real time
Compare between disable and enable components

Conclusion

This tutorial has guided you through how to customize a checkout step in Magento 2. It particularly shows you how to enable and disable the newsletter register component which is one of the important components in Magento 2 checkout. I hope this tutorial is helpful for you to customize your Magento 2 Default checkout and expand your store’s checkout functionalities.

by mageplaza . com

Read More
  • Share This:  
  •  Facebook
  •  Twitter
  •  Google+
  •  Stumble
  •  Digg

Magento 2 Theme Development from Scratch

 Programing Coderfunda     February 23, 2022     Magento 2, MAGENTO TUTORIALS     No comments   


Custom Theme in Magento 2 - Theme Development Tutorial Step by Step


A theme determines how the elements and the entire website are presented to the user. It combines a combination of custom templates, layouts, styles, and graphics to give a Magento store an uniform experience. There are number of ways to create a custom themes in Magento 2. It uses theme.xml, introduced in Magento 1.9, and a new folder structure in Magento 2 that works in a similar way to Magento 1.x, but has the added advantage that you can select unlimited parent themes to inherit from, and you can configure the theme.xml file in your theme.

Let’s say you want to create a brand new theme based on the new Magento “Blank” theme. First, you would create a new folder in app/design/frontend, for example Mageplaza/simple. You would then create a theme.xml file in this directory, path: app/design/frontend/Mageplaza/simple (it is probably best to copy it from app/design/frontend/Magento/blank/theme.xml), In this case, we want to base on Magento 2’s Blank theme.

How To Create Magento 2 Theme

9 Simple Steps To Create Magento 2 Theme:

  • 1. Creating a Magento theme folder
  • 2. Declare your theme
  • 3. Composer package
  • 4. registration.php file
  • 5. Creating static files, folders
  • 6. Configure catalog product images
  • 7. Declare Theme Logo
  • 8. Basic layout elements
  • 9. Layout files types and conventions

So your app/design/frontend/mageplaza/theme.xml file should look something like this:

<theme xmlns:xsi="http://www.w3.org/2001/XMLSchema-instance" xsi:noNamespaceSchemaLocation="../../../../lib/internal/Magento/Framework/Config/etc/theme.xsd">
  <title>Mageplaza Simple</title>
  <parent>Magento/blank</parent>
</theme>

Theme structure

Theme Folder structure

app/design/frontend/Mageplaza/
├── simple/
│   ├── etc/
│   │   ├── view.xml
│   ├── web/
│   │   ├── images
│   │   │   ├── logo.svg
│   ├── registration.php
│   ├── theme.xml
│   ├── composer.json

<Vendor> is theme vendor. e.g: Mageplaza

<theme> is theme name. e.g: simple

Ok, let’s go

1. Creating a Magento theme folder

Creating a folder for the theme:

  • Go to app/design/frontend
  • Creating a vendor folder app/design/frontend/<vendor> e.g: app/design/frontend/Mageplaza
  • Create a theme folder app/design/frontend/<vendor>/<theme> e.g: app/design/frontend/Mageplaza/simple
app/design/frontend/
├── Mageplaza/
│   │   ├──simple/
│   │   │   ├── ...
│   │   │   ├── ...

2. Declare your theme

Now we have folder app/design/frontend/Mageplaza/simple , now create a file named theme.xml that define basic information about theme such as: Name, parent theme (in case your theme inherits from an existing theme), preview image

<theme xmlns:xsi="http://www.w3.org/2001/XMLSchema-instance" xsi:noNamespaceSchemaLocation="urn:magento:framework:Config/etc/theme.xsd">
     <title>Mageplaza Simple</title> <!-- your theme's name -->
     <parent>Magento/blank</parent> <!-- the parent theme, in case your theme inherits from an existing theme -->
     <media>
         <preview_image>media/preview.jpg</preview_image> <!-- the path to your theme's preview image -->
     </media>
 </theme>

3. Composer package

Composer is a tool for dependency management in PHP. It allows you to declare the libraries your project depends on and it will manage (install/update) them for you.

To distribute your theme as a package, add a composer.json file to the theme directory and register the package on a packaging server.

composer.json example:

{
    "name": "mageplaza/simple",
    "description": "N/A",
    "require": {
        "php": "~5.5.0|~5.6.0|~7.0.0",
        "magento/theme-frontend-blank": "100.0.*",
        "magento/framework": "100.0.*"
    },
    "type": "magento2-theme",
    "version": "100.0.1",
    "license": [
        "OSL-3.0",
        "AFL-3.0"
    ],
    "autoload": {
        "files": [
            "registration.php"
        ]
    }
}

4. registration.php file

You can add the following content to register the theme to Magento 2

<?php
/**
 * Copyright © 2015 Magento. All rights reserved.
 * See COPYING.txt for license details.
 */
\Magento\Framework\Component\ComponentRegistrar::register(
    \Magento\Framework\Component\ComponentRegistrar::THEME,
    'frontend/Mageplaza/simple',
    __DIR__
);

You should change Mageplaza, simple to your vendor, theme name.

5. Creating static files, folders

In a design, there are many static files such as javascript, css, images and fonts. They are stored in separate folders in web of theme package.

Here are the structure

app/design/<area>/Mageplaza/simple/
├── web/
│ ├── css/
│ │ ├── source/ 
│ ├── fonts/
│ ├── images/
│ ├── js/

Tips

In Magento 2, theme or extension development, when you update any files in app/design/<area>/Mageplaza/simple/web folder, you have to static folders which located at pub/static and var/view_preprocessed Otherwise, you still there is no change in frontend.

6. Configure catalog product images

As you can see in the theme structure I mentioned above, there is a file called etc/view.xml. This is configuration file. This file is required for the Magento 2 theme but it is optional if it exists in the parent theme.

Go to app/design/<area>/Mageplaza/simple/ and create a folder etc and file view.xml You can copy the view.xml file in parent theme such as Blank theme app/design/frontend/Magento/blank/etc/view.xml

Ok, let update the image configuration for catalog product grid page.

<image id="category_page_grid" type="small_image">
    <width>250</width>
    <height>250</height>
</image>

In view.xml, image properties are configured in the scope of element:

<images module="Magento_Catalog">
...
<images/>

Image properties are configured for each image type defined by the id and type attributes of the <image> element:

<images module="Magento_Catalog">
	<image id="unique_image_id" type="image_type">
	<width>100</width> <!-- Image width in px --> 
        <height>100</height> <!-- Image height in px -->
	</image>
<images/>

7. Declare Theme Logo

In Magento 2 default, it uses <theme_dir>/web/images/logo.svg, in your theme, you can change to different file formats such as png, jpg but you have to declare it.

Logo size should be sized 300x300px and you open file <theme_dir>/Magento_Theme/layout/default.xml

<page xmlns:xsi="http://www.w3.org/2001/XMLSchema-instance" xsi:noNamespaceSchemaLocation="urn:magento:framework:View/Layout/etc/page_configuration.xsd">
    <body>
        <referenceBlock name="logo">
            <arguments>
                <argument name="logo_file" xsi:type="string">images/custom_logo.png</argument>
                <argument name="logo_img_width" xsi:type="number">300</argument> 
                <argument name="logo_img_height" xsi:type="number">300</argument>
            </arguments>
        </referenceBlock>
    </body>
</page>

8. Basic layout elements

The basic components of Magento page design are blocks and containers.

A container exists for the sole purpose of assigning content structure to a page. A container has no additional content except the content of included elements. Examples of containers include the header, left column, main column, and footer.

How To Create Magento 2 Theme Magento 2 Layout

9. Layout files types and conventions

Module and theme layout files

The following terms are used to distinguish layouts provided by different application components:

  • Base layouts: Layout files provided by modules. Conventional location:
    • Page configuration and generic layout files: <module_dir>/view/frontend/layout
    • Page layout files: <module_dir>/view/frontend/page_layout
  • Theme layouts: Layout files provided by themes. Conventional location:
    • Page configuration and generic layout files: <theme_dir>/<Namespace>_<Module>/layout
    • Page layout files: <theme_dir>/<Namespace>_<Module>/page_layout

Create a theme extending file

Rather than copy extensive page layout or page configuration code and then modify what you want to change, in the Magento system, you only need to create an extending layout file that contains the changes you want.

To add an extending page configuration or generic layout file:

<theme_dir>
 |__/<Namespace>_<Module>
   |__/layout
     |--<layout1>.xml
     |--<layout2>.xml

For example, to customize the layout defined in <Magento_Catalog_module_dir>/view/frontend/layout/catalog_product_view.xml, you need to add a layout files with the same name in your custom theme, like following:

<theme_dir>/Magento_Catalog/layout/catalog_product_view.xml

<theme_dir>
 |__/<Namespace>_<Module>
   |__/page_layout
     |--<layout1>.xml
     |--<layout2>.xml

Override base layouts

Overriding is not necessary if a block has a method that cancels the effect of the originally invoked method. In this case, you can customize the layout by adding a layout file where the canceling method is invoked.

To add an overriding base layout file (to override a base layout provided by the module): Put a layout file with the same name in the following location:

<theme_dir>
  |__/<Namespace_Module>
    |__/layout
      |__/override
         |__/base
           |--<layout1>.xml
           |--<layout2>.xml

These files override the following layouts:

  • <module_dir>/view/frontend/layout/<layout1>.xml
  • <module_dir>/view/frontend/layout/<layout2>.xml

Override theme layouts

To add an overriding theme file (to override a parent theme layout):

<theme_dir>
  |__/<Namespace_Module>
    |__/layout
      |__/override
         |__/theme
            |__/<Parent_Vendor>
               |__/<parent_theme>
                  |--<layout1>.xml
                  |--<layout2>.xml

These files override the following layouts:

  • <parent_theme_dir>/<Namespace>_<Module>/layout/<layout1>.xml
  • <parent_theme_dir>/<Namespace>_<Module>/layout/<layout1>.xml

Tips!

- Changing block name or alias. The name of a block should not be changed, and neither should the alias of a block remaining in the same parent element.
- Changing handle inheritance. For example, you should not change the page type parent handle.
Read More
  • Share This:  
  •  Facebook
  •  Twitter
  •  Google+
  •  Stumble
  •  Digg
Newer Posts Older Posts Home

Meta

Popular Posts

  • Generate Migrations from an Existing Database With the Migration Generator Package
    Laravel Migration Generator Migration Generator for Laravel is a package by Bennett Treptow to generate migrations from existing database ...
  • Search Through Models with Laravel Searchable
      Laravel Searchable   is a package by   Spatie   to search through models and other sources pragmatically. Using this package, you can get ...
  • Laravel Razorpay Integration | Payment gateway integration Laravel in 30 mins | Laravel Razorpay
    1 Integration of Razorpay with Laravel. In this tutorial, I have taught how to integrate payment gateway with laravel with mini-project. If...
  • Vue.js Render functions
        Vue.js Render functions Vue.js recommends us to use templates to build HTML. Here, we can use the render function as a closer-to-the-co...
  • Tailwindcss best practices for responsive design
    Tailwind CSS provides powerful utilities for responsive design out of the box. To use it effectively and maintain clean, scalable code, here...

Categories

  • Ajax (26)
  • Bootstrap (30)
  • DBMS (42)
  • HTML (12)
  • HTML5 (45)
  • JavaScript (10)
  • Jquery (34)
  • Jquery UI (2)
  • JqueryUI (32)
  • Laravel (1017)
  • Laravel Tutorials (23)
  • Laravel-Question (6)
  • Magento (9)
  • Magento 2 (95)
  • MariaDB (1)
  • MySql Tutorial (2)
  • PHP-Interview-Questions (3)
  • Php Question (13)
  • Python (36)
  • RDBMS (13)
  • SQL Tutorial (79)
  • Vue.js Tutorial (69)
  • Wordpress (150)
  • Wordpress Theme (3)
  • codeigniter (108)
  • oops (4)
  • php (853)

Social Media Links

  • Follow on Twitter
  • Like on Facebook
  • Subscribe on Youtube
  • Follow on Instagram

Pages

  • Home
  • Contact Us
  • Privacy Policy
  • About us

Blog Archive

  • ▼  2026 (12)
    • ▼  07/26 - 08/02 (11)
      • 'The Odyssey' crosses USD 639.6 million globally
      • 'Ramayana' to have 'Baahubali'-style cliffhanger e...
      • Kim Kardashian remember late granny on 92nd heaven...
      • Emma Roberts weds Cody John in intimate Idaho cere...
      • 'Jana Nayagan' BO day 4: Film crosses Rs 100 Cr Net
      • 'Chennai Love Story' BO jumps 11.1%
      • China’s new hybrid rice can preserve its high-yiel...
      • Quote of the day by Thucydides: 'Self-control is t...
      • Quote of the day by Slavoj Žižek: 'The problem for...
      • A stormwater pond in Calgary appears filled with P...
      • Inside Kriti Sanon's duplex sea-facing penthouse w...
    • ►  06/28 - 07/05 (1)
  • ►  2025 (4)
    • ►  07/06 - 07/13 (2)
    • ►  06/29 - 07/06 (2)
  • ►  2024 (486)
    • ►  09/15 - 09/22 (30)
    • ►  09/08 - 09/15 (35)
    • ►  09/01 - 09/08 (35)
    • ►  08/11 - 08/18 (2)
    • ►  08/04 - 08/11 (33)
    • ►  07/28 - 08/04 (30)
    • ►  07/07 - 07/14 (11)
    • ►  06/30 - 07/07 (35)
    • ►  06/23 - 06/30 (5)
    • ►  06/02 - 06/09 (31)
    • ►  05/26 - 06/02 (20)
    • ►  05/05 - 05/12 (29)
    • ►  04/28 - 05/05 (26)
    • ►  04/07 - 04/14 (10)
    • ►  03/31 - 04/07 (34)
    • ►  03/24 - 03/31 (10)
    • ►  03/03 - 03/10 (35)
    • ►  02/25 - 03/03 (15)
    • ►  02/04 - 02/11 (22)
    • ►  01/28 - 02/04 (30)
    • ►  01/07 - 01/14 (8)
  • ►  2023 (484)
    • ►  12/31 - 01/07 (35)
    • ►  12/24 - 12/31 (10)
    • ►  12/03 - 12/10 (33)
    • ►  11/26 - 12/03 (20)
    • ►  11/05 - 11/12 (35)
    • ►  10/29 - 11/05 (20)
    • ►  10/22 - 10/29 (9)
    • ►  10/15 - 10/22 (7)
    • ►  10/08 - 10/15 (9)
    • ►  10/01 - 10/08 (10)
    • ►  09/24 - 10/01 (9)
    • ►  09/17 - 09/24 (9)
    • ►  09/10 - 09/17 (7)
    • ►  09/03 - 09/10 (9)
    • ►  08/27 - 09/03 (9)
    • ►  08/20 - 08/27 (8)
    • ►  08/13 - 08/20 (8)
    • ►  08/06 - 08/13 (8)
    • ►  07/30 - 08/06 (8)
    • ►  07/23 - 07/30 (7)
    • ►  07/16 - 07/23 (8)
    • ►  07/09 - 07/16 (7)
    • ►  07/02 - 07/09 (8)
    • ►  06/25 - 07/02 (7)
    • ►  06/18 - 06/25 (7)
    • ►  06/11 - 06/18 (7)
    • ►  06/04 - 06/11 (11)
    • ►  05/28 - 06/04 (7)
    • ►  05/21 - 05/28 (8)
    • ►  05/14 - 05/21 (11)
    • ►  05/07 - 05/14 (7)
    • ►  04/30 - 05/07 (7)
    • ►  04/23 - 04/30 (8)
    • ►  04/16 - 04/23 (9)
    • ►  04/09 - 04/16 (7)
    • ►  04/02 - 04/09 (4)
    • ►  03/26 - 04/02 (21)
    • ►  03/19 - 03/26 (2)
    • ►  03/12 - 03/19 (9)
    • ►  03/05 - 03/12 (26)
    • ►  02/26 - 03/05 (25)
    • ►  01/15 - 01/22 (7)
    • ►  01/08 - 01/15 (1)
  • ►  2022 (1037)
    • ►  12/11 - 12/18 (13)
    • ►  12/04 - 12/11 (1)
    • ►  11/27 - 12/04 (40)
    • ►  11/06 - 11/13 (1)
    • ►  10/16 - 10/23 (13)
    • ►  09/04 - 09/11 (5)
    • ►  08/21 - 08/28 (24)
    • ►  08/14 - 08/21 (24)
    • ►  07/03 - 07/10 (9)
    • ►  06/19 - 06/26 (3)
    • ►  05/29 - 06/05 (3)
    • ►  05/22 - 05/29 (3)
    • ►  05/15 - 05/22 (109)
    • ►  05/01 - 05/08 (7)
    • ►  04/24 - 05/01 (7)
    • ►  04/17 - 04/24 (64)
    • ►  04/10 - 04/17 (115)
    • ►  04/03 - 04/10 (73)
    • ►  03/27 - 04/03 (77)
    • ►  03/13 - 03/20 (2)
    • ►  03/06 - 03/13 (25)
    • ►  02/27 - 03/06 (18)
    • ►  02/20 - 02/27 (153)
    • ►  02/13 - 02/20 (187)
    • ►  01/30 - 02/06 (45)
    • ►  01/23 - 01/30 (15)
    • ►  01/16 - 01/23 (1)
  • ►  2021 (412)
    • ►  10/24 - 10/31 (2)
    • ►  07/25 - 08/01 (1)
    • ►  07/11 - 07/18 (10)
    • ►  06/13 - 06/20 (29)
    • ►  05/23 - 05/30 (1)
    • ►  05/02 - 05/09 (24)
    • ►  04/25 - 05/02 (24)
    • ►  04/18 - 04/25 (112)
    • ►  04/11 - 04/18 (1)
    • ►  04/04 - 04/11 (6)
    • ►  03/28 - 04/04 (86)
    • ►  03/21 - 03/28 (19)
    • ►  03/14 - 03/21 (2)
    • ►  03/07 - 03/14 (10)
    • ►  02/28 - 03/07 (1)
    • ►  02/21 - 02/28 (29)
    • ►  02/14 - 02/21 (13)
    • ►  02/07 - 02/14 (12)
    • ►  01/31 - 02/07 (6)
    • ►  01/17 - 01/24 (2)
    • ►  01/10 - 01/17 (8)
    • ►  01/03 - 01/10 (14)
  • ►  2020 (376)
    • ►  12/27 - 01/03 (37)
    • ►  12/20 - 12/27 (92)
    • ►  12/13 - 12/20 (29)
    • ►  12/06 - 12/13 (37)
    • ►  11/29 - 12/06 (4)
    • ►  11/15 - 11/22 (14)
    • ►  11/08 - 11/15 (8)
    • ►  11/01 - 11/08 (2)
    • ►  10/18 - 10/25 (14)
    • ►  10/11 - 10/18 (16)
    • ►  10/04 - 10/11 (10)
    • ►  09/20 - 09/27 (10)
    • ►  09/06 - 09/13 (19)
    • ►  08/30 - 09/06 (26)
    • ►  08/23 - 08/30 (4)
    • ►  08/16 - 08/23 (2)
    • ►  07/12 - 07/19 (48)
    • ►  05/17 - 05/24 (2)
    • ►  01/05 - 01/12 (2)
  • ►  2019 (74)
    • ►  07/07 - 07/14 (6)
    • ►  06/16 - 06/23 (6)
    • ►  02/10 - 02/17 (17)
    • ►  01/13 - 01/20 (37)
    • ►  01/06 - 01/13 (8)
  • ►  2018 (376)
    • ►  12/30 - 01/06 (24)
    • ►  12/16 - 12/23 (8)
    • ►  12/09 - 12/16 (98)
    • ►  12/02 - 12/09 (16)
    • ►  11/18 - 11/25 (36)
    • ►  11/04 - 11/11 (18)
    • ►  10/28 - 11/04 (10)
    • ►  10/21 - 10/28 (26)
    • ►  10/14 - 10/21 (52)
    • ►  10/07 - 10/14 (4)
    • ►  09/30 - 10/07 (2)
    • ►  09/23 - 09/30 (68)
    • ►  09/16 - 09/23 (4)
    • ►  09/09 - 09/16 (4)
    • ►  08/26 - 09/02 (6)

Data Publish News

Loading...

Al Jazeera – Breaking News, World News and Video from Al Jazeera

Loading...

Laravel News

Loading...

Copyright © CoderFunda | Powered by Blogger
Design by Coderfunda | Blogger Theme by Coderfunda | Distributed By Coderfunda