CoderFunda
  • Home
  • About us
    • Contact Us
    • Disclaimer
    • Privacy Policy
    • About us
  • Home
  • Php
  • HTML
  • CSS
  • JavaScript
    • JavaScript
    • Jquery
    • JqueryUI
    • Stock
  • SQL
  • Vue.Js
  • Python
  • Wordpress
  • C++
    • C++
    • C
  • Laravel
    • Laravel
      • Overview
      • Namespaces
      • Middleware
      • Routing
      • Configuration
      • Application Structure
      • Installation
    • Overview
  • DBMS
    • DBMS
      • PL/SQL
      • SQLite
      • MongoDB
      • Cassandra
      • MySQL
      • Oracle
      • CouchDB
      • Neo4j
      • DB2
      • Quiz
    • Overview
  • Entertainment
    • TV Series Update
    • Movie Review
    • Movie Review
  • More
    • Vue. Js
    • Php Question
    • Php Interview Question
    • Laravel Interview Question
    • SQL Interview Question
    • IAS Interview Question
    • PCS Interview Question
    • Technology
    • Other

28 March, 2022

Free vs Paid WordPress Theme

 Programing Coderfunda     March 28, 2022     Wordpress     No comments   

Free vs Paid WordPress Theme

As you already know there are two types of WordPress themes, one is paid (premium) and other one is free. Both are from WordPress community but they possess some differences in their functionality. For some users free themes may be suitable and for some users premium themes may be suitable. It all depends upon their need. A huge number of WordPress themes are available as free but still people go for premium themes. There are multiple reasons why one should go for paid one.

Let's have a look on some of the functions of free as well as premium themes. It will help you in choosing a theme for you.


Cost

Free themes of course as name suggests are absolutely free. You can use them any time without any money.

For premium you have to pay. Its range starts from $1000 which varies depending upon the designing of theme. It is good when you are earning enough from your site but if you are using your site just as a hobby then it may cost you a lot.


Quality

If you want your site at a good rank then you need to improve its quality.

Free theme will not make your site unique. Same theme will be used by other sites because it is free for everyone.

To make your site unique go for the premium one. There are some other qualities which need to be fulfilled. Like your site has to be responsive and should support different browsers. Free theme is not guaranteed to provide these qualities.


Support

In free themes if you need any type of help, you have to search for help and ask on forums. If someone will be willing then you may get your answer but it will take some time.

Premium themes designer offer some support system. You will get timely support from reliable developers. Your problem will be solved very quickly.


Update

WordPress is constantly updated in every few months, so your themes and plugins need to be compatible with the updated version.

Free themes may not be updated regularly. If you are using a free theme and an updated version comes, then you have two options. Either don't update your site or install a new them. Both the options are not right.

Premium theme developers update it on a regular basis to make it compatible with the new WordPress version. So if you are using a premium theme, then it is the responsibility of company to update it. You don't have to worry about it.


SEO

SEO plays an important role in the ranking of your website. It is important for your site to have an SEO options and clean code.

In free themes there are many structural bugs and they don't provide inbuilt SEO options.

Premium themes provide better coding which helps to load your site faster.


Features

Theme developers have to offer latest features for their customers according to the trend.

Free themes provide limited features. Their developers do not update their theme. They are more compatible to the plugins than premium themes.

Premium theme developers provide latest features and much more functionality than free themes. They provide an easy user interface that allows users to make any type of changes in the design of their site.


Encrypted Links

In free themes there are some unwanted links in the footer area. These links are irrelevant from the content of your website. It seriously affects the SEO of your site.

Free themes developers add some links at the footer of their themes which is very annoying.


Security

Security should be of a high level in order to prevent your site. wordPress provides a better security by updating it every few months. An out dated theme may cause a lot of security issues.

Free themes generally have high security threat.

On the other hand, premium themes give high security standards to their customers.

Read More
  • Share This:  
  •  Facebook
  •  Twitter
  •  Google+
  •  Stumble
  •  Digg

How to Install WordPress Themes

 Programing Coderfunda     March 28, 2022     Wordpress     No comments   


How to Install WordPress Themes

For theme installation, first you need to select a theme either free or a premium one. There are a lot of sites from where you can download a theme. Theme will be downloaded in zip format. The next process is installation process. Installation has some steps to be followed.

There are two methods from which you can install a theme:

  • Installing WordPress using admin theme search
  • Installing WordPress using upload method

Installing WordPress using admin theme search

To install free themes from WordPress.org directory, login into your account and click Appearance > Themes.

Wordpress How to install wordpress themes1

Look at the above snapshot, click on Themes option. Following page will appear in front of you.

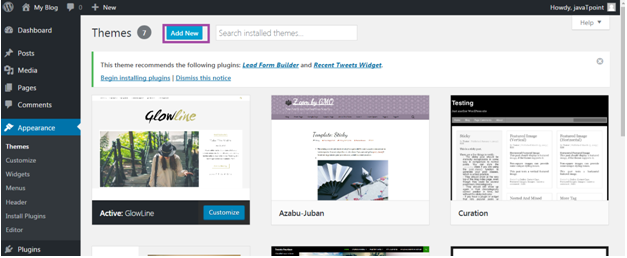
Wordpress How to install wordpress themes2

Click on Add New button to Add New themes.

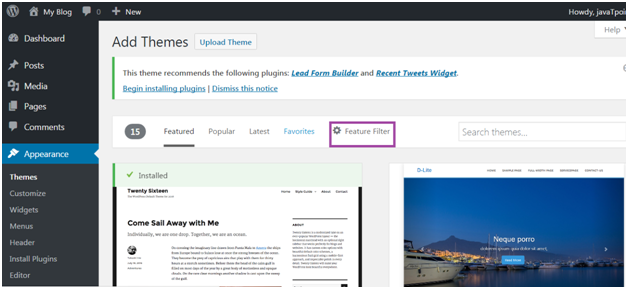
Wordpress How to install wordpress themes3

Look at the above snapshot, here you'll see an option for Feature Filter.

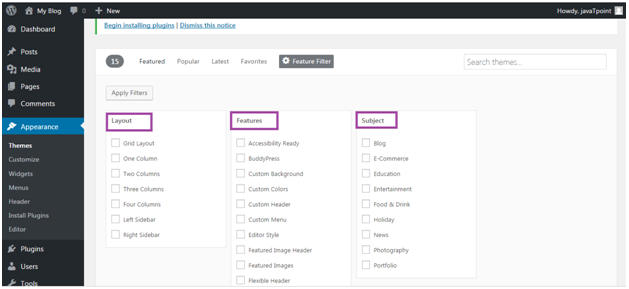
Wordpress How to install wordpress themes4

Look at the above snapshot, here you can filter your search for themes by applying your choice for Layout, Features and Subject.

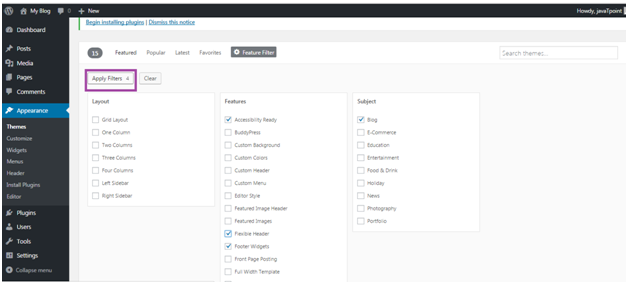
Wordpress How to install wordpress themes5

Look at the above snapshot, we have selected 4 filter criteria, now click on button Apply Filters 4 to apply the filters.

Wordpress How to install wordpress themes6

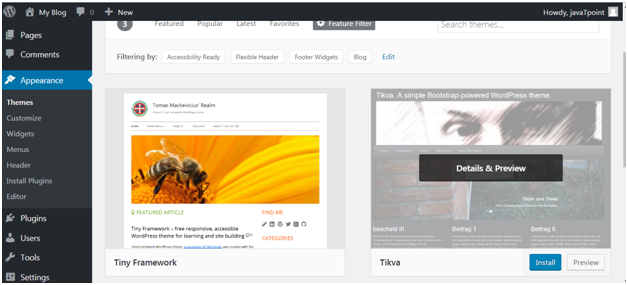
Look at the above snapshot, select a theme and take your mouse above it. Click on Install button.

Wordpress How to install wordpress themes7

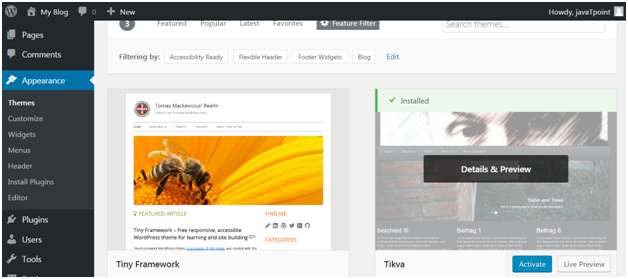
Look at the above snapshot, our theme is installed. To activate it click on Activate button. And you have successfully activated your WordPress theme.


Installing WordPress using upload method

The above method was only to install free themes that are available in WordPress directory only. But if you want to install premium themes, then you have to choose this option which includes following steps. This method can be used to install premium as well as free themes.


Downloading theme

WordPress site itself has a large collection of themes. All the themes on the WordPress site is fully examined and tested. If you are not satisfied with these themes you can go to other sites to download a theme. Make sure you select trusted site to download a theme as anyone can create a theme for WordPress.

Themes are downloaded in the zip format.

Go to wordpress.org site.

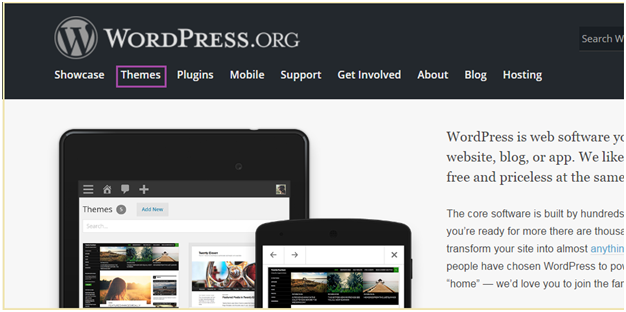
Wordpress How to install wordpress themes8

Look at the above snapshot, this is the site. Here click on Themes. You will be directed to the following page.

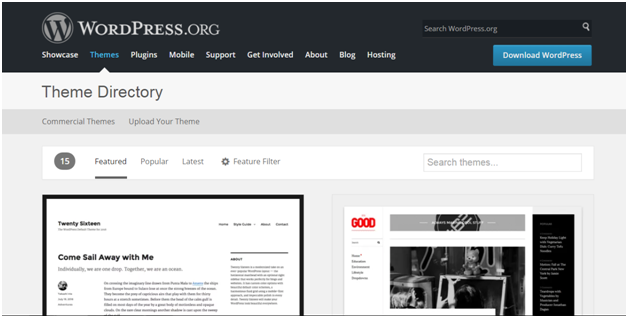
Wordpress How to install wordpress themes9

Look at the above snapshot, on this page you'll have a lot of options to select themes.

Select a theme and then click on Download button.

Theme will be downloaded in zip format in your system.


Installing theme

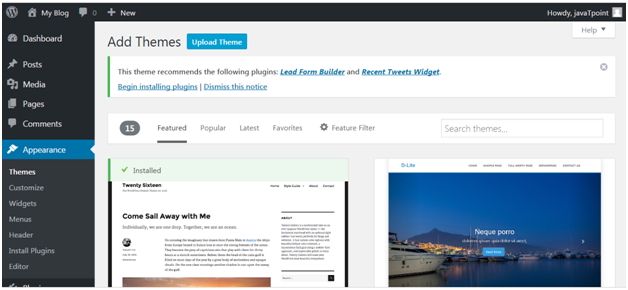
To install the downloaded theme, you have to login to your WordPress and click on Appearance > Themes.

Now click on Add New button, following screen will appear in front of you.

Wordpress How to install wordpress themes10

Look at the above snapshot, click on Upload Theme button.

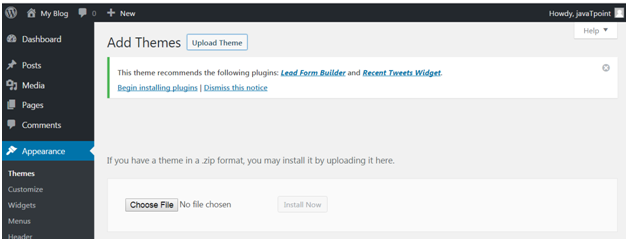
Wordpress How to install wordpress themes11

Look at the above snapshot, choose the file that you installed and click Install Now.

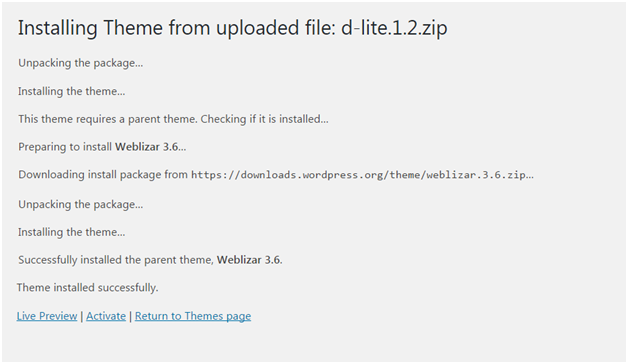
Wordpress How to install wordpress themes12

Look at the above snapshot, once your theme is installed, you will get a successfully installed message. Now click on Activate button, and your theme will be successfully installed.

Now you can customize it according to your choice.


Read More
  • Share This:  
  •  Facebook
  •  Twitter
  •  Google+
  •  Stumble
  •  Digg

WordPress Themes

 Programing Coderfunda     March 28, 2022     Wordpress     No comments   


WordPress Themes

With the help of WordPress theme, you can design the layout and appearance of your website in the front-end.

When WordPress is installed, it has a pre-installed theme which is very simple and unattractive. But no one wants a website to be that much simple. To make it more attractive one can install and apply different themes from WordPress.

Themes provide a style (including font styling), colors, page layouts, widget positions, etc. You can change the theme of your site without changing the content of the site. Themes provide a unique look to your site.

Types of WordPress theme

There are thousands of themes available on the WordPress. Some are free and some are paid. You can choose a theme according to your choice.

Free

WordPress provides many good looking themes absolutely free in the WordPress theme directory. If you are using your site for a small audience or yourself, go for free one. Because there are some chances that same theme is being used by another site.

Premium

Premium themes may cost you starting from $1,000. Prize varies depending upon the design and requirement of your site.

One advantage in premium themes is that they provide a reliable code base and offer support. It gives you a more enhanced security.

How to make a WordPress theme

Building a WordPress theme is somewhat technical work. To build a theme you should have a little knowledge about the following development languages.

  • HTML
  • CSS
  • JavaScript
  • PHP
  • Database

You should know how to use a web server.

Selecting WordPress Theme

WordPress theme should be selected very wisely, so that it perfectly fits on your site. You can select any one either paid or free. It should be complemented to your site.

Themes affect a website in a lot of way. Heavy themes which look great may slow down your website and Google will degrade its ranking. If a theme is not coded properly, it becomes difficult to add any plugin or change that theme.

Theme selection is very important as everything for your website depends upon theme.

Given below are some of the points which may help the users to select a theme for their website.

Look for Simplicity

Your website should look good, but for that you shouldn't compromise with your site's functionality. Theme styling should not be complicated. Complexity will make things difficult for your users. All you need is a good theme, so don't go for an attractive one compromising your users.

Responsive

Your theme should be compatible with all type of screen sizes. A large number of traffic generates from devices other than laptops and PCs. Google also gives better ranking to the responsive sites. Lot of themes is by default responsive but still there are some themes which are not responsive. So look for a theme which is responsive to make your website accessible by all device users.

Browser Support

Make sure the theme you select is supported by all the browsers. Before selecting it, test it on different browsers for mobiles as well as laptops like Chrome, Internet Explorer, and Firefox.

Plugin Support

Plugins are very important for a WordPress site. They enhance the functionality of your site. Make sure that your selected theme must support all the popular plugins.

Multilingual Support

Your theme should support multilingual to support different languages for users.

Help Option

Only some developers provide support option with free themes, not all. So, if you messed up with your site then you may have to solve it on your own. So rather than facing all these problems, you should better choose a theme which has a good documentation and support help option.

SEO Friendliness

To increase your site performance on search engines, choose a theme which is SEO friendly. Many theme developers will let you know whether their theme is SEO friendly or not.

Ratings and Reviews

Before downloading a theme, have a look on its rating and reviews. A theme has both good and bad reviews, but if there are more negative reviews then read it carefully and consider it once again.


Read More
  • Share This:  
  •  Facebook
  •  Twitter
  •  Google+
  •  Stumble
  •  Digg

WordPress Menus

 Programing Coderfunda     March 28, 2022     Wordpress     No comments   


WordPress Menus

The Menu is a list of options presented to the user. They are mostly used as a navigation building method on WordPress websites. Usually, the common content management system's installation is followed by a default menu that provides links to pages at the top level. These menus can be used at the top of the sites with links. It is generally used as a horizontal menu with links like home, email, contact, or pages.

Defining a WordPress Menu

Firstly, we need to define a WordPress menu before adding items to it or use it. We can use the following steps to define a WordPress menu.

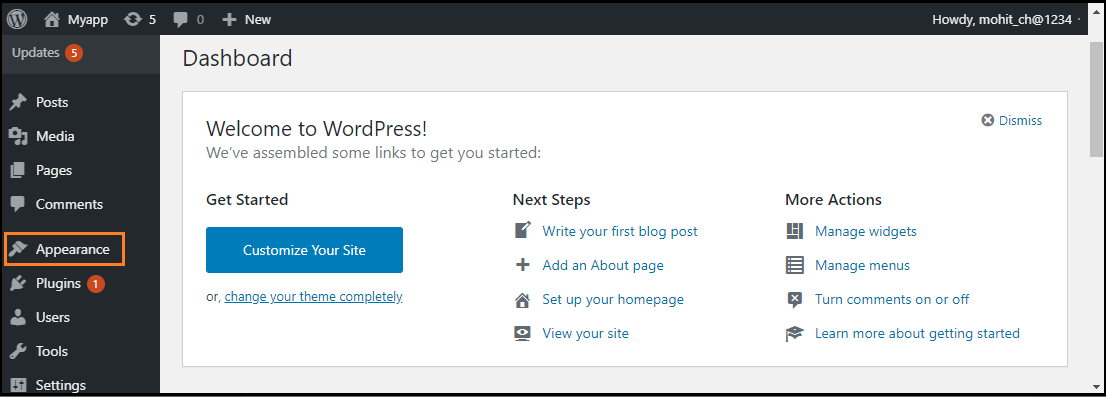
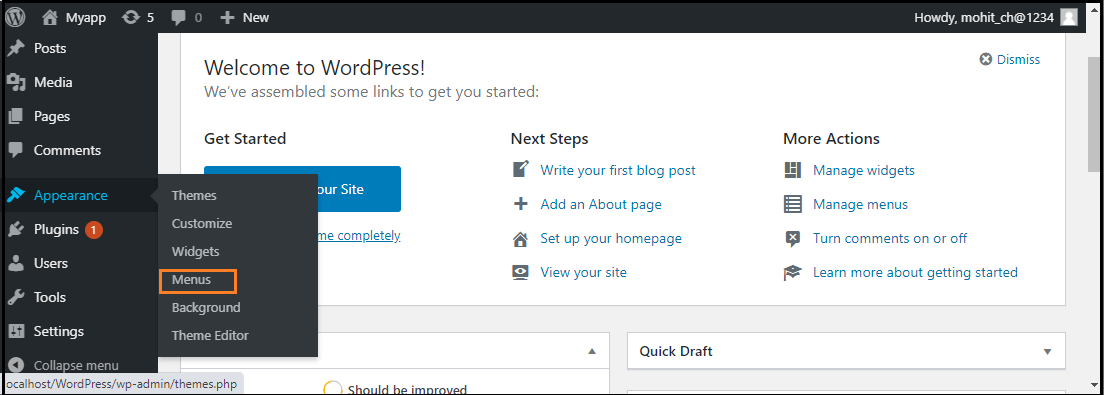
Step 1: First, log in to the WordPress Dashboard and click on the "Appearance" menu option, as shown in the below screenshot.

WordPress Menus

Step 2: The "Appearance" menu option opens a sub-menu where we choose the "Menus" option to bring up the Menu Editor.

WordPress Menus

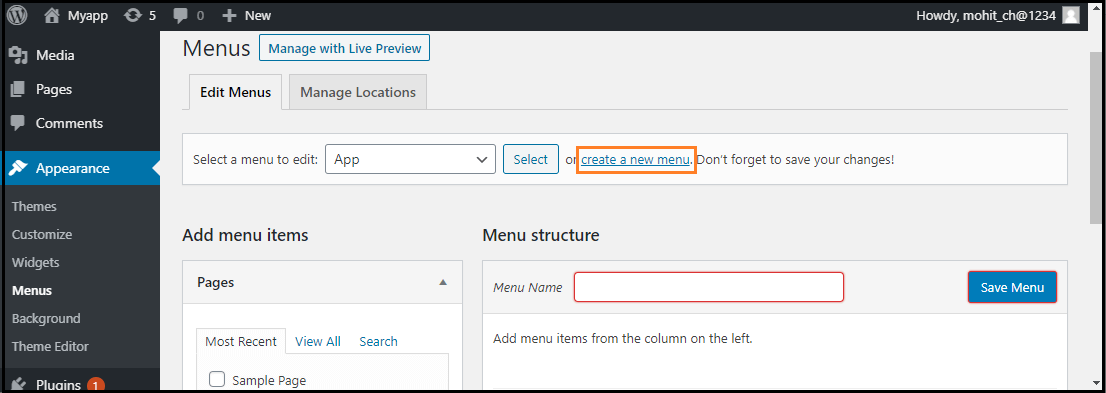
Step 3: After selecting the "Menus" option, choose the "Create a new menu" option shown in the red rectangular box at the top of the page.

WordPress Menus

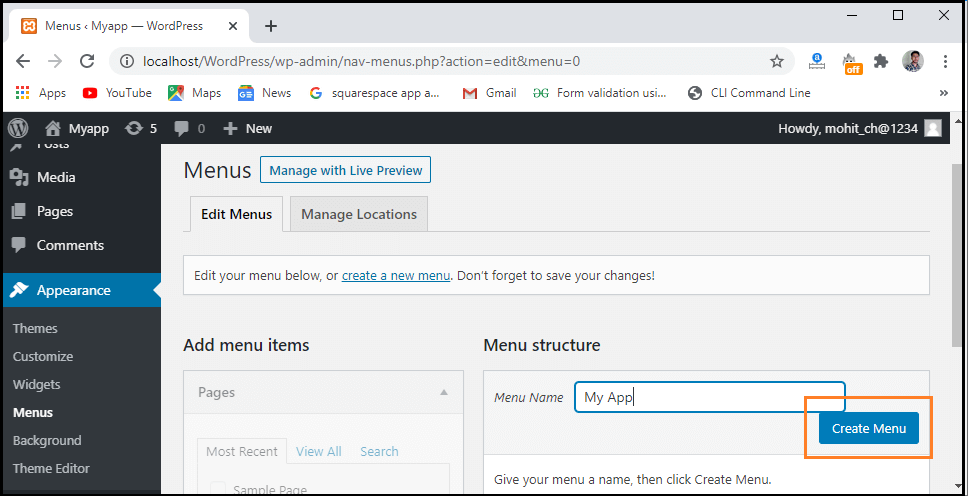
Step 4: Now, enter the name to create a new menu in the "Menu Name" box.

Step 5: After that, click on the "Create Menu" button to create a menu.

WordPress Menus

Adding Menu Items

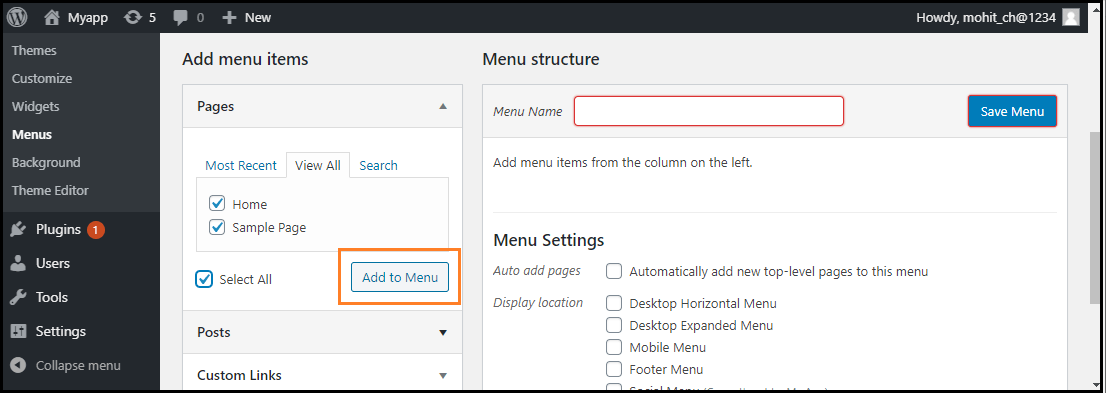
In this section, we can add several link type options to the menu like Pages, Posts, Custom Links, and Categories. The following are the steps to add items in the menu.

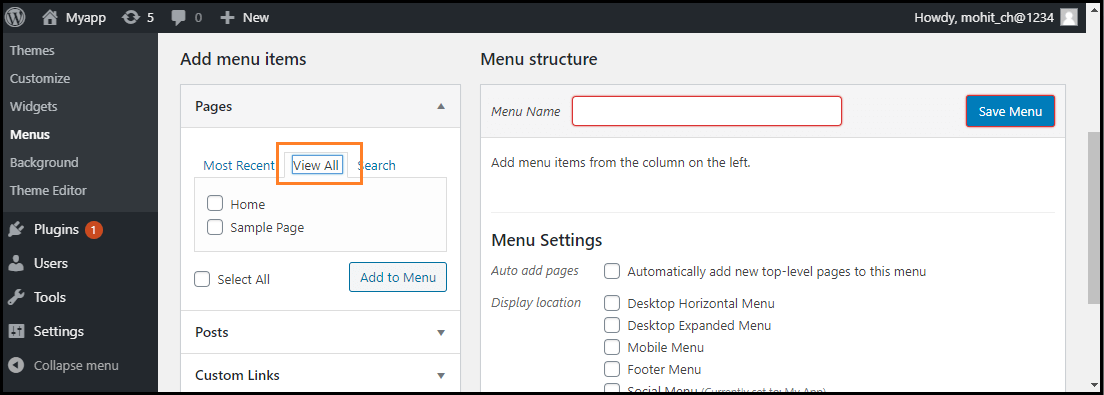
Step 1: Firstly, Find the pane entitled Pages.

Step 2: Choose the "View All" link to see a list of all recently published pages on the WordPress site.

WordPress Menus

Step 3: Now, we can add Pages by clicking the checkbox corresponding to each page title.

Step 4: To add our selection to the menu that we created in the previous step, click on the "Add to Menu" button shown in the red rectangular box at the bottom of this page.

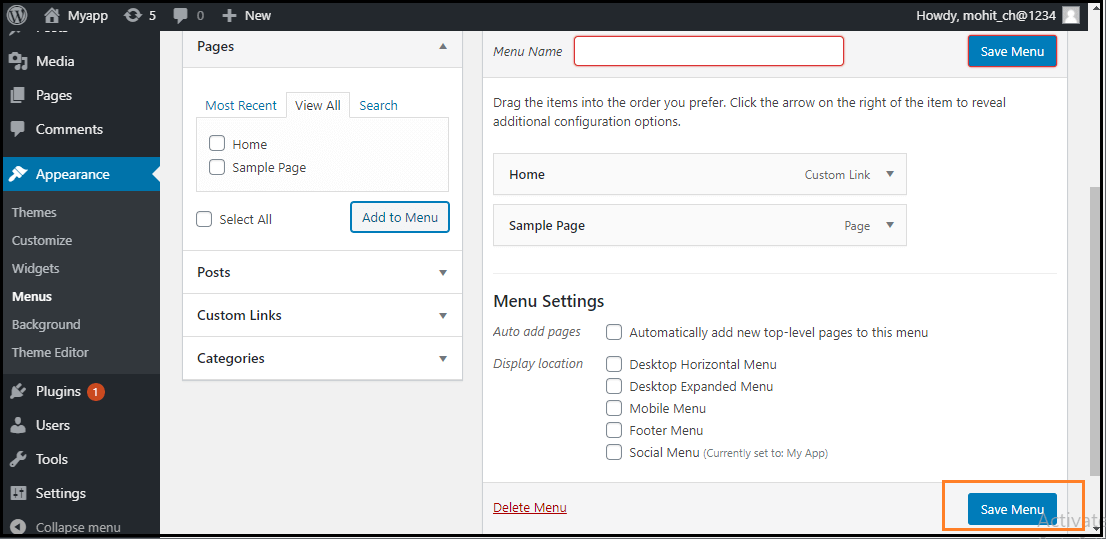
WordPress Menus

Step 5: After that, click on the "Save Menu" button.

WordPress Menus

Now, the new custom menu has been saved in the WordPress site.

Deleting a Menu Item

If we want to delete an item form the menu, we can use the following steps:

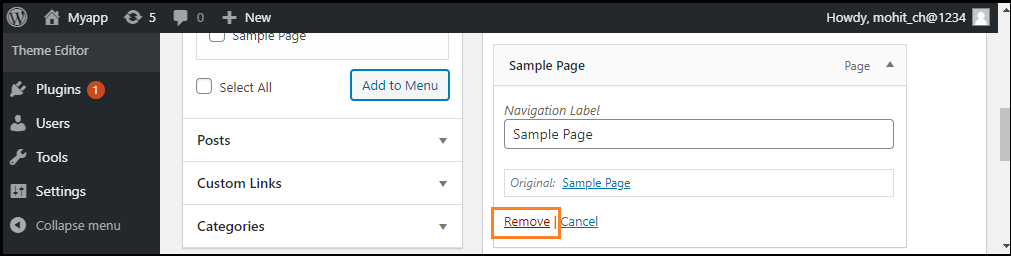
Step 1: First, find the menu items that we want to delete in the menu editor window.

Step 2: Next, click the arrow icon at the top right corner of the menu item.

Step 3: Click on the "Remove" option. The menu item or box will be removed immediately.

WordPress Menus

Step 4: Finally, click on the "Save Menu" button to save the changes.

Customizing Menu Items

There are various customization Menu items available; some of them are as follows:

  • Navigation Label
  • Title Attribute
  • Link Target
  • Link Relationship
  • CSS Classes
  • Original

Navigation Label

This field defines the title of the item on our custom menu. Our visitors will see this when they visit our site or blog.

Title Attribute

This field defines the alternative text ('Alt') for the menu item. This text will be shown when the user's mouse is hovering over the menu item.

Link Target

It allows users to choose the "Same window or tab" or "New window or tab" from the dropdown menu.

Link Relationship

It allows us to automatically create XFN features to demonstrate how we are connected with the authors or owners of the site to whom we are linking.

CSS Classes

It provides the optional CSS classes to the menu item.

Original

It provides a link to the source of the menu item that helps us to see the page or post.

Creating Multi-Level Menus

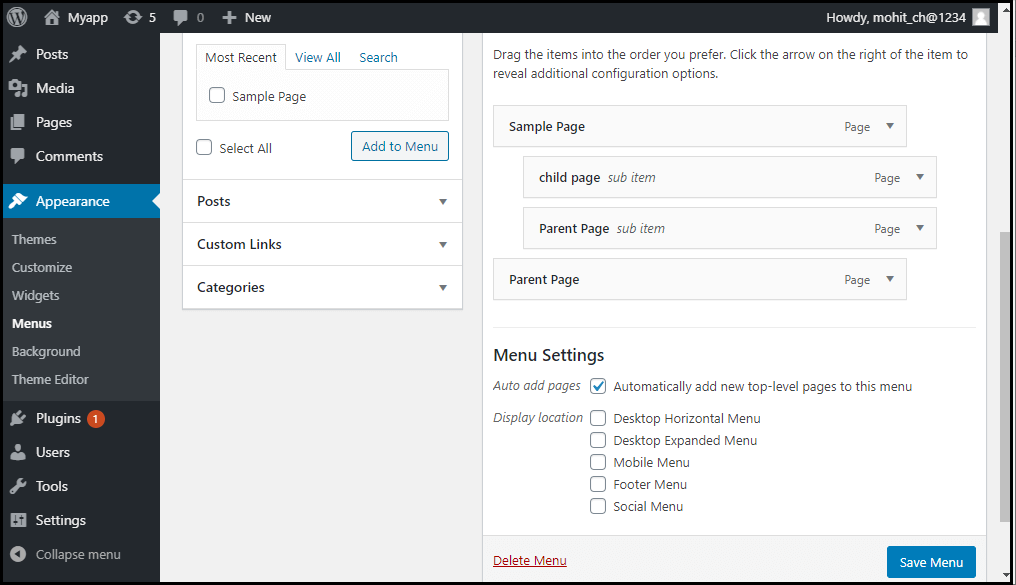
WordPress Menu Editor helps us to build a multi-level menu using the "drag and drop" interface. We can drag the menu items up or down to change the order you want to appear in the WordPress menu. We can also drag menu items left or right to build sub-levels in the Menu.

If we want to create a menu item a subordinate of another, it is required to place the "child" under its "parent" and then drag it slightly to the right. If we want to create a multi-level menu, we can use the following steps:

Step 1: Firstly, move the cursor over the "child" menu item.

Step 2: Drag it to the right while holding the left button of the mouse.

Step 3: Now, release the mouse button.

Step 4: Repeat all these items for every sub-menu items.

Step 5: To save the changes, click on the "Save Menu" button in the Menu Editor.

WordPress Menus

How to add custom links to the Menu

If we want to add the WordPress menu's custom links, we need to follow these steps:

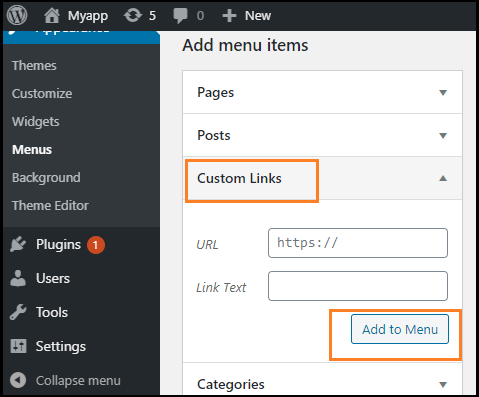
Step 1: First, we need to click on the Custom link option in the menu's left column. Every custom link requires a URL and the Link Text.

Step 2: After that, click on the "Add to Menu" button to add a link.

WordPress Menus

These custom links are useful for situations when we need to link to a page not listed in the left column, such as an external website.

How to link to category pages or tags

If we want to add the post categories or tags to our menu, we can use the following steps:

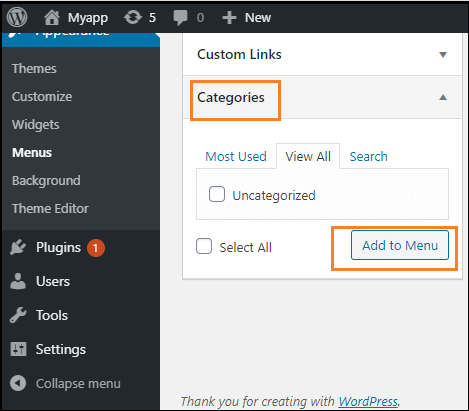
Step 1: First, click on the categories tab in the left side column.

Step 2: Now, choose the one tab that should appear in the menu.

Step 3: After that, click on the "Add to Menu" button to add a category or tab.

WordPress Menus

How to Add a social menu

Creating a menu for our social accounts is much easier than creating a regular one. To create a social account in the WordPress Menu Editor, we can use the following steps:

Step 1: First, click on the "Create a new menu" link.

Step 2: Now, input the name of the menu and click on the Create Menu.

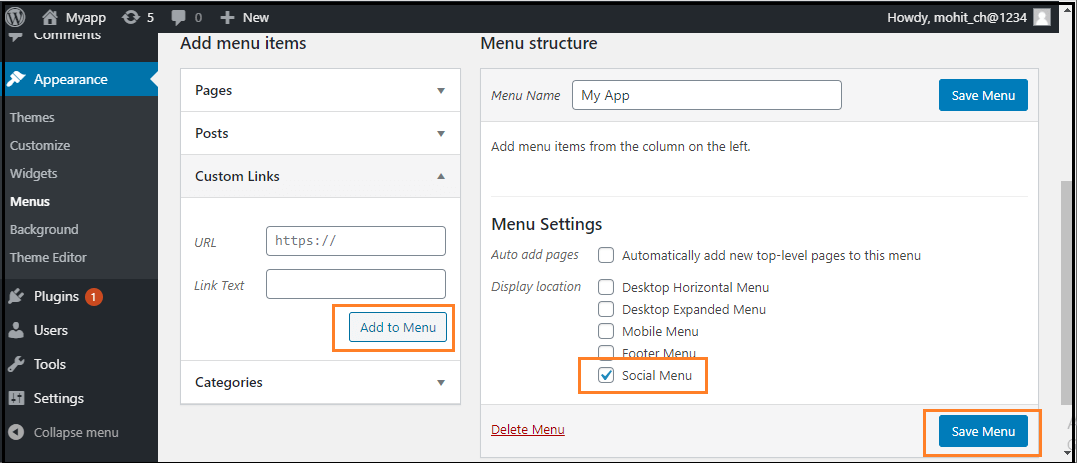
Step 3: Next, check the bottom of the "Social Links" menu box, and use the Custom Links tab to add links to the social media menu.

Step 4: After completing all these steps, click on the "Add to Menu" button to add a social menu.

WordPress Menus
Read More
  • Share This:  
  •  Facebook
  •  Twitter
  •  Google+
  •  Stumble
  •  Digg

Wordpress Users

 Programing Coderfunda     March 28, 2022     Wordpress     No comments   


Wordpress Users


User Role

User role determines the access permission to the users of a WordPress site.

There are five user roles:

  • Administrator - An administrator has full rights over a site. They can do anything from adding a post to deleting the other user's post. They have the authority to design a website by installing plugin and adding themes. They can even change the existing user?s password, delete them or add them.
  • Administrators are basically the site owner and they have the full authority over their site.

  • Editor - They deal with content section of a site. They have the right to add, delete, edit, or publish even others posts. They can also add, delete, or edit comments.
  • Author - They only deal with their own posts in all manners like creating, deleting, editing, publishing or uploading images and videos. They can delete their post, even if that is published. They can't create a new category, they have to choose from the existing one. Although they can add tags to their post.
  • They can't add any page or modify it.

  • Contributor - A contributor doesn't have right to publish their post or page. They have to send their post to the administrator to review. And once it is reviewed, it can't be further edited by the contributor.
  • They can't even upload image or videos files in their own posts.

  • Subscriber - Users which are subscribed to your site can log in and update their profile. They have the authority to change their passwords when they want. They can only read posts and leave comments on your posts.
  • Follower - They don't have any right. They can only read and comment on your post. They are only signed up in your site to receive notifications every time when you update a post.
  • Viewer - They can only read and comment on a post.

How to Add Users

When a user is registered into your site, you'll get a notification. So you can edit a user's role according to your choice.

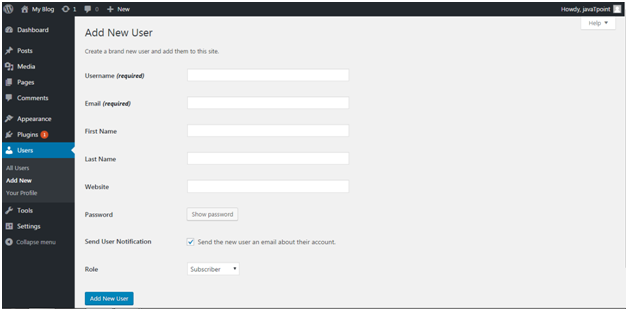
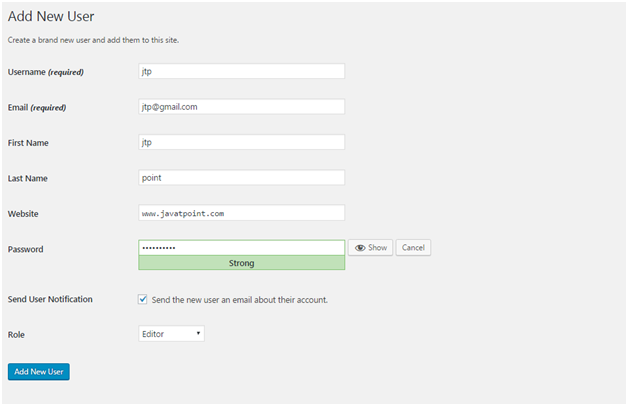
Click on Users > Add New

Wordpress Users1

Look at the above snapshot, fill all the details and click on Add New User button.

Wordpress Users2 Wordpress Users3

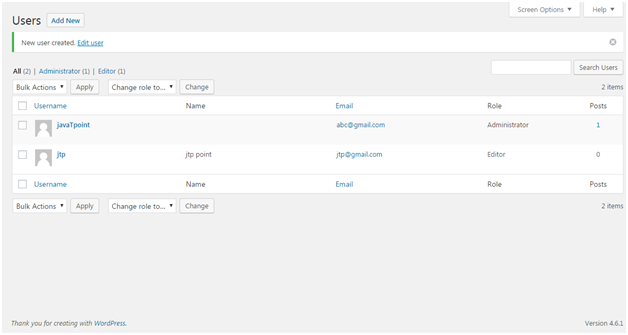
Look at the above snapshot, a message is generated at the top stating, new user created.


How to Edit Users

To edit users, go to Users > All Users

Wordpress Users4

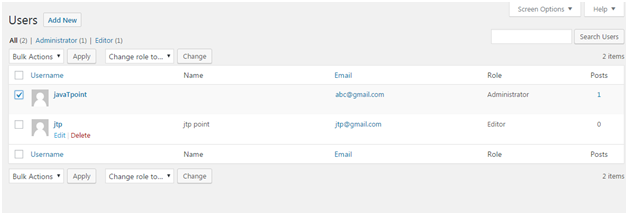
Look at the above snapshot, this is the list of users.

Click on a user's Edit button.

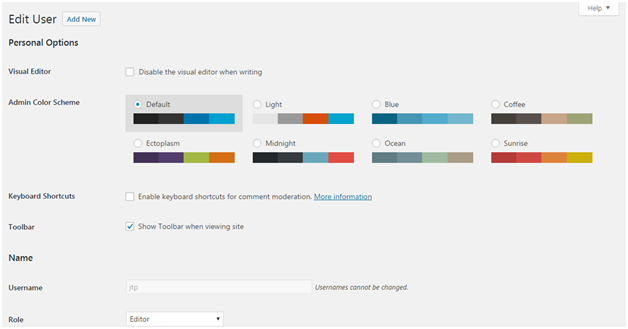
Wordpress Users5

Look at the above snapshot, here you can edit and modify the details.


How to Delete Users

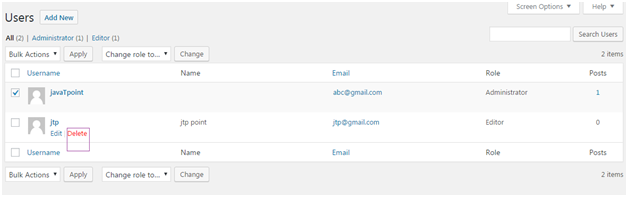
Click on Users > All Users, users list will appear.

Wordpress Users6

Look at the above snapshot, select Delete option.

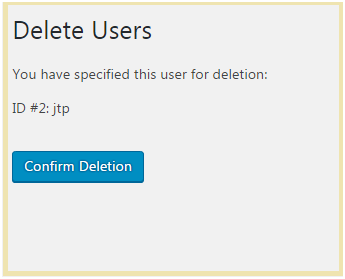
Wordpress Users7

Look at the above snapshot, click Confirm Deletion to delete this user.

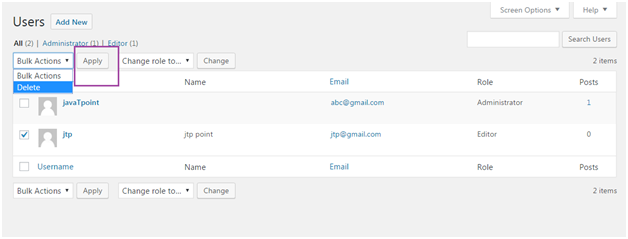
There is one more method to delete a user. Click on Users > All Users

Wordpress Users8

Look at the above snapshot, select a user by clicking on checkbox, from drop-down select Delete and then click on Apply button.


Read More
  • Share This:  
  •  Facebook
  •  Twitter
  •  Google+
  •  Stumble
  •  Digg
Newer Posts Older Posts Home

Meta

Popular Posts

  • Generate Migrations from an Existing Database With the Migration Generator Package
    Laravel Migration Generator Migration Generator for Laravel is a package by Bennett Treptow to generate migrations from existing database ...
  • Tailwindcss best practices for responsive design
    Tailwind CSS provides powerful utilities for responsive design out of the box. To use it effectively and maintain clean, scalable code, here...
  • Search Through Models with Laravel Searchable
      Laravel Searchable   is a package by   Spatie   to search through models and other sources pragmatically. Using this package, you can get ...
  • Laravel Razorpay Integration | Payment gateway integration Laravel in 30 mins | Laravel Razorpay
    1 Integration of Razorpay with Laravel. In this tutorial, I have taught how to integrate payment gateway with laravel with mini-project. If...
  • Vue.js Render functions
        Vue.js Render functions Vue.js recommends us to use templates to build HTML. Here, we can use the render function as a closer-to-the-co...

Categories

  • Ajax (26)
  • Bootstrap (30)
  • DBMS (42)
  • HTML (12)
  • HTML5 (45)
  • JavaScript (10)
  • Jquery (34)
  • Jquery UI (2)
  • JqueryUI (32)
  • Laravel (1017)
  • Laravel Tutorials (23)
  • Laravel-Question (6)
  • Magento (9)
  • Magento 2 (95)
  • MariaDB (1)
  • MySql Tutorial (2)
  • PHP-Interview-Questions (3)
  • Php Question (13)
  • Python (36)
  • RDBMS (13)
  • SQL Tutorial (79)
  • Vue.js Tutorial (69)
  • Wordpress (150)
  • Wordpress Theme (3)
  • codeigniter (108)
  • oops (4)
  • php (853)

Social Media Links

  • Follow on Twitter
  • Like on Facebook
  • Subscribe on Youtube
  • Follow on Instagram

Pages

  • Home
  • Contact Us
  • Privacy Policy
  • About us

Blog Archive

  • ▼  2026 (3)
    • ▼  07/26 - 08/02 (2)
      • A stormwater pond in Calgary appears filled with P...
      • Inside Kriti Sanon's duplex sea-facing penthouse w...
    • ►  06/28 - 07/05 (1)
  • ►  2025 (4)
    • ►  07/06 - 07/13 (2)
    • ►  06/29 - 07/06 (2)
  • ►  2024 (486)
    • ►  09/15 - 09/22 (30)
    • ►  09/08 - 09/15 (35)
    • ►  09/01 - 09/08 (35)
    • ►  08/11 - 08/18 (2)
    • ►  08/04 - 08/11 (33)
    • ►  07/28 - 08/04 (30)
    • ►  07/07 - 07/14 (11)
    • ►  06/30 - 07/07 (35)
    • ►  06/23 - 06/30 (5)
    • ►  06/02 - 06/09 (31)
    • ►  05/26 - 06/02 (20)
    • ►  05/05 - 05/12 (29)
    • ►  04/28 - 05/05 (26)
    • ►  04/07 - 04/14 (10)
    • ►  03/31 - 04/07 (34)
    • ►  03/24 - 03/31 (10)
    • ►  03/03 - 03/10 (35)
    • ►  02/25 - 03/03 (15)
    • ►  02/04 - 02/11 (22)
    • ►  01/28 - 02/04 (30)
    • ►  01/07 - 01/14 (8)
  • ►  2023 (484)
    • ►  12/31 - 01/07 (35)
    • ►  12/24 - 12/31 (10)
    • ►  12/03 - 12/10 (33)
    • ►  11/26 - 12/03 (20)
    • ►  11/05 - 11/12 (35)
    • ►  10/29 - 11/05 (20)
    • ►  10/22 - 10/29 (9)
    • ►  10/15 - 10/22 (7)
    • ►  10/08 - 10/15 (9)
    • ►  10/01 - 10/08 (10)
    • ►  09/24 - 10/01 (9)
    • ►  09/17 - 09/24 (9)
    • ►  09/10 - 09/17 (7)
    • ►  09/03 - 09/10 (9)
    • ►  08/27 - 09/03 (9)
    • ►  08/20 - 08/27 (8)
    • ►  08/13 - 08/20 (8)
    • ►  08/06 - 08/13 (8)
    • ►  07/30 - 08/06 (8)
    • ►  07/23 - 07/30 (7)
    • ►  07/16 - 07/23 (8)
    • ►  07/09 - 07/16 (7)
    • ►  07/02 - 07/09 (8)
    • ►  06/25 - 07/02 (7)
    • ►  06/18 - 06/25 (7)
    • ►  06/11 - 06/18 (7)
    • ►  06/04 - 06/11 (11)
    • ►  05/28 - 06/04 (7)
    • ►  05/21 - 05/28 (8)
    • ►  05/14 - 05/21 (11)
    • ►  05/07 - 05/14 (7)
    • ►  04/30 - 05/07 (7)
    • ►  04/23 - 04/30 (8)
    • ►  04/16 - 04/23 (9)
    • ►  04/09 - 04/16 (7)
    • ►  04/02 - 04/09 (4)
    • ►  03/26 - 04/02 (21)
    • ►  03/19 - 03/26 (2)
    • ►  03/12 - 03/19 (9)
    • ►  03/05 - 03/12 (26)
    • ►  02/26 - 03/05 (25)
    • ►  01/15 - 01/22 (7)
    • ►  01/08 - 01/15 (1)
  • ►  2022 (1037)
    • ►  12/11 - 12/18 (13)
    • ►  12/04 - 12/11 (1)
    • ►  11/27 - 12/04 (40)
    • ►  11/06 - 11/13 (1)
    • ►  10/16 - 10/23 (13)
    • ►  09/04 - 09/11 (5)
    • ►  08/21 - 08/28 (24)
    • ►  08/14 - 08/21 (24)
    • ►  07/03 - 07/10 (9)
    • ►  06/19 - 06/26 (3)
    • ►  05/29 - 06/05 (3)
    • ►  05/22 - 05/29 (3)
    • ►  05/15 - 05/22 (109)
    • ►  05/01 - 05/08 (7)
    • ►  04/24 - 05/01 (7)
    • ►  04/17 - 04/24 (64)
    • ►  04/10 - 04/17 (115)
    • ►  04/03 - 04/10 (73)
    • ►  03/27 - 04/03 (77)
    • ►  03/13 - 03/20 (2)
    • ►  03/06 - 03/13 (25)
    • ►  02/27 - 03/06 (18)
    • ►  02/20 - 02/27 (153)
    • ►  02/13 - 02/20 (187)
    • ►  01/30 - 02/06 (45)
    • ►  01/23 - 01/30 (15)
    • ►  01/16 - 01/23 (1)
  • ►  2021 (412)
    • ►  10/24 - 10/31 (2)
    • ►  07/25 - 08/01 (1)
    • ►  07/11 - 07/18 (10)
    • ►  06/13 - 06/20 (29)
    • ►  05/23 - 05/30 (1)
    • ►  05/02 - 05/09 (24)
    • ►  04/25 - 05/02 (24)
    • ►  04/18 - 04/25 (112)
    • ►  04/11 - 04/18 (1)
    • ►  04/04 - 04/11 (6)
    • ►  03/28 - 04/04 (86)
    • ►  03/21 - 03/28 (19)
    • ►  03/14 - 03/21 (2)
    • ►  03/07 - 03/14 (10)
    • ►  02/28 - 03/07 (1)
    • ►  02/21 - 02/28 (29)
    • ►  02/14 - 02/21 (13)
    • ►  02/07 - 02/14 (12)
    • ►  01/31 - 02/07 (6)
    • ►  01/17 - 01/24 (2)
    • ►  01/10 - 01/17 (8)
    • ►  01/03 - 01/10 (14)
  • ►  2020 (376)
    • ►  12/27 - 01/03 (37)
    • ►  12/20 - 12/27 (92)
    • ►  12/13 - 12/20 (29)
    • ►  12/06 - 12/13 (37)
    • ►  11/29 - 12/06 (4)
    • ►  11/15 - 11/22 (14)
    • ►  11/08 - 11/15 (8)
    • ►  11/01 - 11/08 (2)
    • ►  10/18 - 10/25 (14)
    • ►  10/11 - 10/18 (16)
    • ►  10/04 - 10/11 (10)
    • ►  09/20 - 09/27 (10)
    • ►  09/06 - 09/13 (19)
    • ►  08/30 - 09/06 (26)
    • ►  08/23 - 08/30 (4)
    • ►  08/16 - 08/23 (2)
    • ►  07/12 - 07/19 (48)
    • ►  05/17 - 05/24 (2)
    • ►  01/05 - 01/12 (2)
  • ►  2019 (74)
    • ►  07/07 - 07/14 (6)
    • ►  06/16 - 06/23 (6)
    • ►  02/10 - 02/17 (17)
    • ►  01/13 - 01/20 (37)
    • ►  01/06 - 01/13 (8)
  • ►  2018 (376)
    • ►  12/30 - 01/06 (24)
    • ►  12/16 - 12/23 (8)
    • ►  12/09 - 12/16 (98)
    • ►  12/02 - 12/09 (16)
    • ►  11/18 - 11/25 (36)
    • ►  11/04 - 11/11 (18)
    • ►  10/28 - 11/04 (10)
    • ►  10/21 - 10/28 (26)
    • ►  10/14 - 10/21 (52)
    • ►  10/07 - 10/14 (4)
    • ►  09/30 - 10/07 (2)
    • ►  09/23 - 09/30 (68)
    • ►  09/16 - 09/23 (4)
    • ►  09/09 - 09/16 (4)
    • ►  08/26 - 09/02 (6)

Data Publish News

Loading...

Al Jazeera – Breaking News, World News and Video from Al Jazeera

Loading...

Laravel News

Loading...

Copyright © CoderFunda | Powered by Blogger
Design by Coderfunda | Blogger Theme by Coderfunda | Distributed By Coderfunda