CoderFunda
  • Home
  • About us
    • Contact Us
    • Disclaimer
    • Privacy Policy
    • About us
  • Home
  • Php
  • HTML
  • CSS
  • JavaScript
    • JavaScript
    • Jquery
    • JqueryUI
    • Stock
  • SQL
  • Vue.Js
  • Python
  • Wordpress
  • C++
    • C++
    • C
  • Laravel
    • Laravel
      • Overview
      • Namespaces
      • Middleware
      • Routing
      • Configuration
      • Application Structure
      • Installation
    • Overview
  • DBMS
    • DBMS
      • PL/SQL
      • SQLite
      • MongoDB
      • Cassandra
      • MySQL
      • Oracle
      • CouchDB
      • Neo4j
      • DB2
      • Quiz
    • Overview
  • Entertainment
    • TV Series Update
    • Movie Review
    • Movie Review
  • More
    • Vue. Js
    • Php Question
    • Php Interview Question
    • Laravel Interview Question
    • SQL Interview Question
    • IAS Interview Question
    • PCS Interview Question
    • Technology
    • Other

28 March, 2022

WordPress Menus

 Programing Coderfunda     March 28, 2022     Wordpress     No comments   


WordPress Menus

The Menu is a list of options presented to the user. They are mostly used as a navigation building method on WordPress websites. Usually, the common content management system's installation is followed by a default menu that provides links to pages at the top level. These menus can be used at the top of the sites with links. It is generally used as a horizontal menu with links like home, email, contact, or pages.

Defining a WordPress Menu

Firstly, we need to define a WordPress menu before adding items to it or use it. We can use the following steps to define a WordPress menu.

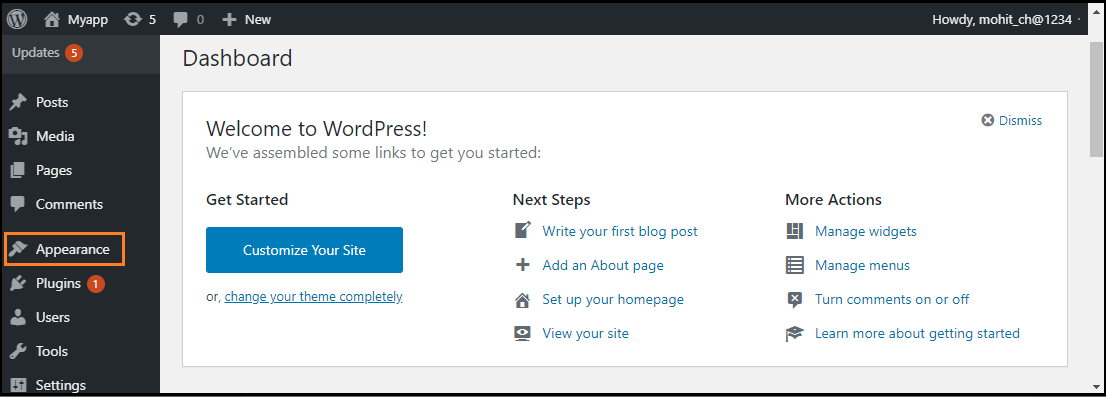
Step 1: First, log in to the WordPress Dashboard and click on the "Appearance" menu option, as shown in the below screenshot.
WordPress Menus

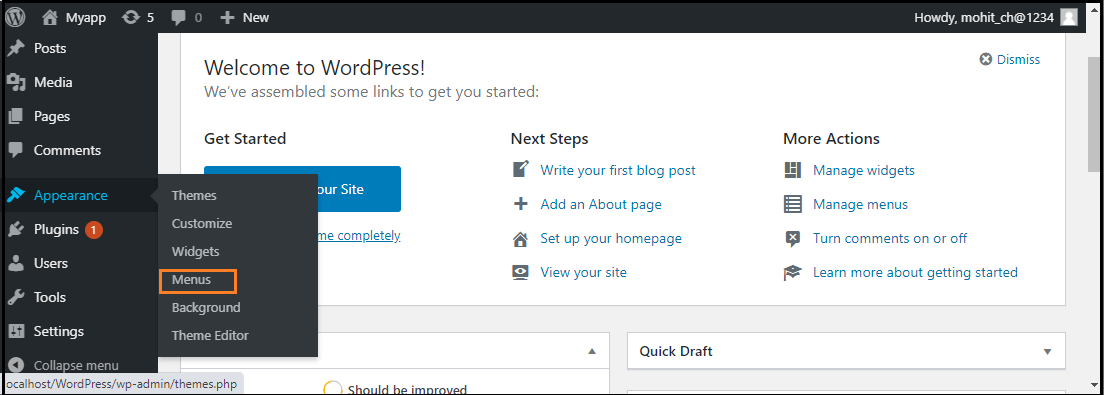
Step 2: The "Appearance" menu option opens a sub-menu where we choose the "Menus" option to bring up the Menu Editor.
WordPress Menus

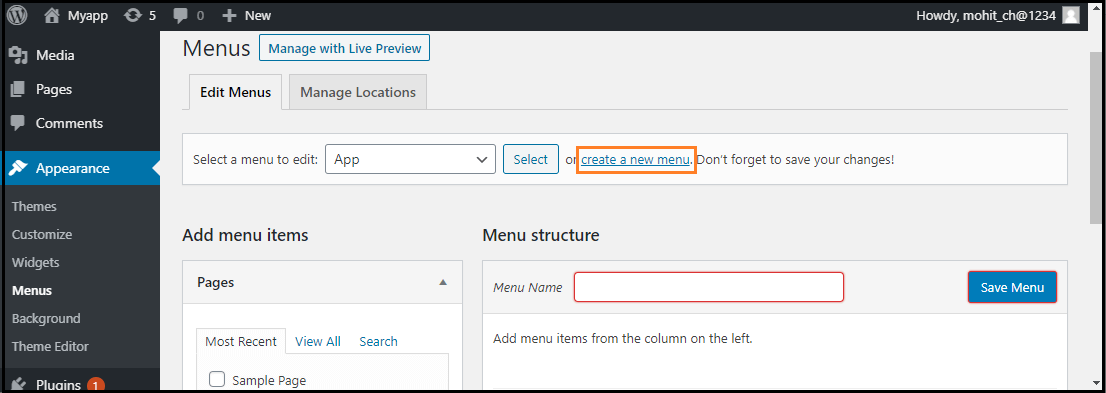
Step 3: After selecting the "Menus" option, choose the "Create a new menu" option shown in the red rectangular box at the top of the page.
WordPress Menus

Step 4: Now, enter the name to create a new menu in the "Menu Name" box.

Step 5: After that, click on the "Create Menu" button to create a menu.
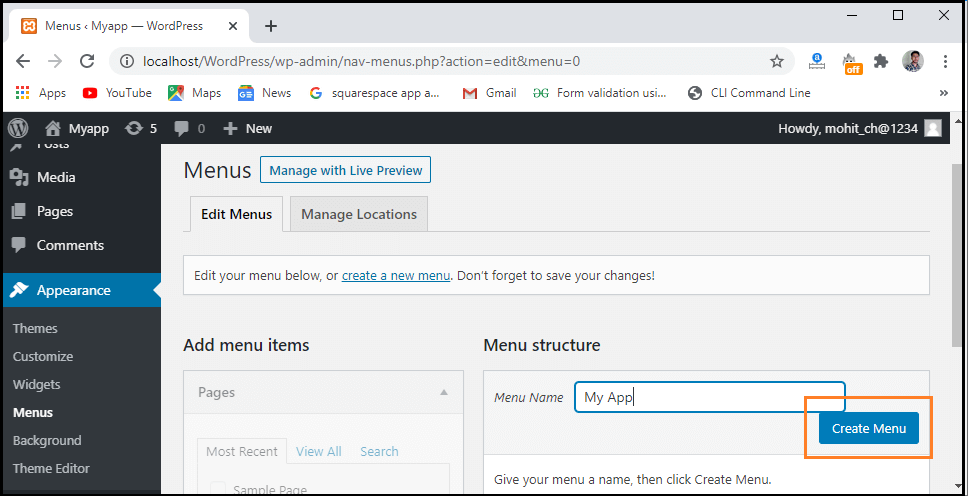
WordPress Menus

Adding Menu Items

In this section, we can add several link type options to the menu like Pages, Posts, Custom Links, and Categories. The following are the steps to add items in the menu.

Step 1: Firstly, Find the pane entitled Pages.

Step 2: Choose the "View All" link to see a list of all recently published pages on the WordPress site.
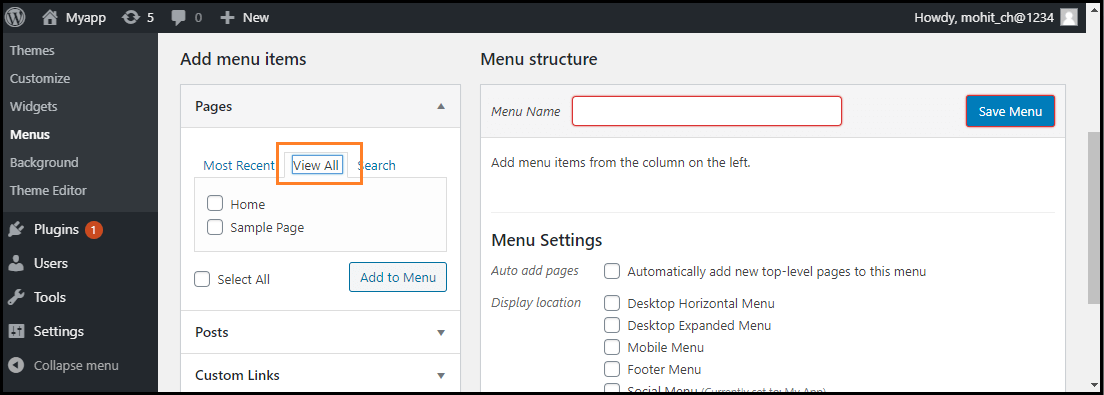
WordPress Menus

Step 3: Now, we can add Pages by clicking the checkbox corresponding to each page title.

Step 4: To add our selection to the menu that we created in the previous step, click on the "Add to Menu" button shown in the red rectangular box at the bottom of this page.
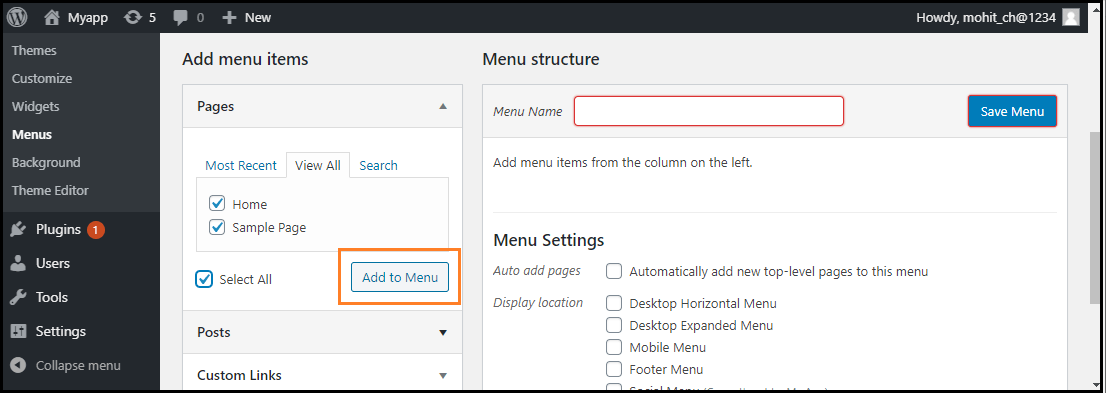
WordPress Menus

Step 5: After that, click on the "Save Menu" button.
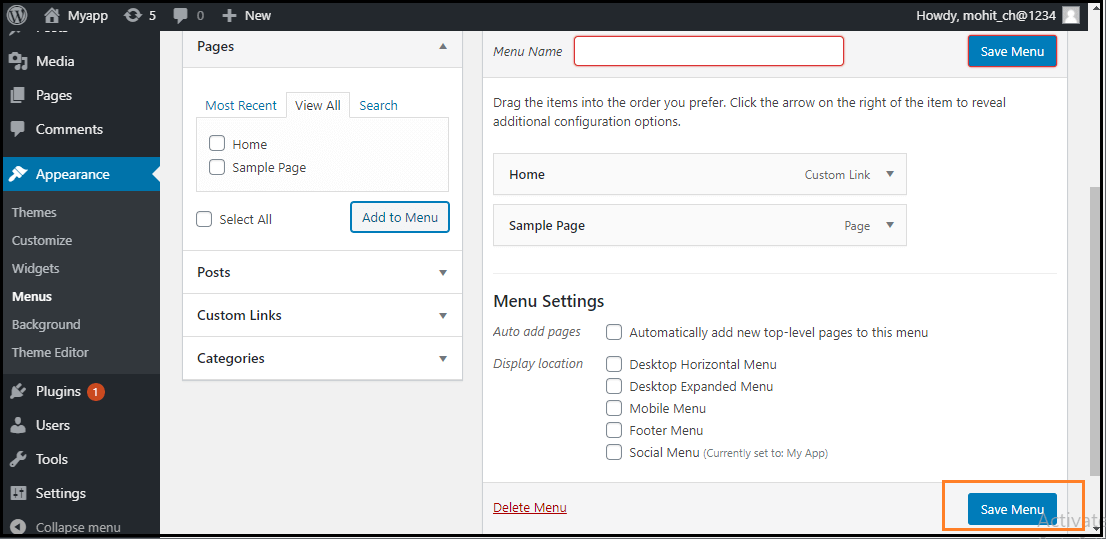
WordPress Menus

Now, the new custom menu has been saved in the WordPress site.

Deleting a Menu Item

If we want to delete an item form the menu, we can use the following steps:

Step 1: First, find the menu items that we want to delete in the menu editor window.

Step 2: Next, click the arrow icon at the top right corner of the menu item.

Step 3: Click on the "Remove" option. The menu item or box will be removed immediately.
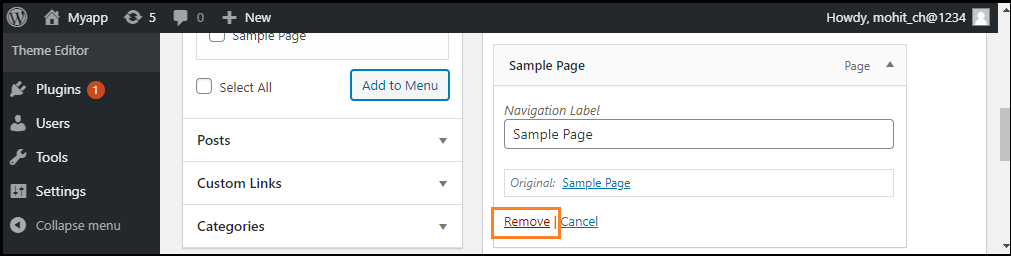
WordPress Menus

Step 4: Finally, click on the "Save Menu" button to save the changes.

Customizing Menu Items

There are various customization Menu items available; some of them are as follows:

  • Navigation Label
  • Title Attribute
  • Link Target
  • Link Relationship
  • CSS Classes
  • Original

Navigation Label

This field defines the title of the item on our custom menu. Our visitors will see this when they visit our site or blog.

Title Attribute

This field defines the alternative text ('Alt') for the menu item. This text will be shown when the user's mouse is hovering over the menu item.

Link Target

It allows users to choose the "Same window or tab" or "New window or tab" from the dropdown menu.

Link Relationship

It allows us to automatically create XFN features to demonstrate how we are connected with the authors or owners of the site to whom we are linking.

CSS Classes

It provides the optional CSS classes to the menu item.

Original

It provides a link to the source of the menu item that helps us to see the page or post.

Creating Multi-Level Menus

WordPress Menu Editor helps us to build a multi-level menu using the "drag and drop" interface. We can drag the menu items up or down to change the order you want to appear in the WordPress menu. We can also drag menu items left or right to build sub-levels in the Menu.

If we want to create a menu item a subordinate of another, it is required to place the "child" under its "parent" and then drag it slightly to the right. If we want to create a multi-level menu, we can use the following steps:

Step 1: Firstly, move the cursor over the "child" menu item.

Step 2: Drag it to the right while holding the left button of the mouse.

Step 3: Now, release the mouse button.

Step 4: Repeat all these items for every sub-menu items.

Step 5: To save the changes, click on the "Save Menu" button in the Menu Editor.
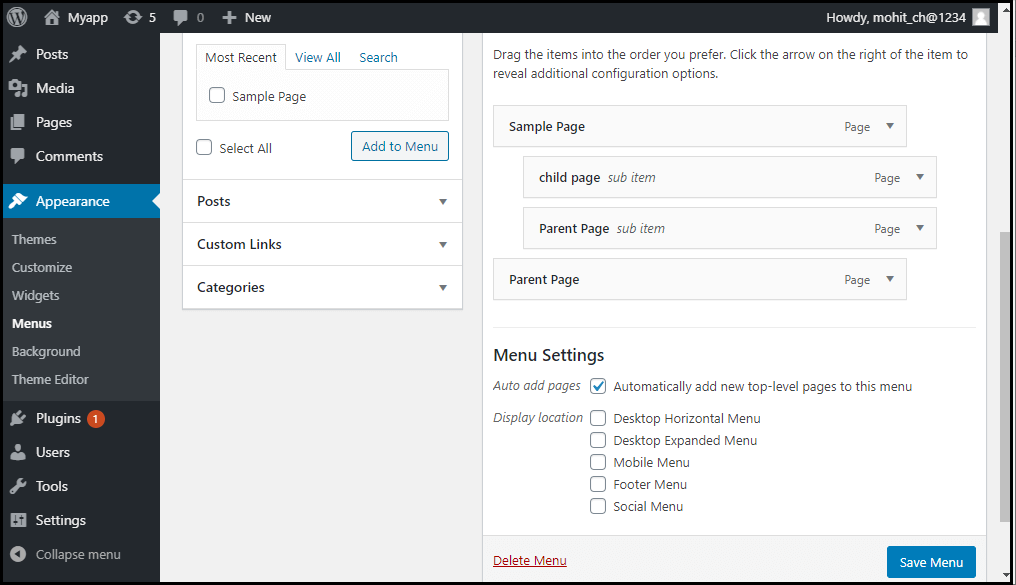
WordPress Menus

How to add custom links to the Menu

If we want to add the WordPress menu's custom links, we need to follow these steps:

Step 1: First, we need to click on the Custom link option in the menu's left column. Every custom link requires a URL and the Link Text.

Step 2: After that, click on the "Add to Menu" button to add a link.
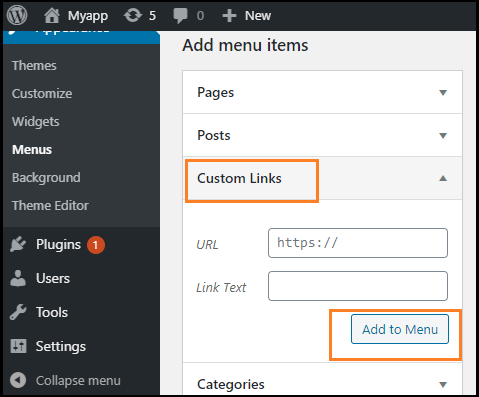
WordPress Menus

These custom links are useful for situations when we need to link to a page not listed in the left column, such as an external website.

How to link to category pages or tags

If we want to add the post categories or tags to our menu, we can use the following steps:

Step 1: First, click on the categories tab in the left side column.

Step 2: Now, choose the one tab that should appear in the menu.

Step 3: After that, click on the "Add to Menu" button to add a category or tab.
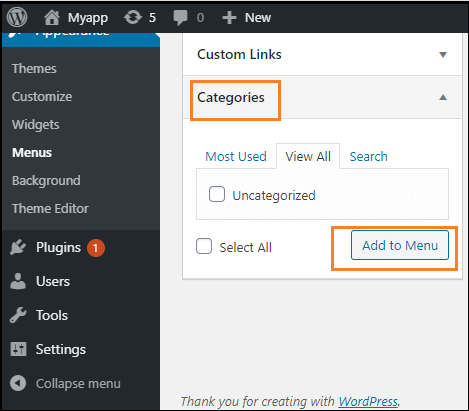
WordPress Menus

How to Add a social menu

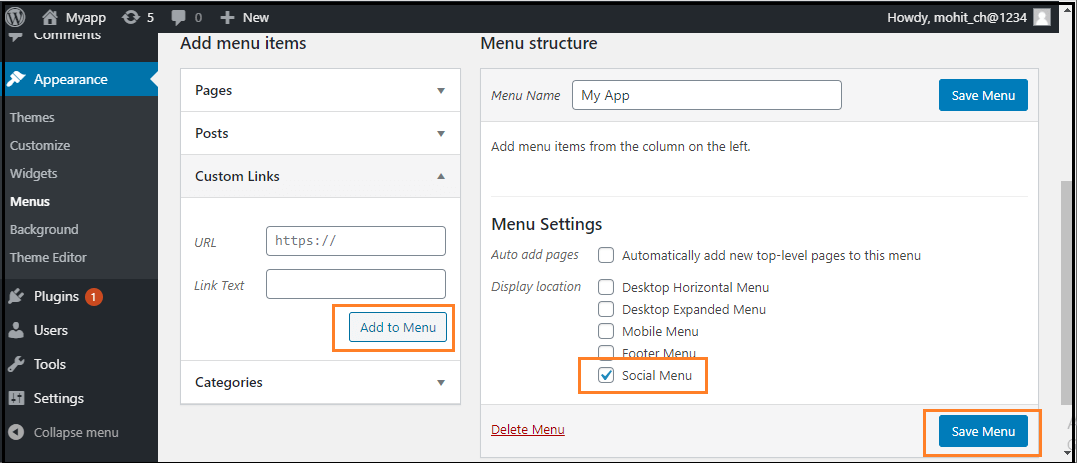
Creating a menu for our social accounts is much easier than creating a regular one. To create a social account in the WordPress Menu Editor, we can use the following steps:

Step 1: First, click on the "Create a new menu" link.

Step 2: Now, input the name of the menu and click on the Create Menu.

Step 3: Next, check the bottom of the "Social Links" menu box, and use the Custom Links tab to add links to the social media menu.

Step 4: After completing all these steps, click on the "Add to Menu" button to add a social menu.
WordPress Menus
Read More
  • Share This:  
  •  Facebook
  •  Twitter
  •  Google+
  •  Stumble
  •  Digg

Wordpress Users

 Programing Coderfunda     March 28, 2022     Wordpress     No comments   


Wordpress Users


User Role

User role determines the access permission to the users of a WordPress site.

There are five user roles:

  • Administrator - An administrator has full rights over a site. They can do anything from adding a post to deleting the other user's post. They have the authority to design a website by installing plugin and adding themes. They can even change the existing user?s password, delete them or add them.
  • Administrators are basically the site owner and they have the full authority over their site.

  • Editor - They deal with content section of a site. They have the right to add, delete, edit, or publish even others posts. They can also add, delete, or edit comments.
  • Author - They only deal with their own posts in all manners like creating, deleting, editing, publishing or uploading images and videos. They can delete their post, even if that is published. They can't create a new category, they have to choose from the existing one. Although they can add tags to their post.
  • They can't add any page or modify it.

  • Contributor - A contributor doesn't have right to publish their post or page. They have to send their post to the administrator to review. And once it is reviewed, it can't be further edited by the contributor.
  • They can't even upload image or videos files in their own posts.

  • Subscriber - Users which are subscribed to your site can log in and update their profile. They have the authority to change their passwords when they want. They can only read posts and leave comments on your posts.
  • Follower - They don't have any right. They can only read and comment on your post. They are only signed up in your site to receive notifications every time when you update a post.
  • Viewer - They can only read and comment on a post.

How to Add Users

When a user is registered into your site, you'll get a notification. So you can edit a user's role according to your choice.

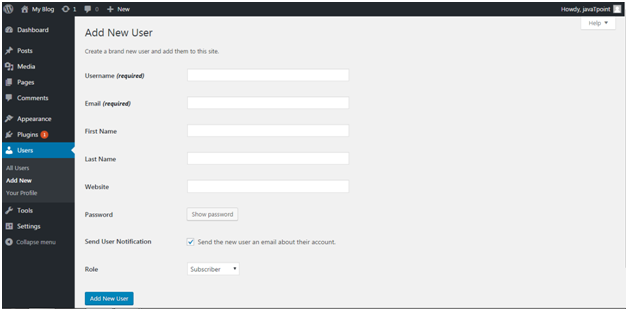
Click on Users > Add New

Wordpress Users1

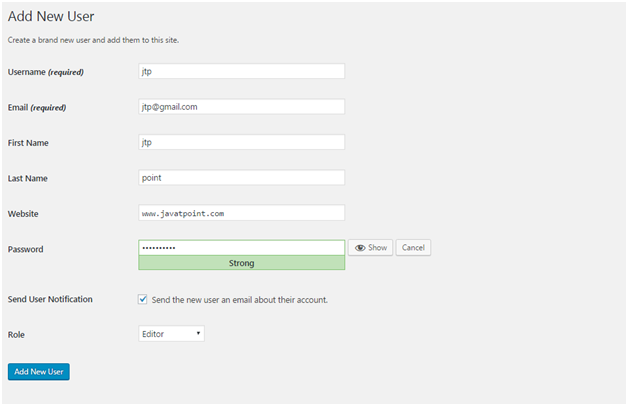
Look at the above snapshot, fill all the details and click on Add New User button.

Wordpress Users2 Wordpress Users3

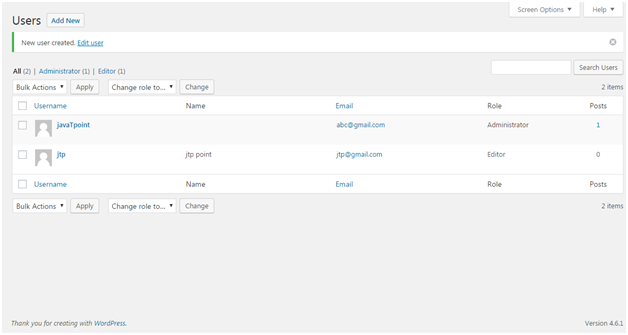
Look at the above snapshot, a message is generated at the top stating, new user created.


How to Edit Users

To edit users, go to Users > All Users

Wordpress Users4

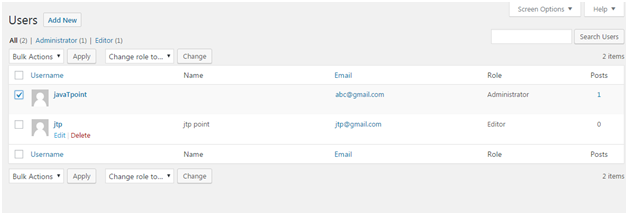
Look at the above snapshot, this is the list of users.

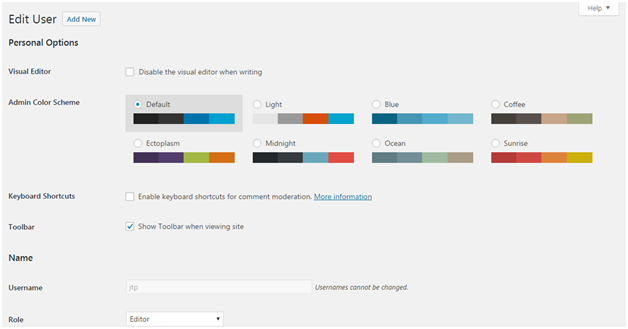
Click on a user's Edit button.

Wordpress Users5

Look at the above snapshot, here you can edit and modify the details.


How to Delete Users

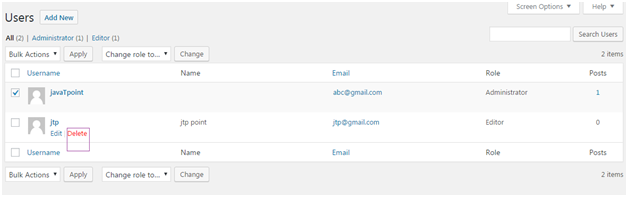
Click on Users > All Users, users list will appear.

Wordpress Users6

Look at the above snapshot, select Delete option.

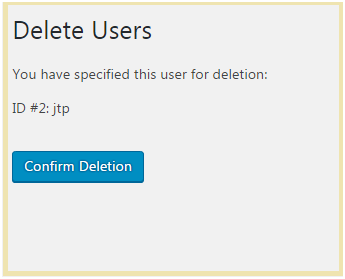
Wordpress Users7

Look at the above snapshot, click Confirm Deletion to delete this user.

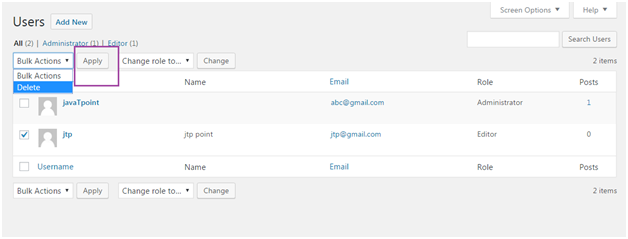
There is one more method to delete a user. Click on Users > All Users

Wordpress Users8

Look at the above snapshot, select a user by clicking on checkbox, from drop-down select Delete and then click on Apply button.


Read More
  • Share This:  
  •  Facebook
  •  Twitter
  •  Google+
  •  Stumble
  •  Digg

WordPress Appearance

 Programing Coderfunda     March 28, 2022     Wordpress     No comments   


WordPress Appearance

Appearance is to manage your theme. From here you can install, delete, update and activate themes. Its menus allow you to change your site's appearance and behavior.

Depending upon the theme, some of the appearance menu may not appear to you because some of the options under appearance are theme based.


How to Manage Theme

For theme management, go to Themes

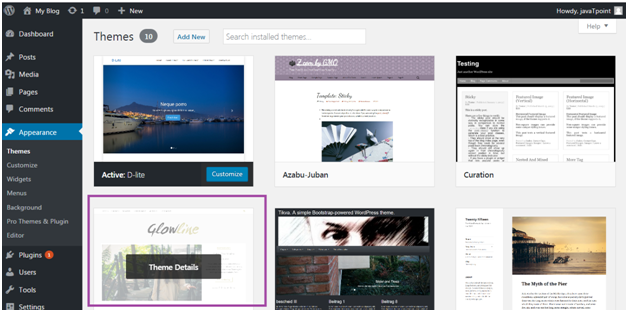
All the installed themes will be displayed. Hover a theme and click it for theme description.

Wordpress Appearence1

Look at the above snapshot, these are the themes installed in our site. After clicking on a theme, theme description page will appear in front of you.

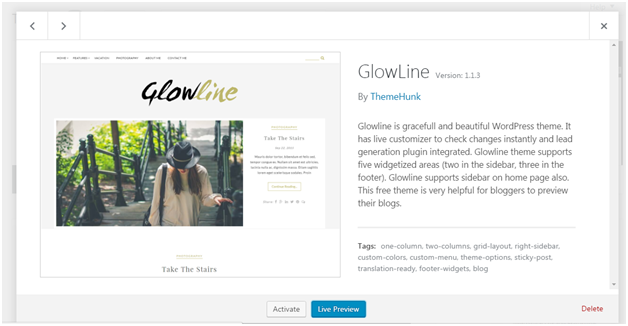
Wordpress Appearence2

Look at the above snapshot, it displays theme description like version, tags and information. If you want to implement this theme then click on Activate button, and to see the preview of theme click on Live Preview button.

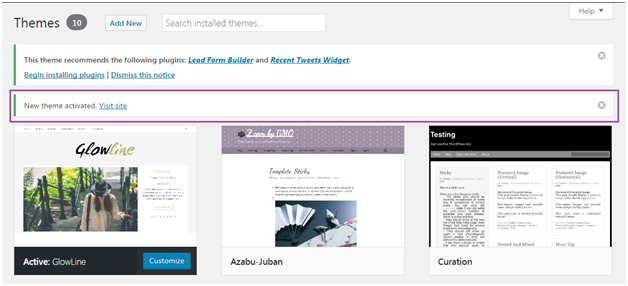
We have activated a theme and got a message as shown in below snapshot.

Wordpress Appearence3

How to Customize Theme

Theme customizer allows you to design your site with your theme. It gives a new look to your site.

Go to Appearance > Customize

Wordpress Appearence4

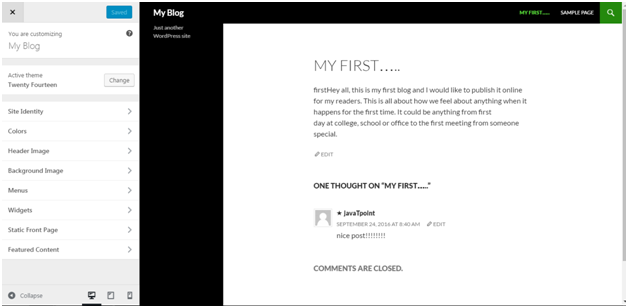
Look at the above snapshot, on the left side it is customizing section and on the right side it is the theme we have selected. Any changes made on the left side will be displayed on the right side of the screen.

At the left side of the screen, following options are present,

  • Active Theme -It shows which theme is currently activated on your site. On our site, Twenty Fourteen theme is activated.
  • There is an option to Change the theme. When you'll click on it, you?ll see other themes which you can activate.

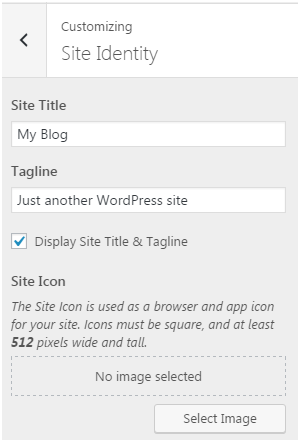
  • Site Identity - It specifies basic site information.
  • Wordpress Appearence5

    Look at the above snapshot,

    Site Title - Enter your site title in the text box.

    Tagline - Enter a tag line matching to your site.

    Checkbox will enable and disable the site title and tag line.

    Site Icon - it is used as an icon for your site in the browser.

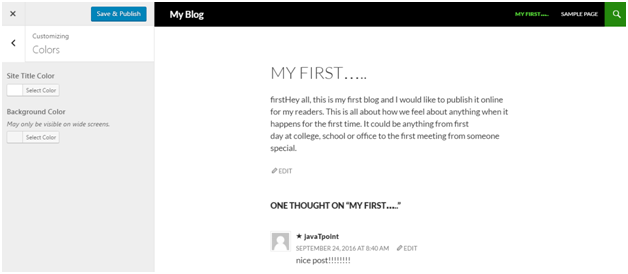
  • Colors - This option allows you to change the color of your site by changing site color and background color.
  • Wordpress Appearence6

    Look at the above snapshot, you can see the options for site color and background color.

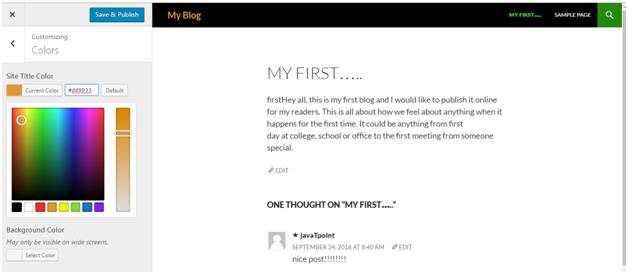
    To change site color

    Wordpress Appearence7

    Look at the above snapshot, by clicking on site Title color, many color options will be shown. We have chosen color with code #dd9933. My site title has been changed to the same color. There is a base color scheme as a vertical bar from where you can set the color of your choice.

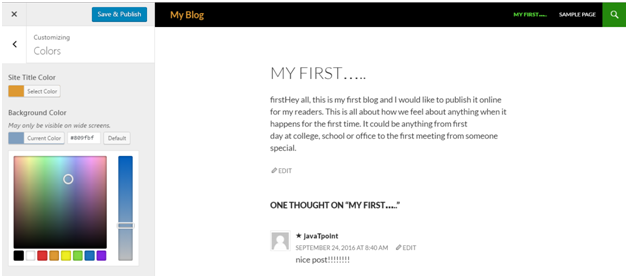
    To change background color

    Wordpress Appearence8
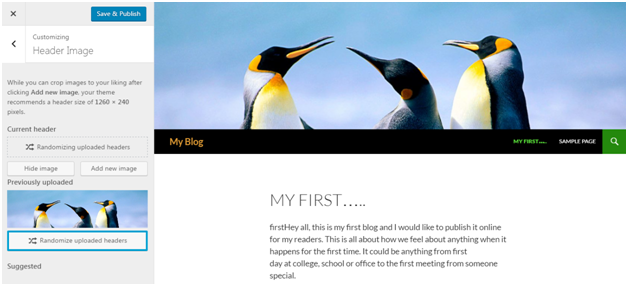
  • Header Image - It will select an image for the header of your site.
  • Wordpress Appearence9

    Look at the above snapshot, this is the image we have selected as the header. By clicking on Hide image, we can remove this photo from the header.

    You will get an option here to crop your image as you want.

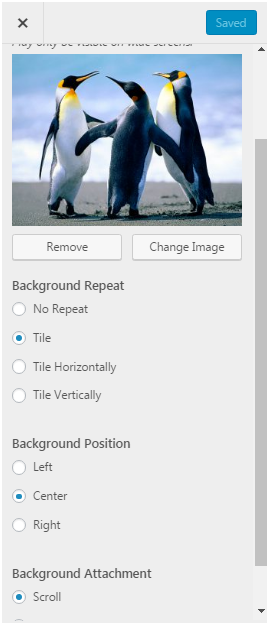
  • Background Image - Select an image for your background from here.
  • Wordpress Appearence10

    Look at the above snapshot, after selecting an image above options will appear.

    You can Remove the image if you want. And from Change Image option, you can change the image.

    Background Repeat determines if your image is repeated or not.

    Background Position determines image to be positioned left, right or center.

    Background Attachment determines whether to display image as fixed or scroll.

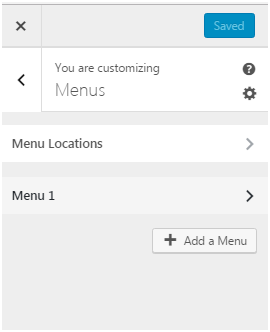
  • Menus - Select the menu type to appear on your site.
  • Wordpress Appearence11

    Look at the above snapshot, there are two options or menu.
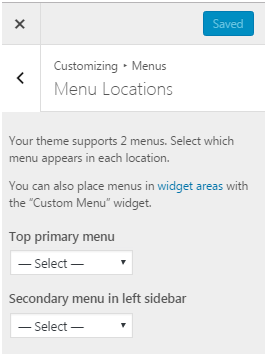
    In Menu Locations, two types of menu locations are there.

    Wordpress Appearence12

    Look at the above snapshot, there are two positions for the menu, one is top and other is sidebar.

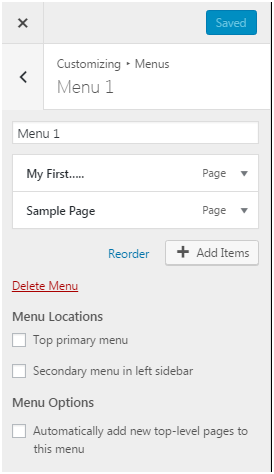
    In Menu 1, following screen will appear.

    Wordpress Appearence13

    Look at the above snapshot, you can select the checkboxes according to your need.

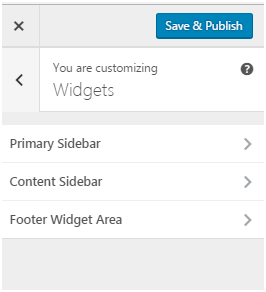
  • Widgets - Themes have sidebars either on left or right. You can add, remove, move up or down widgets into sidebars according to your choice.

    Wordpress Appearence14

    Look at the above snapshot, you can move the widgets according to your need in all the three sidebars.

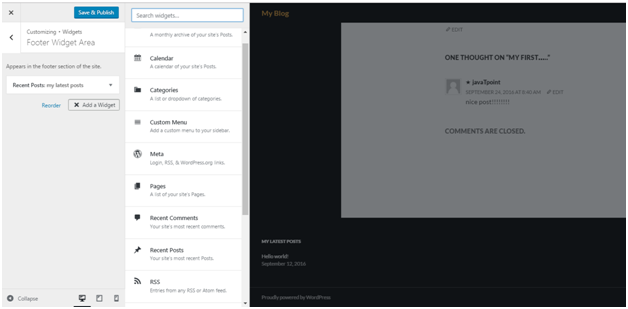
    Wordpress Appearence15

    Look at the above snapshot, we have added Recent posts widget in the Footer widget area. Just choose a widget from the given options and it will be on your sidebar menu.
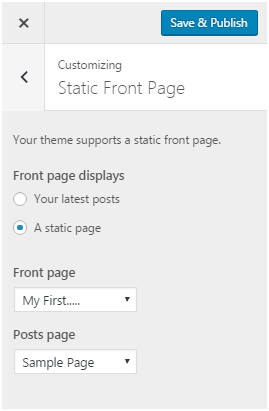
  • Static Front Page - Home page will be either static or display latest posts.
  • Wordpress Appearence16

    Look at the above snapshot, you can choose an option to display static or latest posts.

How to Manage Widget

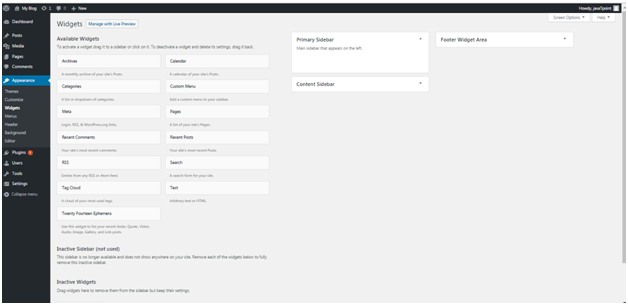
Widgets are like blocks having specific codes for different functions. In any sidebar you can add and remove widget as per need through drag and drop.

Wordpress Appearence17

Look at the above snapshot, following options are available,

Available widgets, these are available to you to add to the sidebar.

Inactive sidebar (not used), these are not used.

Inactive widgets, these are the removed widgets from sidebar.

Select a menu and use drag and drop option to any widget in the desired location.


Read More
  • Share This:  
  •  Facebook
  •  Twitter
  •  Google+
  •  Stumble
  •  Digg

How to Delete Links

 Programing Coderfunda     March 28, 2022     Wordpress     No comments   


How to Delete Links

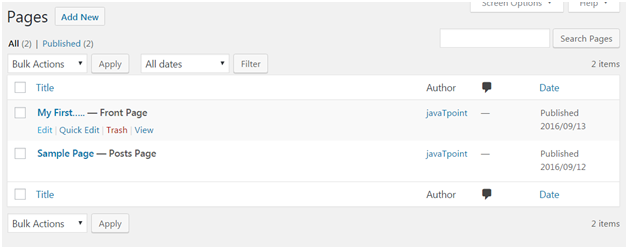
To edit links, go to Pages > All Pages

Wordpress Links1

Look at the above snapshot, click on Edit button.

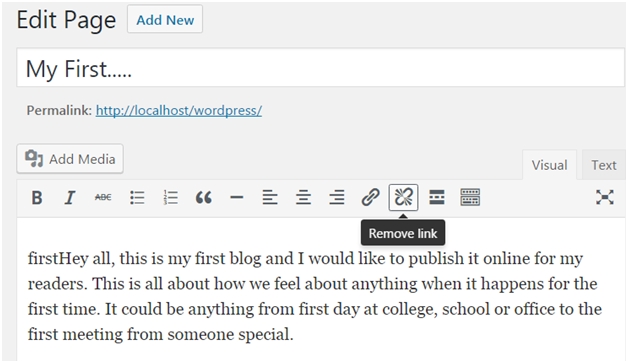
Wordpress Links2

Look at the above snapshot, this is the Remove Link option. Click on this and your link will be removed.


Read More
  • Share This:  
  •  Facebook
  •  Twitter
  •  Google+
  •  Stumble
  •  Digg

How to Add a New Link in WordPress Navigation Menus

 Programing Coderfunda     March 28, 2022     Wordpress     No comments   


How to Add a New Link in WordPress Navigation Menus

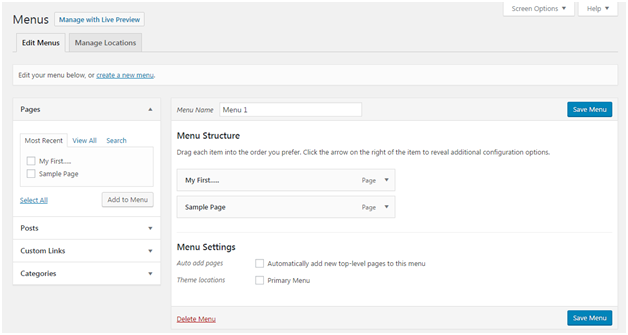
There is an editor in WordPress which allows you to create and manage navigation menus.

For navigation menus, go to Appearance > Menus

Wordpress New link in wordpress navigation menus1

Look at the above snapshot, here you can add, delete or edit links in your posts.


Read More
  • Share This:  
  •  Facebook
  •  Twitter
  •  Google+
  •  Stumble
  •  Digg

How to Add a New Link in WordPress Text Widgets

 Programing Coderfunda     March 28, 2022     Wordpress     No comments   


How to Add a New Link in WordPress Text Widgets

In WordPress you can add links in widgets. Different widgets possess different functions like recent post widget will show links to your recent posts. In text widgets you can add text and basic HTML.

There are two ways to add links in text widgets.

  • Adding a link in HTML
  • This method requires writing some of very basic HTML. In href tag you have to add URL. Remember to add http:// before domain. Between the closing and opening anchor tag add any text that you want to link (here we have written javaTpoint).

    For example, javaTpoint

  • Using a plugin
  • Here you have to install and activate a plugin to enable visual editor for your text widgets.


Read More
  • Share This:  
  •  Facebook
  •  Twitter
  •  Google+
  •  Stumble
  •  Digg

How to Add a New Link in WordPress Posts and Pages

 Programing Coderfunda     March 28, 2022     Wordpress     No comments   


How to Add a New Link in WordPress Posts and Pages

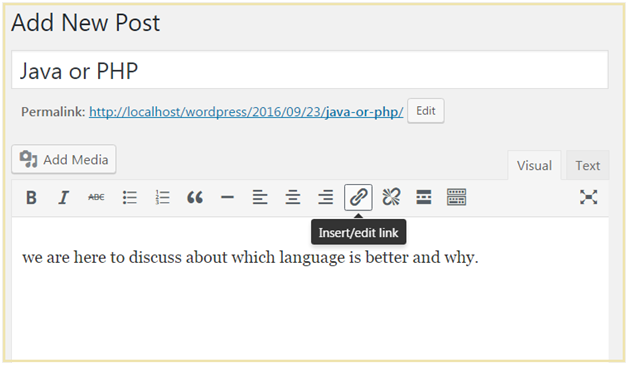
To add a link, go to Posts > Add New

You can add a link either in a new post or in the existing post.

Wordpress Link in WordPress Posts and Pages1

Look at the above snapshot, to create a link, click on the link icon.

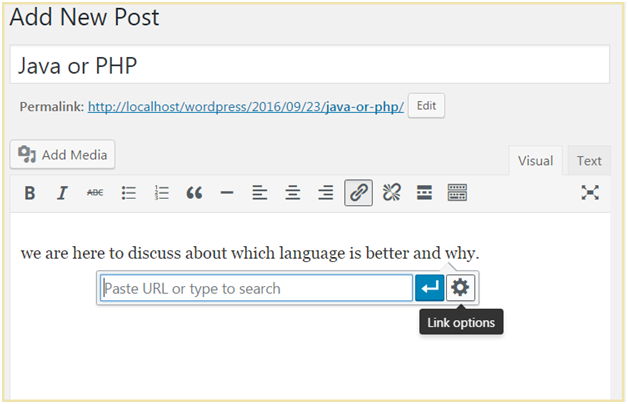
On clicking the link icon, following page will appear,

Wordpress Link in WordPress Posts and Pages2

Look at the above snapshot, next step is to click on Link Options button.

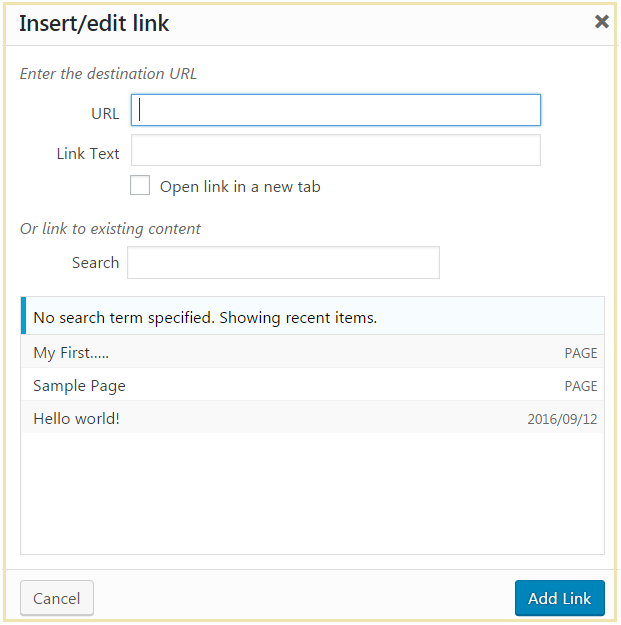
Wordpress Link in WordPress Posts and Pages3

Look at the above snapshot, this pop-up will come on clicking Link Options.

In URL, enter URL you want to link.

In Link Text, insert text you want to enter into the link.

Tick on check-box Open link in new tab.

You can also link it to the existing content.

Now click on Add Link button and your link will be added.


Read More
  • Share This:  
  •  Facebook
  •  Twitter
  •  Google+
  •  Stumble
  •  Digg

WordPress Links

 Programing Coderfunda     March 28, 2022     Wordpress     No comments   


WordPress Links

We can add/edit/delete links on WordPress posts, pages, text widgets and navigation menus. Let's see the 3 ways to add a link in WordPress..

  • Add a link in WordPress posts and pages
  • Add a link in WordPress text widgets
  • Add a link in WordPress navigation menus
  • How to Delete WordPress Links
Read More
  • Share This:  
  •  Facebook
  •  Twitter
  •  Google+
  •  Stumble
  •  Digg

WordPress Categories vs Tags

 Programing Coderfunda     March 28, 2022     Wordpress     No comments   


WordPress Categories vs Tags

Earlier only categories were available in WordPress to divide the posts. But to describe a post more specifically more categories were used. This made the category list very long. To avoid this, we have tags.

Categories are broad-ranging. It helps your users to identify what your blog is about. For a post, there may be sub-categories which make a hierarchy of category. It is possible for a post to have more than one category but it is best for a post to have a single category. A post must have at least one category.

Tags are like categories but they are used to describe a post more specifically. In some posts you may not need to use a tag. Tags are not needed in every post.

Multiple categories may confuse the readers. If you want to provide additional grouping in a post use tags. Tag should be relevant to the topic covered in the post. For example, if you Google for "ladies watch". Here watch is category and ladies is tag.


SEO effect from Category and Tag

Wise use of tag and category can increase traffic to your site via search engines. If both are used together, they will increase your site's usability.

Having internal links will let your sites content to be discovered by the search engine. Tags and categories will clue the search engines about your website topic and your site will be ranked for those targeted keywords.


Optimal number of Categories and Tags

There is no defined limit to use category for a post. However, for simplicity sub-categories are used when more categories are needed for a single post.

For tags also there is specific limit. You can add 100 tags in a post. Tags are used to help in searching of a post. So it is necessary to use relevant keywords related to your post.


Assigning one Post under multiple Categories

Some people used to say that using multiple categories for a single post can result SEO in a negative way or you can be penalized for duplicate content. But it is not entirely true.

Basic use of category is to sort the content on your site for your users so that they could find it easily. It is better to use sub-categories or tags than multiple categories.

Overall there is no SEO advantage in multiple categories. Only consider about your targeted audience and not the search engine. If your decision will be according to your viewers, it will increase your visitors and your site?s SEO will automatically increase.


Read More
  • Share This:  
  •  Facebook
  •  Twitter
  •  Google+
  •  Stumble
  •  Digg

WordPress Tags

 Programing Coderfunda     March 28, 2022     Wordpress     No comments   


WordPress Tags


What are Tags

With the help of tags, similar posts can be grouped together. Hence, it makes easier for the users to search a particular post. It tells the user what a post is about. Tags are similar to categories but still different.

Position of the tag may differ depending on the theme. Sometimes they may appear at the bottom, top, or in the sidebar.

Wordpress Wordpress tags1

How to Add a Tag

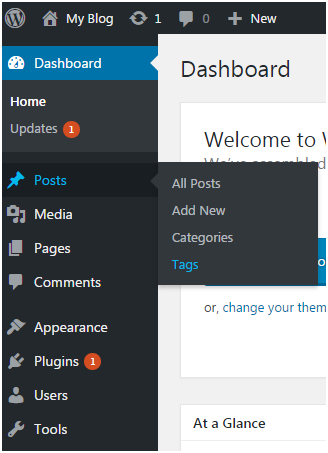
To add a tag, go to Posts > Tags

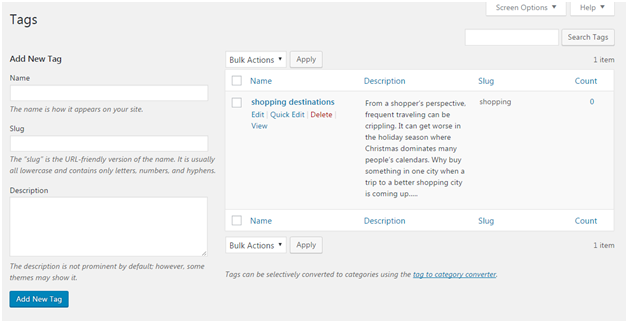
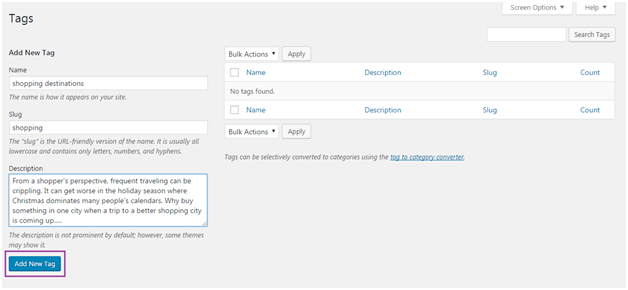
Wordpress Wordpress tags2

Look at the above snapshot, here you have to fill all the fields.

Name - Name of tag which must be unique. Here it is shopping destinations.

Slug - It describes a post in URL. It is generally in lowercase and contains only letters, numbers and hyphens. Here our slug it shopping.

Description - It is a brief intro about the tag. When you hover (bring pointer over the tag) the tag, this description is displayed.

After filling all the above information, click on Add New Tag button.

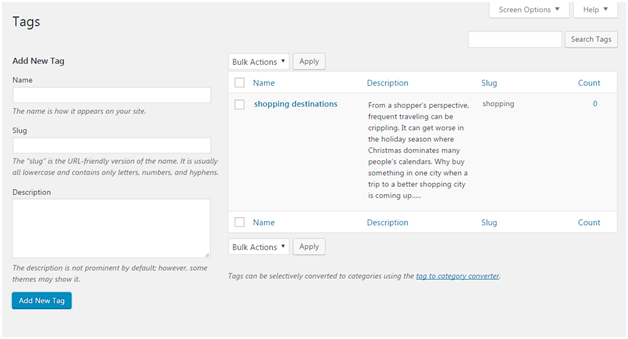
Following screen will appear in front of you.
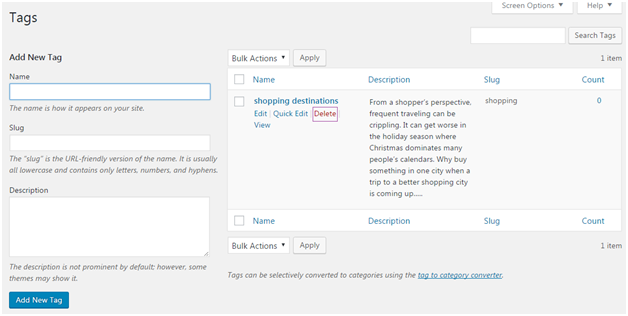
Wordpress Wordpress tags3

Look at the above snapshot, on the right side, created tag is displayed.

How to Edit Tag

To edit a tag, go to Posts > Tag and bring the mouse over the tag.

Wordpress Wordpress tags4

Look at the above snapshot, two options to edit are there.

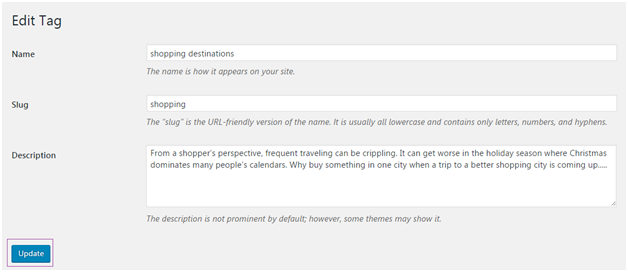
On clicking Edit, following page will appear.

Wordpress Wordpress tags5

Look at the above snapshot, after editing click on Update button.

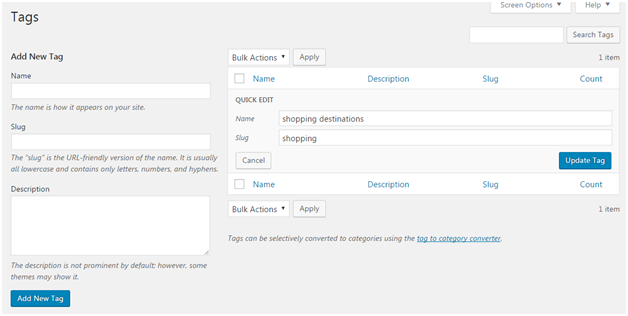
On clicking Quick Edit, following page will appear.

Wordpress Wordpress tags6

Look at the above snapshot, here you can only edit Name and Slug of the tag. After editing, click on Update Tag button.


How to Delete Tag

To delete a tag, go to Post > Tag and bring the mouse over the tag.

Wordpress Wordpress tags7

Look at the above snapshot, click on Delete option and your Tag will be deleted.


Read More
  • Share This:  
  •  Facebook
  •  Twitter
  •  Google+
  •  Stumble
  •  Digg

WordPress Categories

 Programing Coderfunda     March 28, 2022     Wordpress     No comments   


WordPress Categories

Here, we'll see how to add categories. By clicking on a category, user will be able to see the posts listed under that category.


What is a category

Categories allow a user to divide its content into different sections. Different topics publishing in a single website can be divided into different categories. It tells the reader what a post is about and they can easily find their content from a lot.

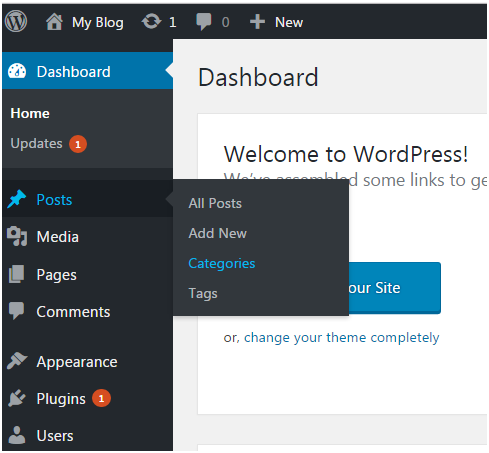
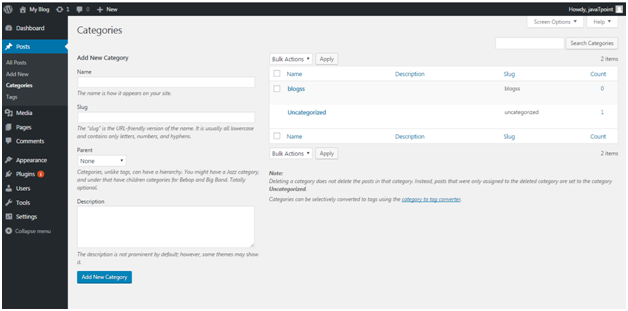
If no category is added, then by default category is uncategorized. To access category section click Posts > Categories

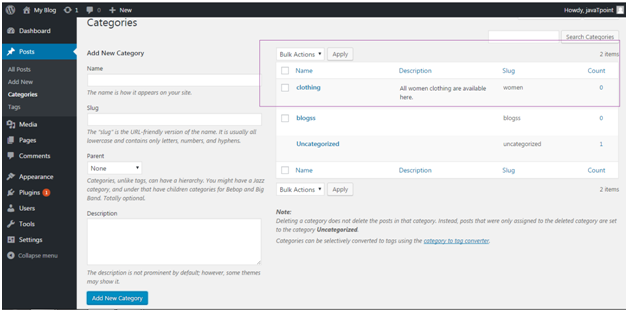
Wordpress Wordpress categories1

Look at the above snapshot, this is the category section.


How to add categories

Wordpress Wordpress categories2

Look at the above snapshot, there are four fields to be filled when adding a new category.

Name - Name of category which has to be unique

Slug - It is used in the URL to display your category. For example, if your category is Clothing and slug is women, then your URL will be like shopping.com/shop/women.

Parent - Here, you can add sub-categories to a category or you can choose none. This is optional.

Description - Descriptions are optional. You can add a brief description to your category.

After filling all the above entries, click on Add New Category button. On the right side of the page your new category will be added.

Wordpress Wordpress categories3

Look at the above snapshot, our new category clothing is added in the category list.


How to Edit Category

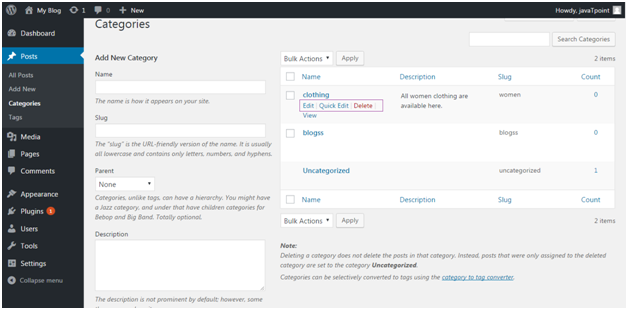
To edit a category, go to Posts > Categories. Hover your mouse to the category you want to edit.

Wordpress Wordpress categories4

Look at the above snapshot, there are several options to Edit, Quick Edit and Delete. Here you can change category name, slug, parent and description.

Edit - It allows you to edit all the fields name, slug, parent and description.

Quick Edit - it only allows you to edit name and slug.


How to Delete Category

You can also delete categories from the above snapshot. By deleting a category, its posts will not be deleted instead they will be transferred to by default category (if that post will not be listed under any other category).

Please remember you can't delete a by default category, before deleting it assign by default status to some other category.


How to Convert Category into Tag

Categories and tags both are different things in WordPress. Categories are sections while tags are keywords. WordPress provide you n option to change category into tag and tag into category.

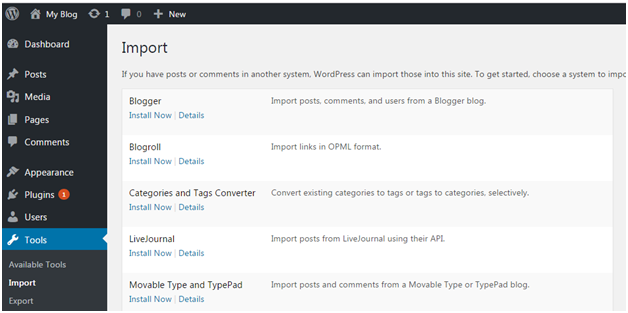
Go to Tools > Import, following screen will appear.

Wordpress Wordpress categories5

Look at the above snapshot, there is an option of Categories and Tags Converter. It is asking for installation. Click on Install Now button.

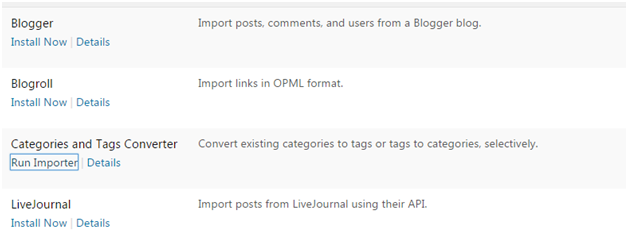
Wordpress Wordpress categories6

Look at the above snapshot, after installation click on Run Importer.

Wordpress Wordpress categories7

Look at the above snapshot, you can select any option either to convert categories to tags or tags to categories.


Read More
  • Share This:  
  •  Facebook
  •  Twitter
  •  Google+
  •  Stumble
  •  Digg
Newer Posts Older Posts Home

Meta

Popular Posts

  • Generate Migrations from an Existing Database With the Migration Generator Package
    Laravel Migration Generator Migration Generator for Laravel is a package by Bennett Treptow to generate migrations from existing database ...
  • Tailwindcss best practices for responsive design
    Tailwind CSS provides powerful utilities for responsive design out of the box. To use it effectively and maintain clean, scalable code, here...
  • Search Through Models with Laravel Searchable
      Laravel Searchable   is a package by   Spatie   to search through models and other sources pragmatically. Using this package, you can get ...
  • Laravel Razorpay Integration | Payment gateway integration Laravel in 30 mins | Laravel Razorpay
    1 Integration of Razorpay with Laravel. In this tutorial, I have taught how to integrate payment gateway with laravel with mini-project. If...
  • Vue.js Render functions
        Vue.js Render functions Vue.js recommends us to use templates to build HTML. Here, we can use the render function as a closer-to-the-co...

Categories

  • Ajax (26)
  • Bootstrap (30)
  • DBMS (42)
  • HTML (12)
  • HTML5 (45)
  • JavaScript (10)
  • Jquery (34)
  • Jquery UI (2)
  • JqueryUI (32)
  • Laravel (1017)
  • Laravel Tutorials (23)
  • Laravel-Question (6)
  • Magento (9)
  • Magento 2 (95)
  • MariaDB (1)
  • MySql Tutorial (2)
  • PHP-Interview-Questions (3)
  • Php Question (13)
  • Python (36)
  • RDBMS (13)
  • SQL Tutorial (79)
  • Vue.js Tutorial (69)
  • Wordpress (150)
  • Wordpress Theme (3)
  • codeigniter (108)
  • oops (4)
  • php (853)

Social Media Links

  • Follow on Twitter
  • Like on Facebook
  • Subscribe on Youtube
  • Follow on Instagram

Pages

  • Home
  • Contact Us
  • Privacy Policy
  • About us

Blog Archive

  • ▼  2026 (3)
    • ▼  07/26 - 08/02 (2)
      • A stormwater pond in Calgary appears filled with P...
      • Inside Kriti Sanon's duplex sea-facing penthouse w...
    • ►  06/28 - 07/05 (1)
  • ►  2025 (4)
    • ►  07/06 - 07/13 (2)
    • ►  06/29 - 07/06 (2)
  • ►  2024 (486)
    • ►  09/15 - 09/22 (30)
    • ►  09/08 - 09/15 (35)
    • ►  09/01 - 09/08 (35)
    • ►  08/11 - 08/18 (2)
    • ►  08/04 - 08/11 (33)
    • ►  07/28 - 08/04 (30)
    • ►  07/07 - 07/14 (11)
    • ►  06/30 - 07/07 (35)
    • ►  06/23 - 06/30 (5)
    • ►  06/02 - 06/09 (31)
    • ►  05/26 - 06/02 (20)
    • ►  05/05 - 05/12 (29)
    • ►  04/28 - 05/05 (26)
    • ►  04/07 - 04/14 (10)
    • ►  03/31 - 04/07 (34)
    • ►  03/24 - 03/31 (10)
    • ►  03/03 - 03/10 (35)
    • ►  02/25 - 03/03 (15)
    • ►  02/04 - 02/11 (22)
    • ►  01/28 - 02/04 (30)
    • ►  01/07 - 01/14 (8)
  • ►  2023 (484)
    • ►  12/31 - 01/07 (35)
    • ►  12/24 - 12/31 (10)
    • ►  12/03 - 12/10 (33)
    • ►  11/26 - 12/03 (20)
    • ►  11/05 - 11/12 (35)
    • ►  10/29 - 11/05 (20)
    • ►  10/22 - 10/29 (9)
    • ►  10/15 - 10/22 (7)
    • ►  10/08 - 10/15 (9)
    • ►  10/01 - 10/08 (10)
    • ►  09/24 - 10/01 (9)
    • ►  09/17 - 09/24 (9)
    • ►  09/10 - 09/17 (7)
    • ►  09/03 - 09/10 (9)
    • ►  08/27 - 09/03 (9)
    • ►  08/20 - 08/27 (8)
    • ►  08/13 - 08/20 (8)
    • ►  08/06 - 08/13 (8)
    • ►  07/30 - 08/06 (8)
    • ►  07/23 - 07/30 (7)
    • ►  07/16 - 07/23 (8)
    • ►  07/09 - 07/16 (7)
    • ►  07/02 - 07/09 (8)
    • ►  06/25 - 07/02 (7)
    • ►  06/18 - 06/25 (7)
    • ►  06/11 - 06/18 (7)
    • ►  06/04 - 06/11 (11)
    • ►  05/28 - 06/04 (7)
    • ►  05/21 - 05/28 (8)
    • ►  05/14 - 05/21 (11)
    • ►  05/07 - 05/14 (7)
    • ►  04/30 - 05/07 (7)
    • ►  04/23 - 04/30 (8)
    • ►  04/16 - 04/23 (9)
    • ►  04/09 - 04/16 (7)
    • ►  04/02 - 04/09 (4)
    • ►  03/26 - 04/02 (21)
    • ►  03/19 - 03/26 (2)
    • ►  03/12 - 03/19 (9)
    • ►  03/05 - 03/12 (26)
    • ►  02/26 - 03/05 (25)
    • ►  01/15 - 01/22 (7)
    • ►  01/08 - 01/15 (1)
  • ►  2022 (1037)
    • ►  12/11 - 12/18 (13)
    • ►  12/04 - 12/11 (1)
    • ►  11/27 - 12/04 (40)
    • ►  11/06 - 11/13 (1)
    • ►  10/16 - 10/23 (13)
    • ►  09/04 - 09/11 (5)
    • ►  08/21 - 08/28 (24)
    • ►  08/14 - 08/21 (24)
    • ►  07/03 - 07/10 (9)
    • ►  06/19 - 06/26 (3)
    • ►  05/29 - 06/05 (3)
    • ►  05/22 - 05/29 (3)
    • ►  05/15 - 05/22 (109)
    • ►  05/01 - 05/08 (7)
    • ►  04/24 - 05/01 (7)
    • ►  04/17 - 04/24 (64)
    • ►  04/10 - 04/17 (115)
    • ►  04/03 - 04/10 (73)
    • ►  03/27 - 04/03 (77)
    • ►  03/13 - 03/20 (2)
    • ►  03/06 - 03/13 (25)
    • ►  02/27 - 03/06 (18)
    • ►  02/20 - 02/27 (153)
    • ►  02/13 - 02/20 (187)
    • ►  01/30 - 02/06 (45)
    • ►  01/23 - 01/30 (15)
    • ►  01/16 - 01/23 (1)
  • ►  2021 (412)
    • ►  10/24 - 10/31 (2)
    • ►  07/25 - 08/01 (1)
    • ►  07/11 - 07/18 (10)
    • ►  06/13 - 06/20 (29)
    • ►  05/23 - 05/30 (1)
    • ►  05/02 - 05/09 (24)
    • ►  04/25 - 05/02 (24)
    • ►  04/18 - 04/25 (112)
    • ►  04/11 - 04/18 (1)
    • ►  04/04 - 04/11 (6)
    • ►  03/28 - 04/04 (86)
    • ►  03/21 - 03/28 (19)
    • ►  03/14 - 03/21 (2)
    • ►  03/07 - 03/14 (10)
    • ►  02/28 - 03/07 (1)
    • ►  02/21 - 02/28 (29)
    • ►  02/14 - 02/21 (13)
    • ►  02/07 - 02/14 (12)
    • ►  01/31 - 02/07 (6)
    • ►  01/17 - 01/24 (2)
    • ►  01/10 - 01/17 (8)
    • ►  01/03 - 01/10 (14)
  • ►  2020 (376)
    • ►  12/27 - 01/03 (37)
    • ►  12/20 - 12/27 (92)
    • ►  12/13 - 12/20 (29)
    • ►  12/06 - 12/13 (37)
    • ►  11/29 - 12/06 (4)
    • ►  11/15 - 11/22 (14)
    • ►  11/08 - 11/15 (8)
    • ►  11/01 - 11/08 (2)
    • ►  10/18 - 10/25 (14)
    • ►  10/11 - 10/18 (16)
    • ►  10/04 - 10/11 (10)
    • ►  09/20 - 09/27 (10)
    • ►  09/06 - 09/13 (19)
    • ►  08/30 - 09/06 (26)
    • ►  08/23 - 08/30 (4)
    • ►  08/16 - 08/23 (2)
    • ►  07/12 - 07/19 (48)
    • ►  05/17 - 05/24 (2)
    • ►  01/05 - 01/12 (2)
  • ►  2019 (74)
    • ►  07/07 - 07/14 (6)
    • ►  06/16 - 06/23 (6)
    • ►  02/10 - 02/17 (17)
    • ►  01/13 - 01/20 (37)
    • ►  01/06 - 01/13 (8)
  • ►  2018 (376)
    • ►  12/30 - 01/06 (24)
    • ►  12/16 - 12/23 (8)
    • ►  12/09 - 12/16 (98)
    • ►  12/02 - 12/09 (16)
    • ►  11/18 - 11/25 (36)
    • ►  11/04 - 11/11 (18)
    • ►  10/28 - 11/04 (10)
    • ►  10/21 - 10/28 (26)
    • ►  10/14 - 10/21 (52)
    • ►  10/07 - 10/14 (4)
    • ►  09/30 - 10/07 (2)
    • ►  09/23 - 09/30 (68)
    • ►  09/16 - 09/23 (4)
    • ►  09/09 - 09/16 (4)
    • ►  08/26 - 09/02 (6)

Data Publish News

Loading...

Al Jazeera – Breaking News, World News and Video from Al Jazeera

Loading...

Laravel News

Loading...

Copyright © CoderFunda | Powered by Blogger
Design by Coderfunda | Blogger Theme by Coderfunda | Distributed By Coderfunda